Welcome to the official Janome.com Blog Page!

  • 7/28/2021

    Welcome back for the next step that will take you closer to finishing your Good Tidings Quilt designed by Janome Maker Melanie Call!  This week you will be sewing the Good Tidings Blocks together plus final quilt assembly with sashing and borders.  Soon your Good Tidings Quilt will be ready for snuggling or gift giving! Grab your fabrics for the race to the finish! Is there anything better to a quilter than a quilt finish? 


    Good Tidings Quilt Instructions (HERE) .


    It’s Melanie Call from A Bit of Scrap Stuff Blog https://abitofscrapstuff.blogspot.com . I hope you are ready to assemble your Good Tidings Blocks! 

    Don't forget to share your fabric selection, cutting, flying geese, patchwork squares, and Good Tidings Block, and Good Tidings Quilt top on Instagram with hashtag #GoodTidingsQAL


    My Good Tidings Quilt was pieced and machine quilted on my Janome M7. I love how well my Janome M7 perfectly pieces blocks AND is fabulous for free motion quilting!


    The Janome Continental M7 features:

    A speedy 1300 stitches per minute (faster finish anyone)

    Automatic Presser Foot Lift

    Independent Bobbin Winding Motor and so many other features to make your sewing and quilting effortless!


    Good Tidings Quilt    

    #GoodTidingsQAL     59.5" x 59.5"

    Fabric used in Good Tidings Quilt -  All About Christmas fabric designed by J.Wecker Frisch for Riley Blake Designs


    You can find the past Good Tidings Quilt Along Blog Posts  to make this full quilt by visiting:


    Don't forget to download the Good Tidings Quilt Flying Geese Instructions HERE. I can't wait to see your Good Tidings Quilt progress photos!!! #GoodTidingsQAL


    Be sure to follow me on Instagram @ABitofScrapStuff  https://www.instagram.com/abitofscrapstuff/ and on my A Bit of Scrap Stuff Blog https://abitofscrapstuff.blogspot.com  for more fabric fun! Also, be sure to follow Janome America on Instagram, and if you are creating on your Janome Sewing Machine, tag @janomeamerica and use the hashtag #janomemakes!  


    Have a great day and happy quilting! 

    Melanie Call


  • 7/27/2021

    Welcome back to the Rainbow Quilt Block of the Month designed by Janome Maker Carolina Oneto!This month you will make Block Six. The Diamond Block, is a block that is perfect for practicing your half square triangle skills!  Get ready to have fun! 


    Remember that all the blocks will have a finished size of 12” and the unfinished size will be 12 1/2”. All seams are ¼”.  Please read through all of the instructions prior to starting this block. Carolina sews on the Janome 1600P-QC that makes piecing and quilting effortless with an extra-wide work area, side loading bobbin for easy access, and an automatic thread cutter! 

    Fabrics:

    White background

    Three 5 3/4” squares

    Two 4” square

    Pink

    One 5 3/4” square

    One 4” square

    Dark pink

    One 5 3/4” square

    One 4” square

    Orange

    One 5 3/4” square

    INSTRUCTIONS for making HST four at a time:

    • Make four half-square triangles.
    • Place a white and colored fabric square (5 3/4”) right sides together.
    • Sew a 1/4″ seam allowance all around the perimeter of the square.
    • Make two diagonal cuts and press each piece open to one side.
    • Trim away the dog ears using a square quilting ruler, you will obtain 4 HST 3,5”


    Instructions for making HST two at a time

    Do this process with the 2 white squares of 4” and the two squares of the same size in pink and dark pink. You will assemble 8 half-square triangles that you must square up to the size of 3.5".


    PINK


    DARK PINK


    ORANGE


    FINAL ASSEMBLY


    • Arrange your blocks in correct layout
    • Using a quarter-inch seam allowance, sew together in rows. Join all rows, using a ¼” inch seam allowance.
    • Press your completed block and trim down to 12.5″ square (if necessary).


    You can find the past blocks by visiting:


    Block One     HERE

    Block Two     HERE

    Block Three  HERE

    Block Four    HERE

    Block Five     HERE


    After you make your block, we’d love to see them!

    Janome Sewing Classroom

    Janome America Instagram – Be sure to tag @janomeamerica and use the hashtag #janomemakes and also tag @carolinaoneto!


  • 7/21/2021

    It is a new week and time for the next installment of the Good Tidings Quilt Along designed by Janome Maker Melanie Call from A Bit of Scrap Stuff! 

    This week Melanie stitched up  Good Tidings Quilt Along - Patchwork Squares on her Janome Continental M7! 

    Hi Quilty Friends! I hope you had fun making all the flying geese blocks and bonus half-square triangles last week. No worries if you are behind, this week is quicker! 

    This week we will be sewing the Patchwork Squares!  Patchwork is always been a favorite of mine! Simple and looks fabulous!


    Good Tidings Quilt Flying Geese Instructions (HERE).  I hope you are joining as there are AMAZING PRIZES from Riley Blake Designs, Fat Quarter Shop, and Oliso. Don't forget to share your fabric selection, cutting, and flying geese  on Instagram with the hashtag #GoodTidingsQAL

    Be sure to check my A Bit of Scrap Stuff Blog  each week as I will be sharing a new pattern section each for the FREE Good Tidings Quilt Quilt Along (schedule at end of blog post)


    Good Tidings Quilt    

    Finished size:   59.5" x 59.5"


    A Bit of Scrap Stuff Blog #ABitofScrapStuff #GoodTidingsQAL #GoodTidingsQuilt #RileyBlakeDesigns

    Patchwork Squares Instructions


    Good Tidings Quilt Along Schedule
    A Bit of Scrap Stuff Blog #ABitofScrapStuff #GoodTidingsQAL #GoodTidingsQuilt #RileyBlakeDesigns

    You can find the previous Good Tidings Quilt Along Blog Posts to get caught up by visiting:
     
    A Bit of Scrap Stuff Blog #ABitofScrapStuff #GoodTidingsQAL #GoodTidingsQuilt #RileyBlakeDesigns


    I can't wait to see your Good Tidings Quilt progress photos!!! #GoodTidingsQAL
    Be sure to follow me on Instagram @ABitofScrapStuff and on my A Bit of Scrap Stuff Blog for more fabric fun!


    Have a great day and happy quilting! 
  • 7/15/2021

    We are very fortunate to have so many talented Cosplayers in the Janome Maker Program. It is inspiring to learn how they create spectacular costumes by thinking outside of the box, using items that are not typically thought of as sewing fabrics, and somehow making it all come together seamlessly! 


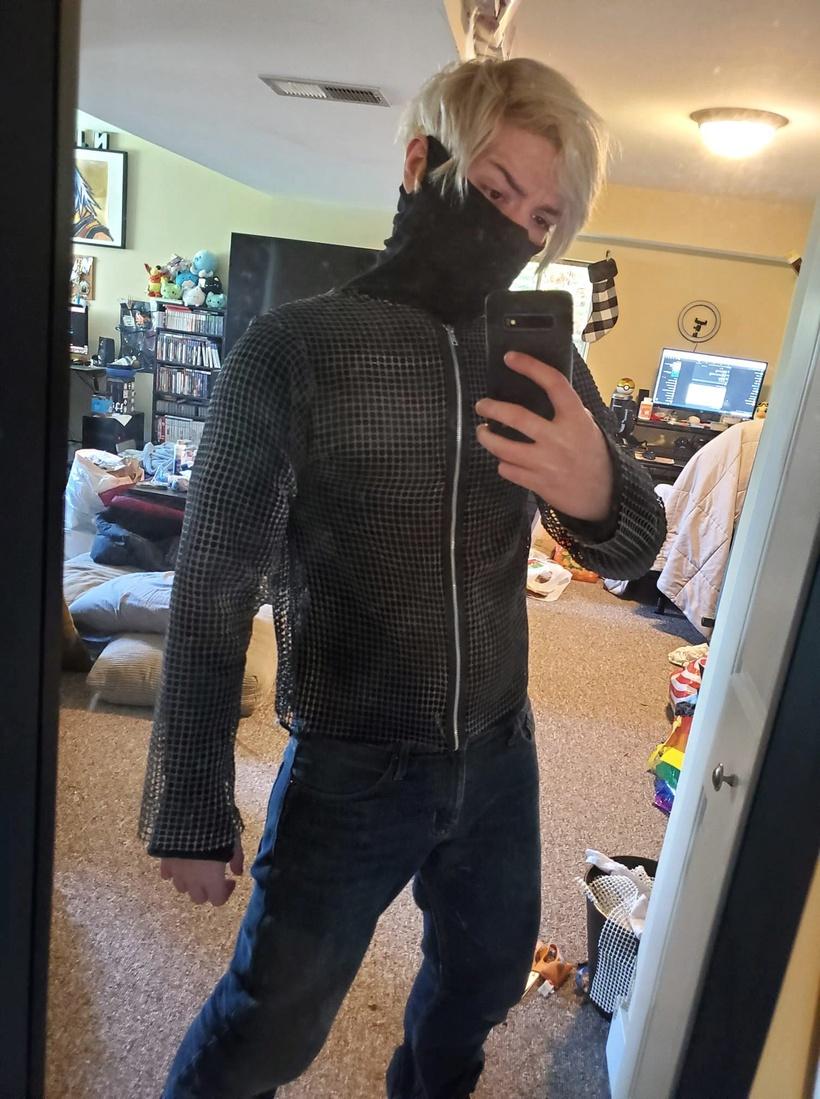
    Janome Maker Nipah Dubs wanted to create a chainmail top for his latest  Warrior of Light Paladin cosplay that is attainable for everyone! Get ready to be astounded at the look he accomplished and then try it yourself! Thank you, Nipah for this great tutorial! 
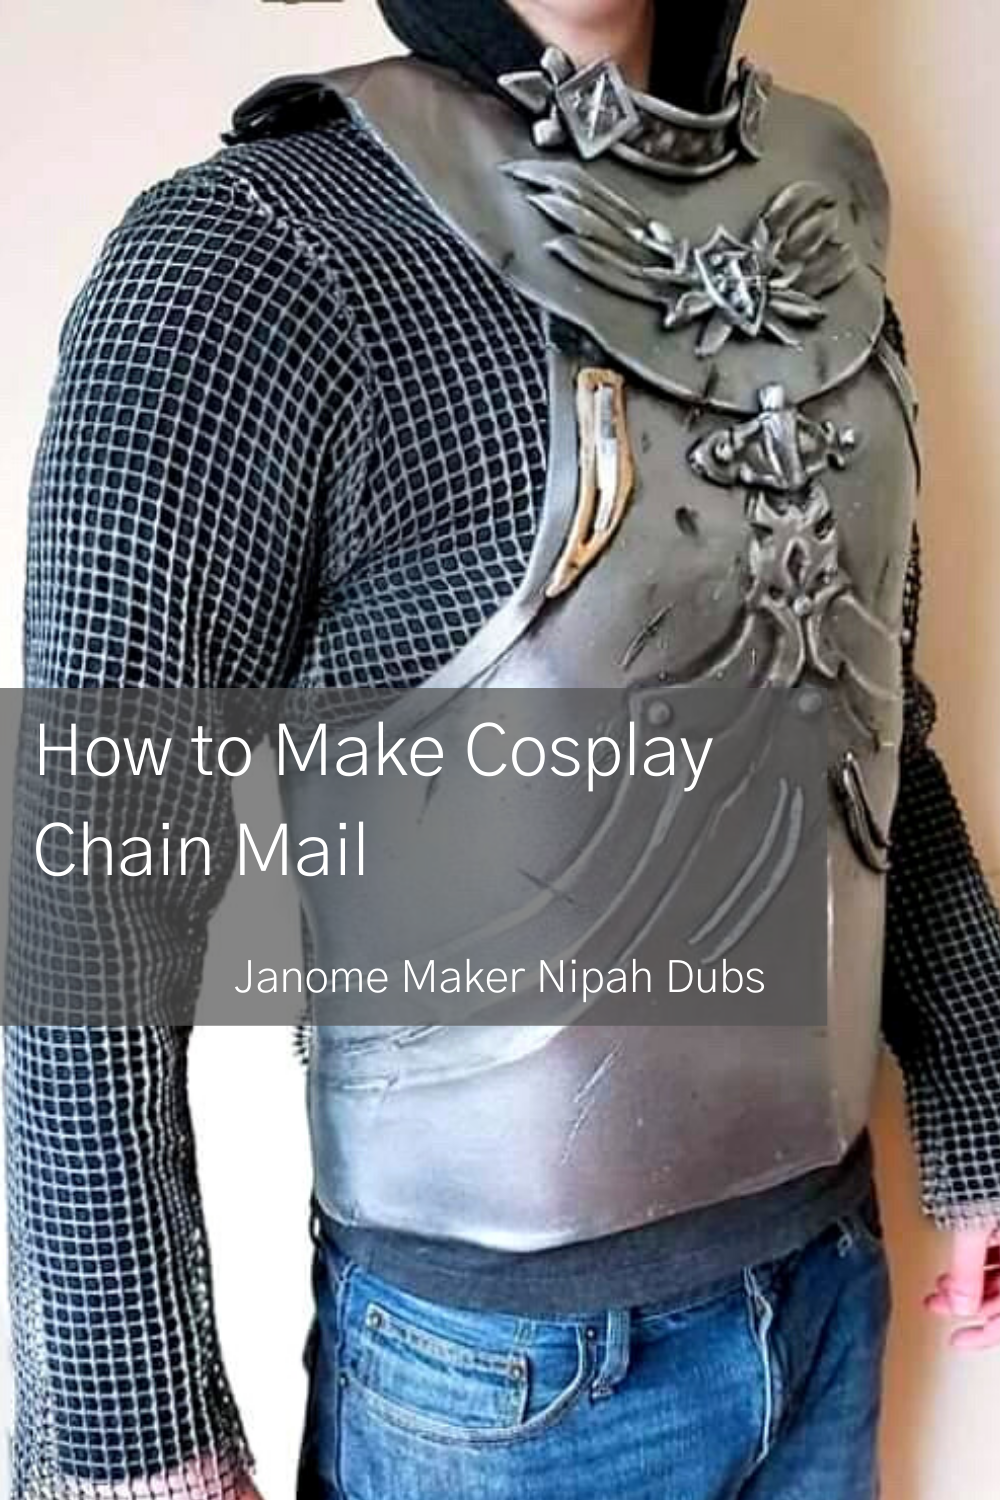


    It's REALLY easy and gets the idea of chainmail across rather well in my opinion without needing to spend a lot of real chainmail and also not having to deal with the weight/bulk chain mail has.


    Materials

    • Non-slip rug mat

    • Baby Powder 

    • Rustoleum Silver spray paint 

    • Design Masters Floral Spray (Black)

      Hey guys, I wanted to share with you how I went about making my chainmail for my Warrior of Light Paladin cosplay. It's REALLY easy and gets the idea of chainmail across rather well in my opinion without needing to spend a lot of real chainmail and also not having to deal with the weight/bulk chain mail has.

      So first off, what is it made out of? Well, it's simply just the rubber floor matting you put under carpets so they don't slip and move around! These come in various styles but you want to get this version where it's a spaced-out grid pattern!

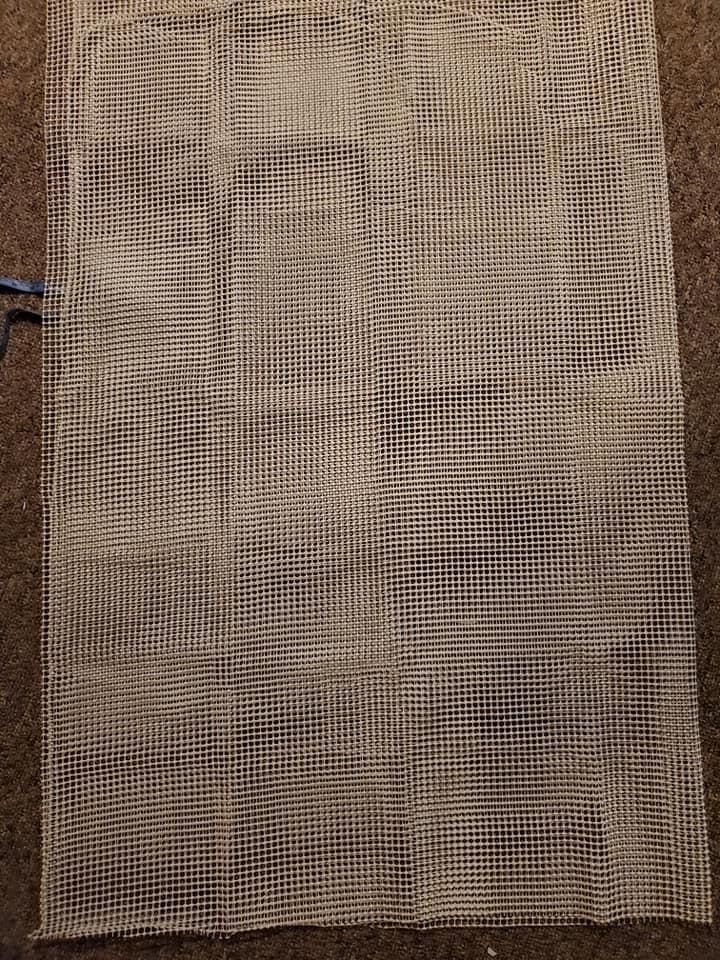
                  

    Go ahead and unravel the mat and fold it over so it is double-layered, I will be making just a chainmail top so a standard sweatshirt pattern is all you need. When cutting out your pattern be sure you make it bigger than you need, that way you can take it in as you go, this material DOES NOT stretch at all and can be a pain to get on and off due to its nature being a non-slip rubber.
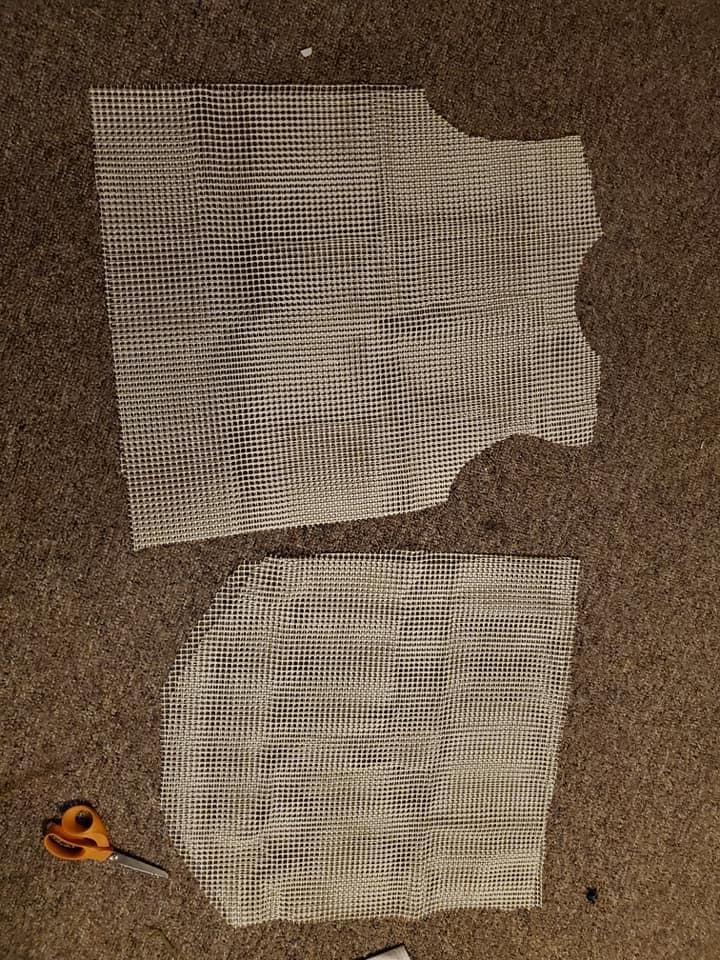
     

    I got the basic shape I needed (Again, making it much larger than myself) and now it was time to sew!


    When putting it on your machine to sew, make sure to interlock the grids so that the holes are filled in by the overlapping grid of the top layer, this way you’re not sewing into nothing.

    I used your standard Zig-Zag stitch for this, that way it would catch the fabric much easier and had less chance of messing up (ex. if I used a straight stitch it would be much harder to sew). The material is a bit hard to sew through so take your time and go slowly making sure to adjust as you work your way through.

    Repeat the last steps while taking it in and keep trying it on till you get to a point where it fits well enough on your body! You don't want it too tight where it's uncomfortable after all, just loose enough to where it's still fitted/flattering on you.

    Now comes painting! Be sure to spray in a well-ventilated area using protective gear for safety. Please read all of the manufacturer’s requirements prior to use.  Due to this project being rubber and something that will move as it is worn,  I am using Design Masters Floral spray in black, this paint is intended to be used on fake flowers and crafts that do move and bend, the paint moves with it and will NOT crack. I usually use this on boots but it also works perfectly as a base for this project. Spray evenly to give a decent coat to both sides and let it dry thoroughly. Next, I am using silver spray paint to get the look of metal. 


    One thing to note about spray paint against rubber is that it doesn't cure 100% properly due to the material, it leaves it a bit sticky but there is an easy way to get rid of the stickiness. Take some baby powder and put a portion of it inside a plastic bag, then put the top into it. Tie up the bag and shake it around for a couple of minutes, enough time to get the power on all of the spaces it needs to of the chainmail. Once you're done, take it out and shake it off to get rid of the excess powder and ta-dah, no more stickiness!


    You can opt to leave it like this if you wish but in my opinion, it's rather difficult to take on and off by slipping it over your head so I opted to do something to help with that issue. I installed a zipper down the front, it would not be seen on the cosplay, and this way it would be MUCH easier to put on. I also used a Zig-Zag stitch for this to help catch the chainmail underneath and make sure it was fully stitched onto the zipper. For extra measures, you can go over your zig-zag stitch with a straight stitch if you want!    


    I installed a zipper down the front, it would not be seen on the cosplay, and this way it would be MUCH easier to put on. I also used a Zig-Zag stitch for this to help catch the chainmail underneath and make sure it was fully stitched onto the zipper. For extra measures, you can go over your zig-zag stitch with a straight stitch if you want!

    And with that, it is done! Hope this tutorial helps you out on your cosplay adventures!


  • 7/15/2021

     A Bit of Scrap Stuff Blog #ABitofScrapStuffPattern #GoodTidingsQAL #GoodTidingsQuilt  #RileyBlakeDesigns #Quilt


    Hi Janome Friends!  It is time to start piecing the Good Tidings Block with Janome Maker Melanie Call from A Bit of Scrap Stuff!

    Join Melanie for her favorite part of making a quilt! She loves watching the cut pieces of fabric become a quilt...just like a fabric puzzle. Plus her Janome M7 sews so fabulously!

    This week we will be sewing the Flying Geese Block ... I love this versatile block! Be sure to keep reading as you can make bonus half-square triangle blocks from the trimmed fabric scraps.


    A Bit of Scrap Stuff Blog #ABitofScrapStuffPattern #GoodTidingsQAL #GoodTidingsQuilt  #RileyBlakeDesigns #Quilt


    Good Tidings Quilt Flying Geese Instructions (HERE) Don't forget to share your fabric selection, cutting, and flying geese  on Instagram with the hashtag #GoodTidingsQAL

    Each week  I will be sharing a new pattern section each for the FREE Good Tidings Quilt Quilt Along (schedule at end of blog post)

    A Bit of Scrap Stuff Blog #ABitofScrapStuffPattern #GoodTidingsQAL #GoodTidingsQuilt  #RileyBlakeDesigns #Quilt


    Good Tidings Quilt    
    #GoodTidingsQAL     59.5" x 59.5"
    A Bit of Scrap Stuff Blog #ABitofScrapStuff #GoodTidingsQAL #GoodTidingsQuilt #RileyBlakeDesigns


    Flying Geese Instructions


    A Bit of Scrap Stuff Blog #ABitofScrapStuffPattern #GoodTidingsQAL #GoodTidingsQuilt  #RileyBlakeDesigns #Quilt

    Bonus Half-Square Triangles 
    Don't toss the trimmed off triangle fabric scraps. You can sew (2) triangles together to make a half-square triangle! 
    A Bit of Scrap Stuff Blog #ABitofScrapStuffPattern #GoodTidingsQAL #GoodTidingsQuilt  #RileyBlakeDesigns #QuiltA Bit of Scrap Stuff Blog #ABitofScrapStuffPattern #GoodTidingsQAL #GoodTidingsQuilt  #RileyBlakeDesigns #Quilt
    Trim the half-square triangles to 2.5" squares. I like to use the Bloc-loc Half-Square Triangle Ruler for accurate trimming.  You can use the (72) half-square triangles to create a bonus project! My favorite scrap project is to make a pillow because each quilt needs a matching pillow :)

    A Bit of Scrap Stuff Blog #ABitofScrapStuffPattern #GoodTidingsQAL #GoodTidingsQuilt  #RileyBlakeDesigns #Quilt
     
     
    Good Tidings Quilt Along Schedule
    A Bit of Scrap Stuff Blog #ABitofScrapStuff #GoodTidingsQAL #GoodTidingsQuilt #RileyBlakeDesigns

    Good Tidings Quilt Along Blog Posts
    A Bit of Scrap Stuff Blog #ABitofScrapStuffPattern #GoodTidingsQAL #GoodTidingsQuilt  #RileyBlakeDesigns #Quilt
     
     
    I can't wait to see your Good Tidings Quilt progress photos!!! #GoodTidingsQAL
     
    Be sure to follow me on Instagram @ABitofScrapStuff and on my A Bit of Scrap Stuff Blog for more fabric fun!

    Have a great day and happy quilting! 

    Melanie Call


Prev ... 11 12 13 14 15 16 17 18 19 20  ... Next 

Tags

#freesewingtutorial 4th of July Applique Block of the Month Bunny Carolina Oneto Christmas Continental M7 Cosplay Cosplay Tutorial Costume Crafting Decorative Stitches DIY DIY Accessories DIY Father's Day Gift DIY skirt Embroidery Everyday Applique Father's Day Fiesta Weave Lunch Mats Fiesta! Four Fabric Quilted Project Bag Free Bag Pattern Free Pattern Free Quilt Pattern Free Sewing Free Sewing Pattern Free Sewing Tutorial free skirt tutorial Free tutorial Fun Projects Garment Sewing Good Tidings Quilt Along Green Goddess Dress Handmade Gifts Heidi Proffety Historical Costume Tutorial Holiday Sewing Home Decor How To How to Machine Bind How to Make a Quilt How to Make a Quilt. Free Quilt Pattern How to Make Panties How to Quilt How to Sew How to sew a top Janome Janome 9450 Janome AirThread2000D Janome Artisan Janome Artistic Digitizer Janome Conitential M7 Janome Continental M7 Janome HD3000 Janome Maker Janome MamoryCraft 15000 Janome MemoryCraft 15000 Janome MemoryCraft 6700p Janome S9 Janome Sewing Machine Janome Skyline S7 Janome Skyline S9 JanomeHD9 Lifestyle Machine Embroidery Maureen Cracknell MDW Melanie Call Memory Craft 15000 Moon Garden QAYG Quilt Block Mother's Day gift Napkins Patriotic Pattern Pillow Pillows Project QAYG Quilt Block Quilt Quilt As You Go Quilt Block Quilt Block Pattern Quilted Project Bag Quilting Quilting How to Quilt Rainbow Block of the Month Rainbow Quilt Block of the Month Rainbow Quilt BOM Reversible Zippered Pillow Rolled Hem Foot Scrappy Star Pillow Sew Sewing Sewing Machine Sewing Project Sewing Tutorial Skyline S9 SkylineS9 Stuffie Summer Sewing Project The Hype Tutorial Valentine's Day
DEALERS
The TWO Closest Dealers to you are:
1900 CENTRE ST , WEST ROXBURY MA, 02132
(617)323-6200
443 MOODY STREET , WALTHAM MA, 02453
781-893-3331
Find Additional Dealers