Welcome to the official Janome.com Blog Page!

  • 4/27/2021

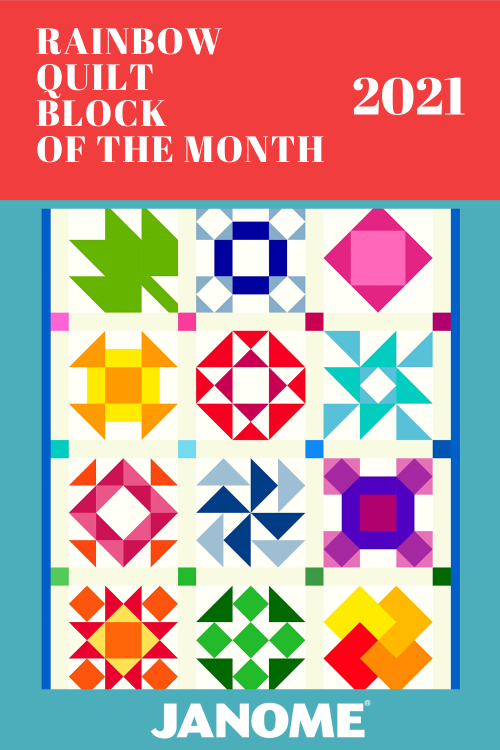
    Welcome back to the Janome Rainbow Quilt Block of the Month 2021! designed by Janome Maker Carolina Oneta

    This month is Block 3, The Churn Dash Block. The Churn Dash Block originated around 1800-1845. As with many other blocks, it is based on what was in the homes and lives of the creators. This simple 9 patch block was one of the first to be learned by young girls also has many other names including Broken Plate and Monkey Wrench.  Carolina shows how you can take a traditional block and make it modern with the fabrics that you choose! 


    Fabrics:    

    White background

    · One 7” square

    . One strip 2.5” x 18”


    Yellow

    . One strip 2.5” x 18”


    Orange

    · One  7” square

    · One  4.5” square


    INSTRUCTIONS:

     Make four half-square triangles.

    • Place a white and orange fabric square right sides together.
    • Sew a 1/4″ seam allowance all around the perimeter of the square.
    • Make two diagonal cuts and press each piece open to one side.
    • Trim away the dog ears using a square quilting ruler, you will obtain 4 - 4.5” half square triangles.


    • Sew the two long strips of fabric, right sides together.
    • Next, cut your sewn strip of fabrics into four equal parts 4.5”. Press these units to the dark side.
    • Join all rows according to the diagram below. Use a quarter-inch seam allowance.


    Press your completed block and trim down to 12.5″ square.


    If you are just joining in, please be sure to make Block One and Block Two on the Janome Blog! 


    After you finish your block, please be sure to share a photo on your social media! We love to see what you are creating! 

    Janome Sewing Classroom on Facebook

    Instagram

    Pinterest

    Twitter

    Be sure to use the hashtags:

    #janomemakes + #rainbowquiltBOM2021 also,  tag @janomeamerica and @carolina_oneto!


  • 3/24/2021


    How to Make a Sewing Machine Organizer 


    Helping keep your sewing tools handy helps to keep your sewing time more efficient! Janome Artisan Maday Delgado from Sustainable Textiles Designs created a fantastic solution and tutorial using the limited edition 100 Anniversary Janome fabric!

    I’m so excited to share this easy sewing room organizer with you and I can’t believe it took me eleven years to make one! I used the Accuquilt Go cutting system to streamline the fabric cutting process. I also included two rulers that you can use instead, to create hexagons and triangles.

    With this organizer, you will have all of your favorite sewing notions visibly at your fingertips, maintain a tidy sewing table and celebrate Janome’s 100th anniversary. This project can be adapted to fit into any room or make into a table mat or larger quilt.


     Helpful Hints:

    I used 1/8” and ¼” seams throughout this project and ironed seams to the side.

    When you work with hexagons or half-hexagons, it helps to stitch units in rows vs a completed block, to avoid y-seams.

    Stitch length – 2 – 2.2”

    The triangles in this project are equilateral (all sides are equal). The stitching sequence is the same no matter what side we choose.

    Adjust the vinyl size if you would like to create deeper pockets.

    Supplies:

    4 assorted color fat quarters or scraps

    Janome 100th Anniversary fabric – half a yard

    GO! Half Hexagon-4 1/2" Sides (4 1/4" Finished) Die

    GO! Equilateral Triangle-4 1/2" Sides (4 1/4" Finished) Die

    Quilt in a Day 60-degree Equilateral triangle Ruler (8 ½”) – Optional

    Hex N More Ruler by Jaybird Quilts – Optional

    Book – Simplicity by Gyleen Fitzgerald – Optional

    Clear vinyl or favorite color (7.5”x22”)

    Batting (28” square)

    Backing fabric (28” square)

    Coordinating 50wt cotton thread for top and bobbin

    Clips/fine pins

    Organ needle 90/14

    Machine Used

    Janome Continental M7 - with hp 1/4” foot/hp needle plate

    Cut triangles and half-hexagons (HH) using AccuQuilt dies

    6 Janome fabric triangles and HH, 6 triangles of print 2 (hearts), 6 triangles of print 3 (light blue), 3 HH of print 4 (dark blue), 3 HH of print 5 (geometrical cream)

    Make 6 units  – Join triangle and HH as shown below 


    When you have all of the pieces cut, arrange them on your design wall or on any flat surface to make sure you are happy with the layout.

    Taking a photo helped me to visualize the pieces that were out of order.


    Make 6 of the following unit – the triangle die, cuts perfect dog ears, matching the corners has never been easier.


    Add 3 dark blue HH to 3 of the above units and 3 geometrical cream HH to the remaining 3. Stitch the half-hexagons to print 2 (hearts). See below


    The finished large triangle units (60-degree equilateral triangle), are comprised of 3 triangles and 2 HH each.

    Stitch units in the order below, as rows. You will have two rows. The vinyl will be attached to most of the bottom row to create a pocket with compartments for tools.


    Use 1/8” seam allowance to stitch vinyl to the lower half of the hexagon and two sides. Pin using fine pins to hold it in place.


    Using the top as a guide, trim backing, and batting to the same size. Place organizer top and backing RST, batting on the bottom. Use pins or clips to keep layers together.


    Leave a 5” opening to turn the organizer right side out. It helps if the opening is left on the side that does not have the extra layer of vinyl.


    Push all corners carefully out after turning and topstitch 1/8” or ¼” from the edges.

    If you need to press the organizer, I recommend carefully ironing from the backside as to not melt the vinyl.


     Now you are ready to stitch/create the pockets of the organizer that will best accommodate the sewing tools you use regularly.


    Your organizer is ready to enjoy! As you can see below, it makes the perfect centerpiece for small tables as well.


    I recommended a book, under the supply list, that I think you would enjoy from an artist that loves to work with polygons. If you are curious about working with interesting shapes, this book will surely delight you.


    Happy Making!

    Maday.

    www.sustainabletextiledesign.com

  • 3/22/2021

    Welcome back to the Janome Rainbow Quilt Block of the Month designed by Janome Maker Carolina Oneta! We hope you had fun making Block One in this delightful Block of the Month! 


    This month we will make our second block, the Economy Block. The Economy Block is also known as a Square in a Square Block. The solid version is gorgeous but it is also a fun block to add a fussy cut in the center! 

    All the blocks in the Rainbow Quilt Block of the Month 2021will have a finished size of 12” finished so that means the unfinished size will be 12 1/2."

    Fabric Requirements:

     White background

    · Two 7” squares

    Light Pink (center)     

    · One 6 1/2” square

     Dark Pink

    · One  7 1/2” square


    Instructions:


    • From the 7.5″ square cut corner to corner to create (4) triangles.
    • From the two 7″ squares, cut each square on diagonal to create (4) triangles

    Center the long edge of two of the smaller triangles on opposite sides of the center square and sew using a 1/4″ seam. Triangle tips will overhang the outside edges of the square.


    I recommend that to make sure that your triangles are centered, fold the long edge in half and make a little crease with your fingernails at the center. Do the same on all four sides of the center square. Match up crease marks to easily center the triangle.

    Press seams toward the outside triangles. Trim dog-ears. Repeat the process with the remaining 2 triangles, pressing seams toward the outside.


    Repeat the same process with the final 4 triangles, sewing two sides, pressing toward the outside, sew the remaining 2 triangles, press.


    Trim your block if it is necessary to 12.5” x 12.5”


    After you finish your block, please be sure to share a photo on our social media!

    Janome Sewing Classroom on Facebook

    Instagram

    Pinterest

    Twitter

    Be sure to use the hashtags 

    #janomemakes + #rainbowquiltBOM2021 and tag @janomeamerica! 


  • 2/22/2021


    Welcome to the Janome Rainbow Quilt Block of the Month 2021! 


    Are you ready for a fun and colorful Block of the Month that will add brightness to your sewing, give you a great reason to try new techniques, and, perhaps, even accomplish some scrap busting! Janome Maker Carolina Oneto has put together a delightful variety of blocks just for you! 


    Hello! I am Carolina Oneto, Chilean Quilter living in Brazil and a new Janome maker, for more than 6 years I worked with Janome Chile and now I’m so happy to be a part of the amazing team of Janome makers for Janome America. I am very excited to present you with this beautiful project that we have planned together with Janome! Every month, for 12 months, the instructions to make a 12 ”block (finished size) and by the beginning of next year, you will have all the blocks ready to build this beautiful Rainbow Quilt!  

     Whether you are a quilter with experience or a beginner, you will love this project! The final measurements of the quilt are 44 ”x 58” (110 cm x 145 cm)


     What materials will you need?

     Rotary cutter

     Cutting mat

     Quilter’s ruler

     Pins

     Scissors

     Sewing machine 

     Walking foot and 1/4” foot

     Clips for binding

     Neutral colored sewing threads (beige or gray)


    The fabrics needed to make the Rainbow Quilt BOM:

     1.- White Color: 1 1/2 yards

     2.- Beige or light gray color(for sashing) or could be white too: 1 yard

     3.- Fabrics of various colors (yellow, orange, red, pink, fuchsia, purple, light blue, blue, light green, dark green, etc.) must be a total of 2,5 yards of fabric.        For example 12” x WOF or 1 fat quarter of each color.

     4.- Back fabric: 3,5 yards 

     5.- Batting: 2 yards

     6.- Binding fabric (bias): 24-inch x WOF


    You can use solids or patterned fabrics! you can use the colors you want.

    The key requirement is that the fabrics need to be 100% cotton.


    All the blocks will have a finished size of 12” square, so that means the unfinished size will be a 12 1/2” square.


    FIRST BLOCK: MAPLE LEAF

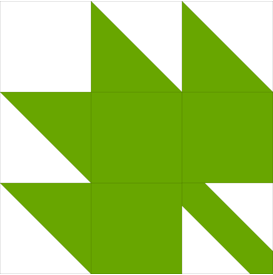
    Are you ready to hop right in with the first block! Let's make the classic Maple Leaf quilt block. 


    FABRICS:


     White background

     ·cut 2 squares of 4 1/2 ”

    Cut 2 squares of 5 1/4”


     Leaf Color (green)· cut 3 squares 4 1/2 ”
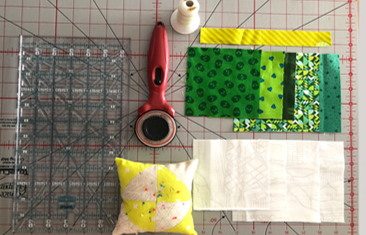
    Cut 2 squares 5 1/4”


    Stem

    Cut 1 ”x 8” rectangle


    Block Assembly

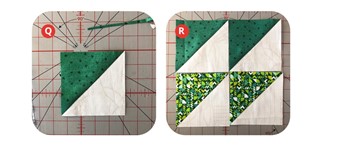
    Match up two of the larger size 5 1/4″ x 5 1/4″ leaf squares and background squares and place them right sides together. We are going to use these to make 4 Half Square Triangle blocks.

    Draw a diagonal line on the back of one of the squares and sew a 1/4″ seam allowance along both sides of the drawn line.


    HALF SQUARE TRIANGLES (HST)
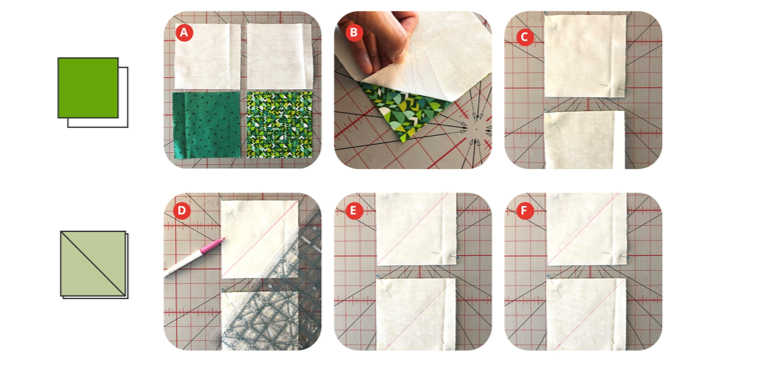


    Rotary cut both squares on the drawn diagonal line to get 4 Half Square Triangle blocks. Square-up the HST blocks to 4 1/2″ x 4 1/2″).

    Press seams toward the dark fabric.


    PIECING THE STEM


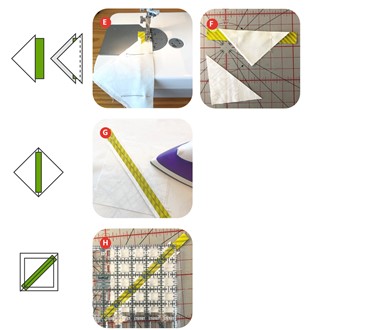
    Cut the remaining large background square in half on the diagonal to create two triangles. Fold rectangle strip in half vertically and finger press to find the center. Fold triangles in half along the longest edge and finger press to mark the center.


    Line up the center crease of one triangle with the center crease on one side of the rectangle and sew in place. Repeat with the opposite triangle.

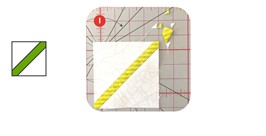
    Square up triangle to 4 1/2”


    ASSEMBLE THE BLOCK:

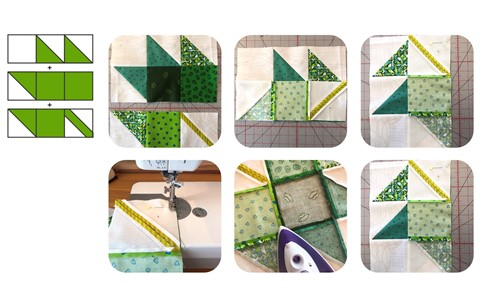
    Layout the remaining squares, half-square triangle, and stem square to form your leaf.

    Sew squares together into three rows. Press seams open.

    Sew rows together and press seams open.


    And VOILÁ! I hope you enjoy this first block! 


    After you finish your block, please be sure to share a photo on our social media!

    Janome Sewing Classroom on Facebook

    Instagram

    Pinterest

    Twitter

    Be sure to use the hashtags 

    #janomemakes + #rainbowquiltBOM2021


    Join Carolina right here, the last Tuesday of each month for the next Rainbow Quilt Block of the Month 2021!


  • 2/22/2021


    Welcome to the Janome Rainbow Quilt Block of the Month 2021! 


    Are you ready for a fun and colorful Block of the Month that will add brightness to your sewing, give you a great reason to try new techniques, and, perhaps, even accomplish some scrap busting! Janome Maker Carolina Oneto has put together a delightful variety of blocks just for you! 


    Hello! I am Carolina Oneto, Chilean Quilter living in Brazil and a new Janome maker, for more than 6 years I worked with Janome Chile and now I’m so happy to be a part of the amazing team of Janome makers for Janome America. I am very excited to present you with this beautiful project that we have planned together with Janome! Every month, for 12 months, the instructions to make a 12 ”block (finished size) and by the beginning of next year, you will have all the blocks ready to build this beautiful Rainbow Quilt!  

     Whether you are a quilter with experience or a beginner, you will love this project! The final measurements of the quilt are 44 ”x 58” (110 cm x 145 cm)


     What materials will you need?

     Rotary cutter

     Cutting mat

     Quilter’s ruler

     Pins

     Scissors

     Sewing machine 

     Walking foot and 1/4” foot

     Clips for binding

     Neutral colored sewing threads (beige or gray)


    The fabrics needed to make the Rainbow Quilt BOM:

     1.- White Color: 1 1/2 yards

     2.- Beige or light gray color(for sashing) or could be white too: 1 yard

     3.- Fabrics of various colors (yellow, orange, red, pink, fuchsia, purple, light blue, blue, light green, dark green, etc.) must be a total of 2,5 yards of fabric.        For example 12” x WOF or 1 fat quarter of each color.

     4.- Back fabric: 3,5 yards 

     5.- Batting: 2 yards

     6.- Binding fabric (bias): 24-inch x WOF


    You can use solids or patterned fabrics! you can use the colors you want.

    The key requirement is that the fabrics need to be 100% cotton.


    All the blocks will have a finished size of 12” square, so that means the unfinished size will be a 12 1/2” square.


    FIRST BLOCK: MAPLE LEAF

    Are you ready to hop right in with the first block! Let's make the classic Maple Leaf quilt block. 


    FABRICS:


     White background

     ·cut 2 squares of 4 1/2 ”

    Cut 2 squares of 5 1/4”


     Leaf Color (green)· cut 3 squares 4 1/2 ”

    Cut 2 squares 5 1/4”


    Stem

    Cut 1 ”x 8” rectangle


    Block Assembly

    Match up two of the larger size 5 1/4″ x 5 1/4″ leaf squares and background squares and place them right sides together. We are going to use these to make 4 Half Square Triangle blocks.

    Draw a diagonal line on the back of one of the squares and sew a 1/4″ seam allowance along both sides of the drawn line.


    HALF SQUARE TRIANGLES (HST)


    Rotary cut both squares on the drawn diagonal line to get 4 Half Square Triangle blocks. Square-up the HST blocks to 4 1/2″ x 4 1/2″).

    Press seams toward the dark fabric.


    PIECING THE STEM


    Cut the remaining large background square in half on the diagonal to create two triangles. Fold rectangle strip in half vertically and finger press to find the center. Fold triangles in half along the longest edge and finger press to mark the center.


    Line up the center crease of one triangle with the center crease on one side of the rectangle and sew in place. Repeat with the opposite triangle.

    Square up triangle to 4 1/2”


    ASSEMBLE THE BLOCK:

    Layout the remaining squares, half-square triangle, and stem square to form your leaf.

    Sew squares together into three rows. Press seams open.

    Sew rows together and press seams open.
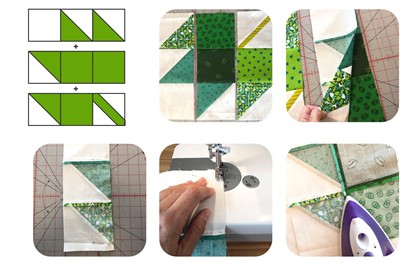


    And VOILÁ! I hope you enjoy this first block! 
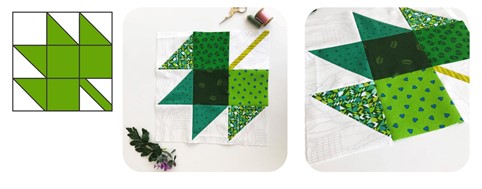
     

    After you finish your block, please be sure to share a photo on our social media!

    Janome Sewing Classroom on Facebook

    Instagram

    Pinterest

    Twitter

    Be sure to use the hashtags 

    #janomemakes + #rainbowquiltBOM2021


    Join Carolina right here, the last Tuesday of each month for the next Rainbow Quilt Block of the Month 2021!


Prev ... 11 12 13 14 15 16 17 18 19 20  ... Next 

Tags

#freesewingtutorial 4th of July Applique Block of the Month Bunny Carolina Oneto Christmas Continental M7 Cosplay Cosplay Tutorial Costume Crafting Decorative Stitches DIY DIY Accessories DIY Father's Day Gift DIY skirt Embroidery Everyday Applique Father's Day Fiesta Weave Lunch Mats Fiesta! Four Fabric Quilted Project Bag Free Bag Pattern Free Pattern Free Quilt Pattern Free Sewing Free Sewing Pattern Free Sewing Tutorial free skirt tutorial Free tutorial Fun Projects Garment Sewing Good Tidings Quilt Along Green Goddess Dress Handmade Gifts Heidi Proffety Historical Costume Tutorial Holiday Sewing Home Decor How To How to Machine Bind How to Make a Quilt How to Make a Quilt. Free Quilt Pattern How to Make Panties How to Quilt How to Sew How to sew a top Janome Janome 9450 Janome AirThread2000D Janome Artisan Janome Artistic Digitizer Janome Conitential M7 Janome Continental M7 Janome HD3000 Janome Maker Janome MamoryCraft 15000 Janome MemoryCraft 15000 Janome MemoryCraft 6700p Janome S9 Janome Sewing Machine Janome Skyline S7 Janome Skyline S9 JanomeHD9 Lifestyle Machine Embroidery Maureen Cracknell MDW Melanie Call Memory Craft 15000 Moon Garden QAYG Quilt Block Mother's Day gift Napkins Patriotic Pattern Pillow Pillows Project QAYG Quilt Block Quilt Quilt As You Go Quilt Block Quilt Block Pattern Quilted Project Bag Quilting Quilting How to Quilt Rainbow Block of the Month Rainbow Quilt Block of the Month Rainbow Quilt BOM Reversible Zippered Pillow Rolled Hem Foot Scrappy Star Pillow Sew Sewing Sewing Machine Sewing Project Sewing Tutorial Skyline S9 SkylineS9 Stuffie Summer Sewing Project The Hype Tutorial Valentine's Day
DEALERS
The TWO Closest Dealers to you are:
196 Boston Post Road , Orange CT, 06477
203-878-1654
19 PUTNAM AVENUE , PORT CHESTER NY, 10573
914-934-2934
Find Additional Dealers