Welcome to the official Janome.com Blog Page!

  • 11/5/2020

                  The first time my mother tried to teach me how to sew, I made a small, four panel pillow. After that, I never really sewed until I was about 10-ish, when I would go into my mother’s sewing room and raid her fabric stash for something pretty and try to make an article of clothing with absolutely no experience in doing so. Today, I was awoken by the sound of her Janome.

                  When the golden light from the sun beamed in my eyes, and when my body permitted itself, I got up from bed. From the other room, a faint humming repeated over and over, then stopped then started then stopped again. The air smelled of bacon and eggs, and the old matted carpet on my feet felt like walking on sandpaper. I walked straight and then made a left, peering into the Tiffany blue room that once was my bedroom, that had been renovated into my mother’s sewing room. As soon as I opened the wooden door, a wave of dog smell launched at me. I looked down at the ground, to find my German shepherd, Loki, staring up at me with his big brown eyes. White cabinets lined the walls, shelves with fabric rolls and small projects displayed my mother’s love for sewing and her job, along with picture frames with sayings that you’d see in a teacher’s classroom in school.

                    Sewing was always near and dear to my mother’s heart. Growing up without a lot of money, she decided to start making her own clothes out of old ones and fabric she could buy for cheap. Years later, she got involved with the sewing machine industry and became an educator for Janome America, and specializes in teaching people how to use and sell the machines, so, naturally, she wanted to teach me too. And then, she did. We started off with a bag that, although complex, wasn’t too hard. A saddle bag made out of a beautiful screen printed cotton, printed with vibrant flowers and vines and leaves, with rose gold hardware and a green cork bottom.

                A lot of this project consisted of cutting and ironing. Measuring out 11” by 22”, 2” by 35”, ironing interfacing onto it to make it strong and thick, the heat permeating through the room, steam from ironing spray covering up the dog smell and making it smell like a weird starchy peach. When I finally began to sew, the heat from the sewing machine warmed me up quickly. The humming continued, but much louder. After finishing some of the basic assembly, I pressed seams open, trying to keep them down with my fingers after opening, but burning them on the hot fabric. I kept sewing and sewing, ironing and cutting, pinning and folding, and then my stomach rumbled a deep rumble that shakes your entire body, and I turned to my mother. She gave me a knowing look, and we ran out to get food. Although it was fast food (considering these were the only restaurants open at the time) my first sip of Baja blast from Taco Bell felt like a dip in the pool of youth, and my steak cantina bowl felt like I was eating a three michelin star meal. When we finished our meals, we returned home and finished the bag.

                   My mother often goes on about the mental health benefits of sewing. She remembers this experiment that she read about, where human trafficking victims were taught how to sew and how that then, in turn, taught them how to plan ahead. They spent so much of their life living day to day that they forgot about that aspect of life, and when they re-learned it, it helped them grow. She thinks, although I haven’t experienced something as extreme as that, it still helps keep you in the moment while also helping you learn how to think in advance. And she was right! The entire time I spent sewing, there was no overthinking or intrusive thoughts or paranoia, it was just me in my mother’s sewing room with my dog, making something together.

  • 11/5/2020

    If you’re like me, you LOVE to sew quilt tops. And, when you’re done making those quilt tops, you LOVE to send them off to a long armer. After some not-so-pleasant experiences with previous sewing machines I have some trust issues when it comes to quilting. But, after receiving my Janome 9450 QCP 8 months ago, I have been slowly working up the courage to try quilting something again and pillows felt like a good start. I just knew that if there was a sewing machine out there to redeem all those bad experiences my Janome Memory Craft was it. Spoiler alert - I was correct!

    I highly recommend, if you’re new to quilting, to start small. Pillows, potholders, minis, etc. are great projects for testing the quilting waters.

    Interested in making the pillows featured in this post? The pattern for the Holiday Pillows, Snowman and Falala, are available HERE! Use the hashtag #snowmanpillow and #falalapillow in your caption when you share your progress to social media. Don’t forget to tag me (@penandpaperpatterns) in your post as well!

    After piecing my pillow tops, I used some basting spray and made a quilt sandwich (backing fabric + batting (TIP: Use fusible fleece instead of batting and skip the basting spray part) + pillow top. I made sure there was at least a 2” overage with my backing and batting as well.

    I made a sample piece with some remnant fabric and batting to test out what quilting pattern I wanted to go with. There are so many options on the Janome 9450 QCP that I had a hard time narrowing it down.

    I ultimately decided on the #44 scallop design under the Quilt category. I wanted something simple that wouldn’t distract from the pillow top designs. Also (even though I ended up leaving the design on the default settings) I really liked how I had the option to customize it.

    Once I figured out my settings, I started quilting! It couldn’t have been easier. I also attached the quilting bar onto my foot holder to make sure my lines of quilting were evenly spaced. Yay for not having to mark my quilting with a water-soluble pen or Hera marker!

    And this is how the quilting turned out! Not too shabby for a novice quilter. It was such a positive experience that I’m anxious to try the Hand-look Quilt Stitches next! The look of hand quilting minus the time commitment – I’m so excited!

    Check out my other holiday patterns and tutorials here: ttps://penandpaperpatterns.com/search?q=holiday

    And check out my most recent finish - the Kris Kringle Quilt! This quilt is what inspired the colors in my Snowman and Falala pillows. PS – For those wondering, the Kona solids I used in my pillows are listed in the pattern. Kits for these pillows are also available from Sewtopia here: https://bit.ly/2FIkUCM

  • 10/19/2020

    Hello! My name is Jessee, and this is my first post here on the Janome Blog. I'm super excited!

    To give a little bit of background...

    I have been sewing since I was 5 years old and I come from a family of makers. My mom is a seamstress and my sisters all make their own clothes. I myself have had a maker business for the past 18 years under the name Art School Dropout. I make everything from 3D printed pieces, laser cut jewelry, cast plastic accessories, quilt patterns & quilts, wood pieces, embroidered pieces and more. I also teach these things at a local makerspace and I'm a girl scout leader! Basically my  whole life revolves around being a maker.

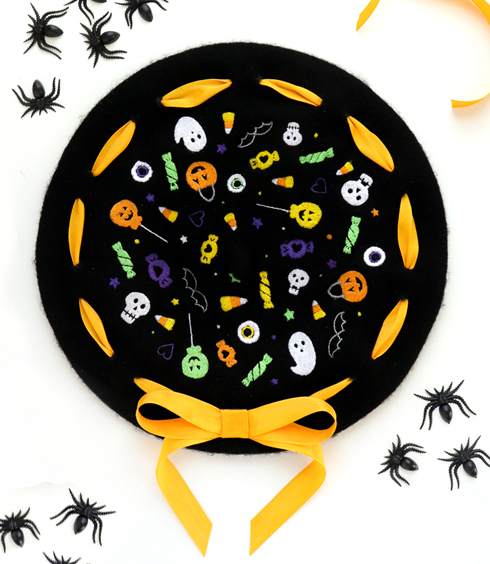
    Lately my maker habits have pushed me towards Conventions and Cosplay. My family and I go to all of the local conventions around the Washington DC area and I even sell at a few. So when I was thinking about what my first project would be, I thought of the trends I'd see at these events.  I noticed a bunch of Kawaii (cute) embroirdered wool berets at different booths last year. They'd have cut animals, fruit or something else anime themed dancing around them. A few even had ribbon borders and cute bows. My 10 year old daughter loved them anbd kept asking for one.

    Which brings me to today's tutorial...

    How to Machine Embroider a Kawaii Halloween Beret!

    You'd think the process was a no brainer, but these wool berets can get tricky to machine embroider. It took some trial and error with both the file and the technique to get it just right. I also went through a handful of berets! oops.

    Now lets get started with a supply list...

    You will need:

    • A Janome Embroidery Machine that can use the SQ23 230x230 Hoop (I am using the MC15000)
    • An 11" wool beret (I bought mine off of Amazon since I'm still staying home 24/7)
    • Embroidery thread in Yellow, Orange, Bright Purple, Slime Green, White and Medium Grey
    • A stiletto tool or a 'That Purple Thang'
    • Peel & Stick stabilizer (I used Pellon)
    • Scissors
    • 1/4" or 1/2" Ribbon (optional)
    •  Fabric Fusion Glue or a Glue Gun (optional)
    • A white gel pen or silver sharpie marker (optional)
    • A large upholstrey or needlework needle (optional)


    First things first, lets untighten the embroidery hoop and get it ready!


    Next you will want to measure how much of the Peel & Stick stabilizer you will need. I always cut a little extra just in case.

    Place it in your hoop with the paper side up! This is very important.


    Now using your stiletto or a pair of scissors open, score some lines around the paper. You will want to cut through the paper, but not the stabilizer underneath. I always say it's better to score a few times than to push too hard and cut through on the first time around.

    The scoring should have allowed you to start peeling off the paper. Make sure to get as much off as possible.

    To make the beret easy to embroider, you will need to turn it inside out. Once you have done so, try and center it on the hopp using the raised lines on each side of the hoop. It's fine if it's not perfect, we'll do some more wiggling around in the next step.


    Your hoop should have come with a clear centering template like shown above. This is absolutely perfect for this project, since you will now try and center the little nub on the beret with the hole in the center of the template. Make sure the template mactches up with those notches on the hoop! This will save you heartache later.

    Once you are comfortable with the placement of the beret, press down as much as possible to make sure it doesnt shift on the machine.
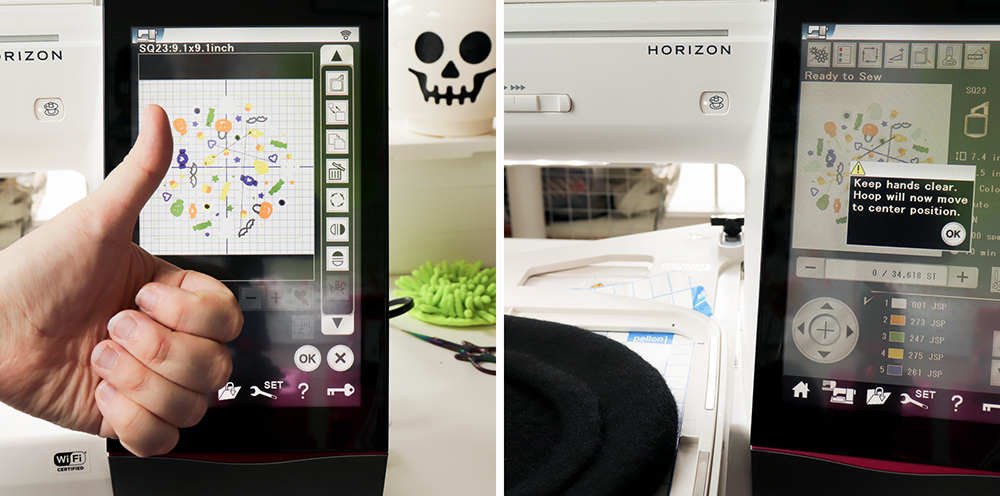
     Now load up the Halloween Beret file and get started! It has already been sized perfectly to fit on the beret AND to account for the inside flaps with some assistance.

    Please note that this is a 65min embroidery job and it will need constant babysitting due to those flaps, but I promise you it will be worth it in the end.
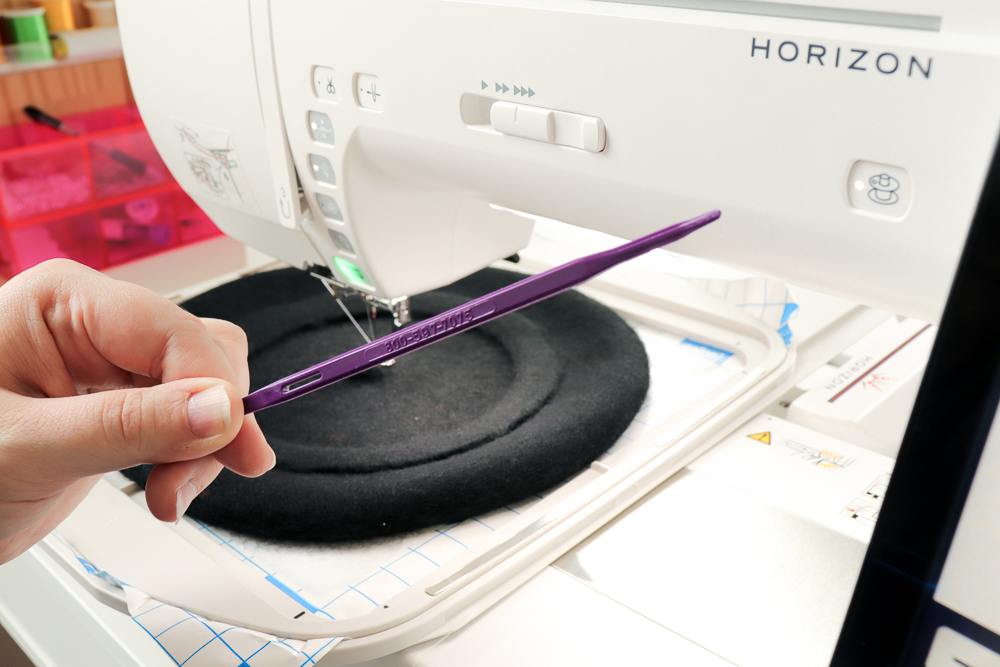
     

    Now I bet you were wondering what I was talking about it the supply list when I wrote "That Purple Thang'. Well, this was it! It's one of my most used tools and is almost crucial for this project. It's a plastic slightly curved stiletto that can also be used to thread ribbon and elastic as well as push out corners in sewn pieces.

    For this project we are using it to move the flaps on the beret to the side while the machine is going. This allows for zero interference with the needle and carriage, as well as keeping our hands as far away as possible.

    Thats a must! I have def sewn through my finger with both a sewing machine and a longarm machine. I don't wish that grossness on my worst enemy.

    A regular sewing stiletto will also work for this btw, I'm just a fan of 'That Purple Thang' (plus I just really like saying "Thang")
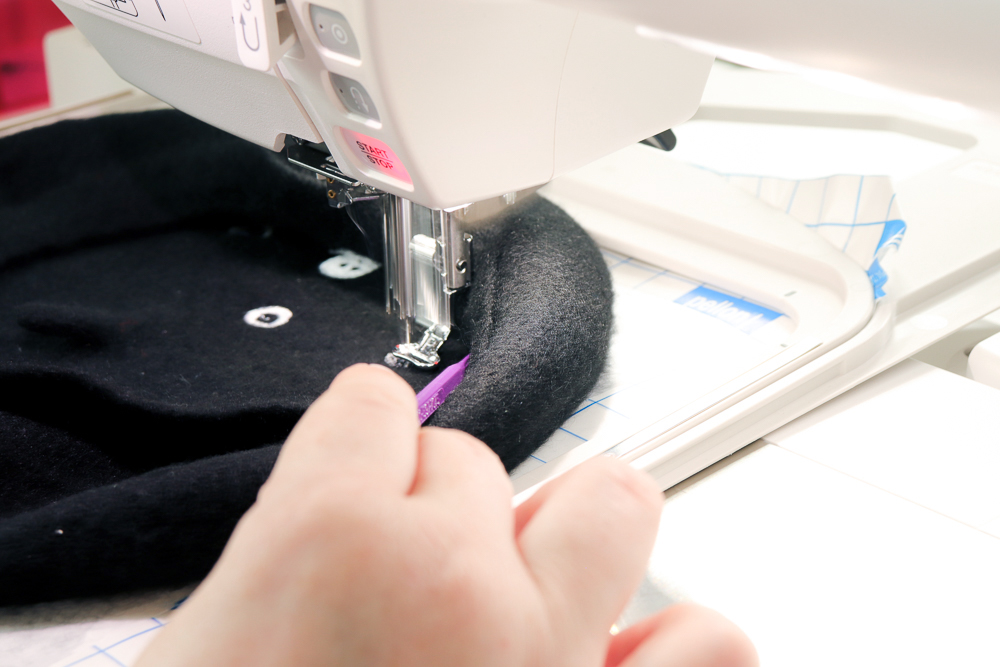
     

    Once you have sat and watched the embroidery machine work it's magic, you could be 100% finished and go about your day wearing your new magical halloween beret.

    You could also take it one more step, which is what my daughter requested, and add some fun ribbon around the edge!

    To make this easier, I have included a printable template for positioning the ribbon. I wanted to help you and take out any guess work. It will print out on two pages, so you will need to cut it out and tape it together. Make sure to match up the shapes with the stars inside. Please note: It is an inch smaller than the actual beret. I did this so there were only two pages to print instead of four.

    To accomplish the ribbon look, you can use either 1/4" or 1/2" ribbon. We used 1/2" because thta is what my daughter picked out. I personally wanted to go with gold, but she is the one who will be wearing this.

    DOWNLOAD the ribbon template HERE!

    Once your template is taped together, you will need to poke holes in all the circles. My hole punches all mysteriously dissapeared, so I just used the tips of my scissors, but a hole punch would be so much nicer!

    Now center the template and line up where you would like the bow to go. Once you are happy with the placement, use a white gel pen or a silver sharpie to mark where each hole should go.

    Side note: I tried to use chalk, a dressmakers pen, and a chalk pencil but none of them would leave nice enough marks.


     We're almost done! I promise!

    I left the ribbon the spool and threaded it into my large upolstrey needle. I started inside at the part where the bow was going to go and just when in and out all the way around the beret. If the needle isn't big enough to make a hole for the ribbon, you can cut little slits. I personally only had to do that twice.

    When you get to the end it make look a little sloppy, mine did. I just went around and straightened it all up and opened the robbon so it was "puffier" looking.  To keep this look and to prevent movement later, I dabbed a glob of Fabric Fusion glue under each piece os ribbon.

    From here you can tie a pretty bow, glue the and go about your day. You could also struggle with tying a pretty bow and instead tie it off, make a seperate bow and hot glue it on. Your choice!

    Ta-Da! You now have a super cute Kawaii Halloween Beret to wear this spooky season OR year 'round. I don't judge.


    Bonus: I've added two extra files to this project incase you want to add them to some cute accessories or the top left corner of a shirt. Pretty much anywhere a 75mm wide design will fit! I know I'll be adding those ghosts to a simple sweatshirt and wearing it year 'round.

    All of the files for this project can be found on our Janome Projects page HERE!

  • 10/19/2020

    Hello! My name is Jessee, and this is my first post here on the Janome Blog. I'm super excited!

    To give a little bit of background...

    I have been sewing since I was 5 years old and I come from a family of makers. My mom is a seamstress and my sisters all make their own clothes. I myself have had a maker business for the past 18 years under the name Art School Dropout. I make everything from 3D printed pieces, laser cut jewelry, cast plastic accessories, quilt patterns & quilts, wood pieces, embroidered pieces and more. I also teach these things at a local makerspace and I'm a girl scout leader! Basically my  whole life revolves around being a maker.

    Lately my maker habits have pushed me towards Conventions and Cosplay. My family and I go to all of the local conventions around the Washington DC area and I even sell at a few. So when I was thinking about what my first project would be, I thought of the trends I'd see at these events.  I noticed a bunch of Kawaii (cute) embroirdered wool berets at different booths last year. They'd have cut animals, fruit or something else anime themed dancing around them. A few even had ribbon borders and cute bows. My 10 year old daughter loved them anbd kept asking for one.

    Which brings me to today's tutorial...

    How to Machine Embroider a Kawaii Halloween Beret!

    You'd think the process was a no brainer, but these wool berets can get tricky to machine embroider. It took some trial and error with both the file and the technique to get it just right. I also went through a handful of berets! oops.

    Now lets get started with a supply list...

    You will need:

    • A Janome Embroidery Machine that can use the SQ23 230x230 Hoop (I am using the MC15000)
    • An 11" wool beret (I bought mine off of Amazon since I'm still staying home 24/7)
    • Embroidery thread in Yellow, Orange, Bright Purple, Slime Green, White and Medium Grey
    • A stiletto tool or a 'That Purple Thang'
    • Peel & Stick stabilizer (I used Pellon)
    • Scissors
    • 1/4" or 1/2" Ribbon (optional)
    •  Fabric Fusion Glue or a Glue Gun (optional)
    • A white gel pen or silver sharpie marker (optional)
    • A large upholstrey or needlework needle (optional)


    First things first, lets untighten the embroidery hoop and get it ready!


    Next you will want to measure how much of the Peel & Stick stabilizer you will need. I always cut a little extra just in case.

    Place it in your hoop with the paper side up! This is very important.


    Now using your stiletto or a pair of scissors open, score some lines around the paper. You will want to cut through the paper, but not the stabilizer underneath. I always say it's better to score a few times than to push too hard and cut through on the first time around.

    The scoring should have allowed you to start peeling off the paper. Make sure to get as much off as possible.

    To make the beret easy to embroider, you will need to turn it inside out. Once you have done so, try and center it on the hopp using the raised lines on each side of the hoop. It's fine if it's not perfect, we'll do some more wiggling around in the next step.


    Your hoop should have come with a clear centering template like shown above. This is absolutely perfect for this project, since you will now try and center the little nub on the beret with the hole in the center of the template. Make sure the template mactches up with those notches on the hoop! This will save you heartache later.

    Once you are comfortable with the placement of the beret, press down as much as possible to make sure it doesnt shift on the machine.

     Now load up the Halloween Beret file and get started! It has already been sized perfectly to fit on the beret AND to account for the inside flaps with some assistance.

    Please note that this is a 65min embroidery job and it will need constant babysitting due to those flaps, but I promise you it will be worth it in the end.


    Now I bet you were wondering what I was talking about it the supply list when I wrote "That Purple Thang'. Well, this was it! It's one of my most used tools and is almost crucial for this project. It's a plastic slightly curved stiletto that can also be used to thread ribbon and elastic as well as push out corners in sewn pieces.

    For this project we are using it to move the flaps on the beret to the side while the machine is going. This allows for zero interference with the needle and carriage, as well as keeping our hands as far away as possible.

    Thats a must! I have def sewn through my finger with both a sewing machine and a longarm machine. I don't wish that grossness on my worst enemy.

    A regular sewing stiletto will also work for this btw, I'm just a fan of 'That Purple Thang' (plus I just really like saying "Thang")


    Once you have sat and watched the embroidery machine work it's magic, you could be 100% finished and go about your day wearing your new magical halloween beret.

    You could also take it one more step, which is what my daughter requested, and add some fun ribbon around the edge!

    To make this easier, I have included a printable template for positioning the ribbon. I wanted to help you and take out any guess work. It will print out on two pages, so you will need to cut it out and tape it together. Make sure to match up the shapes with the stars inside. Please note: It is an inch smaller than the actual beret. I did this so there were only two pages to print instead of four.

    To accomplish the ribbon look, you can use either 1/4" or 1/2" ribbon. We used 1/2" because thta is what my daughter picked out. I personally wanted to go with gold, but she is the one who will be wearing this.

    DOWNLOAD the ribbon template HERE!

    Once your template is taped together, you will need to poke holes in all the circles. My hole punches all mysteriously dissapeared, so I just used the tips of my scissors, but a hole punch would be so much nicer!

    Now center the template and line up where you would like the bow to go. Once you are happy with the placement, use a white gel pen or a silver sharpie to mark where each hole should go.

    Side note: I tried to use chalk, a dressmakers pen, and a chalk pencil but none of them would leave nice enough marks.


     We're almost done! I promise!

    I left the ribbon the spool and threaded it into my large upolstrey needle. I started inside at the part where the bow was going to go and just when in and out all the way around the beret. If the needle isn't big enough to make a hole for the ribbon, you can cut little slits. I personally only had to do that twice.

    When you get to the end it make look a little sloppy, mine did. I just went around and straightened it all up and opened the robbon so it was "puffier" looking.  To keep this look and to prevent movement later, I dabbed a glob of Fabric Fusion glue under each piece os ribbon.

    From here you can tie a pretty bow, glue the and go about your day. You could also struggle with tying a pretty bow and instead tie it off, make a seperate bow and hot glue it on. Your choice!

    Ta-Da! You now have a super cute Kawaii Halloween Beret to wear this spooky season OR year 'round. I don't judge.
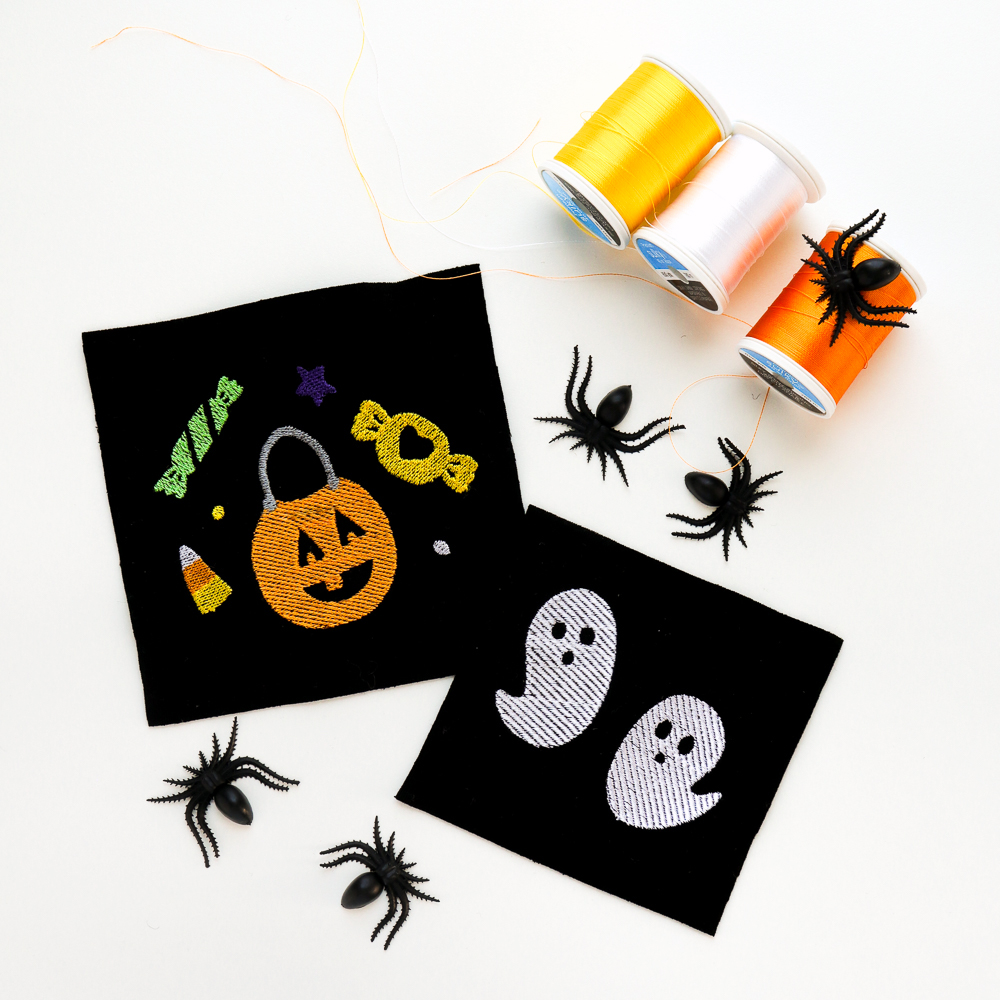
     

    Bonus: I've added two extra files to this project incase you want to add them to some cute accessories or the top left corner of a shirt. Pretty much anywhere a 75mm wide design will fit! I know I'll be adding those ghosts to a simple sweatshirt and wearing it year 'round.

    All of the files for this project can be found on our Janome Projects page HERE!

Prev ... 11 12 13 14 15 16 17 18 19 20  ... Next 

Tags

#freesewingtutorial 4th of July Applique Block of the Month Bunny Carolina Oneto Christmas Continental M7 Cosplay Cosplay Tutorial Costume Crafting Decorative Stitches DIY DIY Accessories DIY Father's Day Gift DIY skirt Embroidery Everyday Applique Father's Day Fiesta Weave Lunch Mats Fiesta! Four Fabric Quilted Project Bag Free Bag Pattern Free Pattern Free Quilt Pattern Free Sewing Free Sewing Pattern Free Sewing Tutorial free skirt tutorial Free tutorial Fun Projects Garment Sewing Good Tidings Quilt Along Green Goddess Dress Handmade Gifts Heidi Proffety Historical Costume Tutorial Holiday Sewing Home Decor How To How to Machine Bind How to Make a Quilt How to Make a Quilt. Free Quilt Pattern How to Make Panties How to Quilt How to Sew How to sew a top Janome Janome 9450 Janome AirThread2000D Janome Artisan Janome Artistic Digitizer Janome Conitential M7 Janome Continental M7 Janome HD3000 Janome Maker Janome MamoryCraft 15000 Janome MemoryCraft 15000 Janome MemoryCraft 6700p Janome S9 Janome Sewing Machine Janome Skyline S7 Janome Skyline S9 JanomeHD9 Lifestyle Machine Embroidery Maureen Cracknell MDW Melanie Call Memory Craft 15000 Moon Garden QAYG Quilt Block Mother's Day gift Napkins Patriotic Pattern Pillow Pillows Project QAYG Quilt Block Quilt Quilt As You Go Quilt Block Quilt Block Pattern Quilted Project Bag Quilting Quilting How to Quilt Rainbow Block of the Month Rainbow Quilt Block of the Month Rainbow Quilt BOM Reversible Zippered Pillow Rolled Hem Foot Scrappy Star Pillow Sew Sewing Sewing Machine Sewing Project Sewing Tutorial Skyline S9 SkylineS9 Stuffie Summer Sewing Project The Hype Tutorial Valentine's Day
DEALERS
The TWO Closest Dealers to you are:
1900 CENTRE ST , WEST ROXBURY MA, 02132
(617)323-6200
443 MOODY STREET , WALTHAM MA, 02453
781-893-3331
Find Additional Dealers