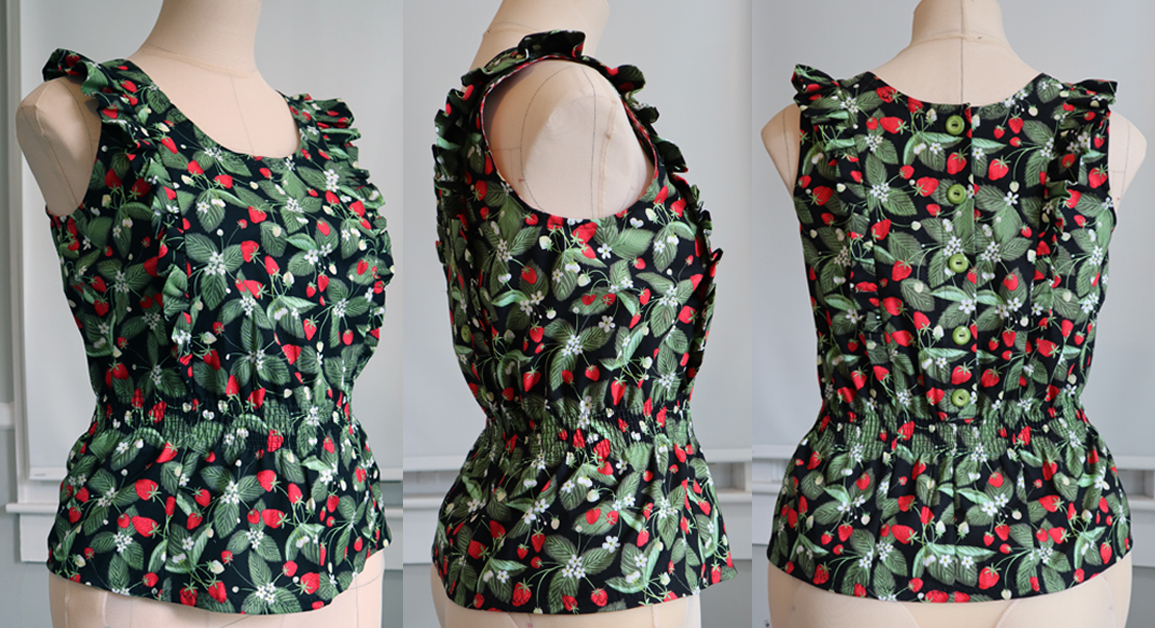
Are you ready for Summer? With the warmer weather approaching, it is a great time to add some fun details to your wardrobe with Janome Maker Janelle Marie!
In this walk-through, Janelle will show you how she drafted her strawberry blouse from her Sloper (also known as a pattern Block). It’s a relatively quick project that doesn't require much fabric. This covers how to expand the paper pattern to create a new shape, adding new seams, creating folded ruffles, how to add shirring, ruffles, and extra fabric for buttons.

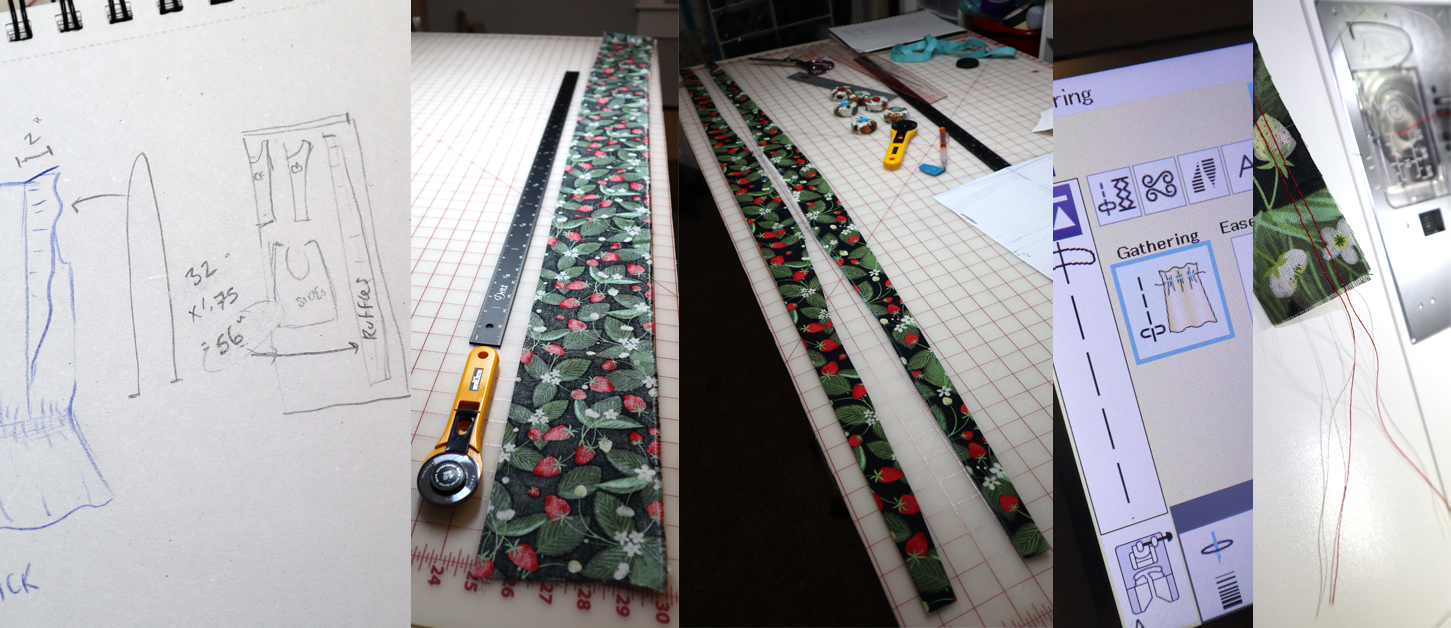
This whole pattern begins with a custom, well-fitting Sloper. A base on which it is infinitely more easy to draft a pattern than to start from scratch. You will need to have one of these already but if you do not, no worries! There are many great guides on how to do so. I drafted mine following Kim Dave’s YouTube tutorial. In the below photo you can see my sloper as well as some of the things you will need:
-Sloper/Bodice Block
-2 yds main fabric (I used 1 ½ cotton but if you want to pattern match you’ll need more)
-2 yds Single fold Bias tape (I made mine from the red and white checkered fabric shown but premade is fine)
-Approx. 6x14” Mid-weight Fusible interfacing (I happened to have black but any color is fine as it’ll be completely hidden)
-4-5 buttons
-Fray check
-Sewing machine and appropriate needles for your fabric
-A serger is helpful but not essential
-Iron and ironing board
-Fabric chalk/marker
-Pins or clips
-Good quality thread (Gutermann or better)
-Shirring (elastic) thread
-An empty bobbin
-Muslin or large scrap fabric for your mockup
-Ruler and Curve/Fashion ruler
-Scissors or rotary cutter
-Tape
-Pen, pencil, tracing wheel


-
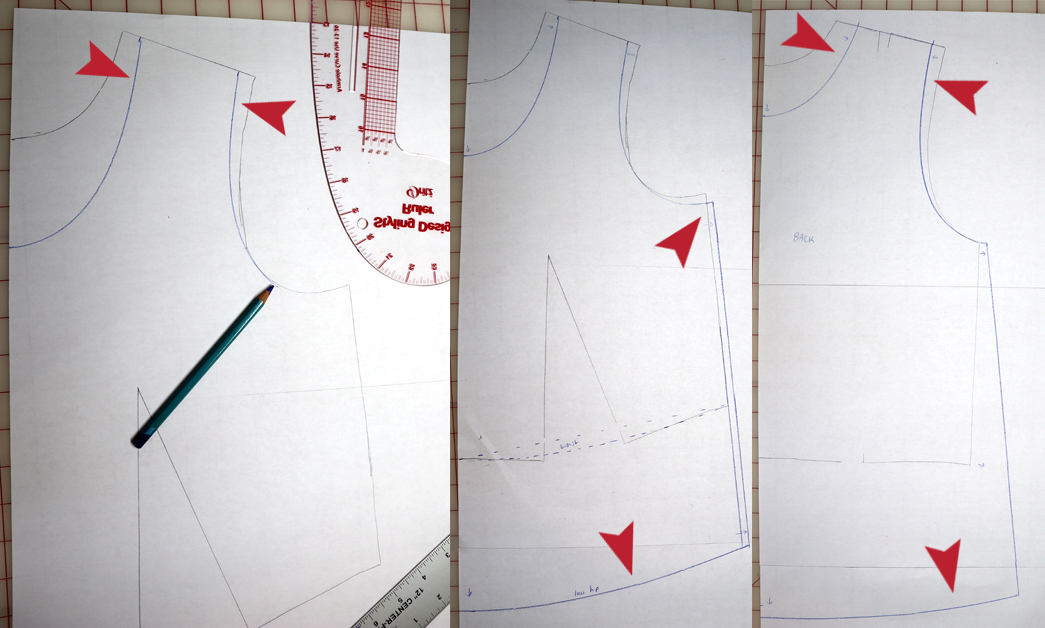
Trace your front sloper onto a new sheet of paper with bust darts closed. You want the excess fabric that comes with leaving the waist dart open. Once traced, bring in the shoulders about 1.5” (.75” on each side) and drop the neckline 3”. This is where a curved ruler comes in handy to get nice, smooth lines.
-
Next, you want the top of the underarm seams to be a 90-degree angle so drop it about ½” and extend the side out about ½” until you get a 90-degree point. Measure from your waist to where you want the bottom of the shirt to end on you and add that measurement plus 1” to the bottom of the front.
-
You are going to repeat this process for the back without closing any darts. Bring in the shoulder to match the front and drop the back neckline approx. 2”. Extend the underarm out about ½” and lengthen the side seam to match the front.
-
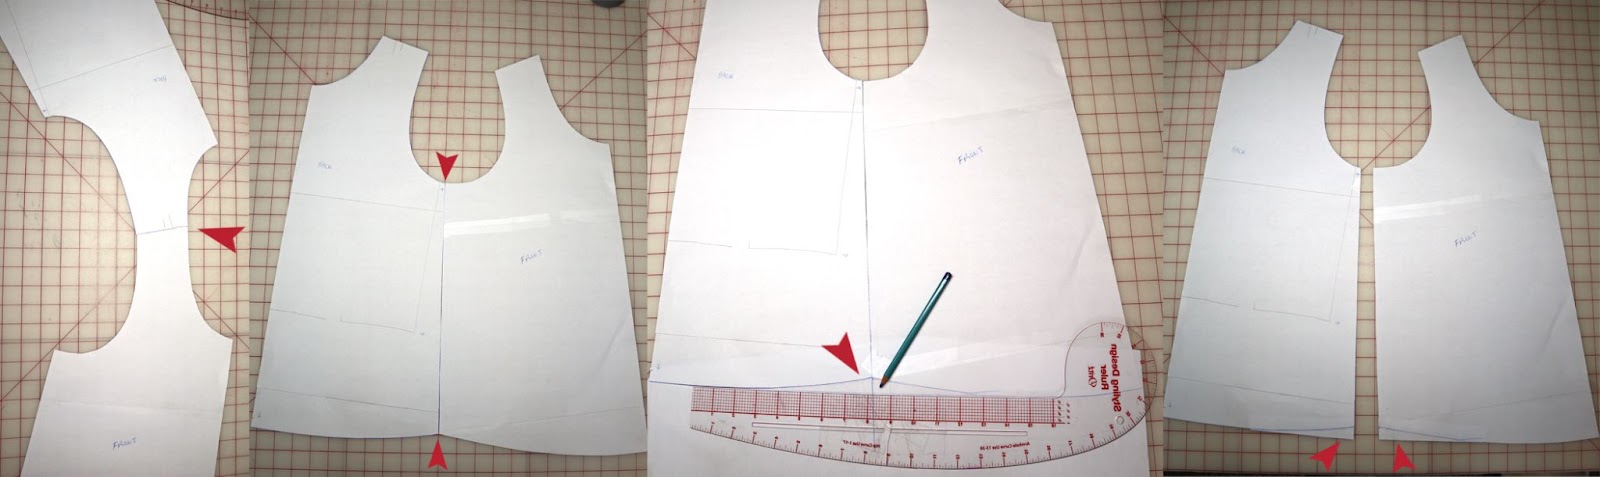
Once you make those changes, cut out both the front and back pieces. Align and tape the shoulders to check that the lengths match and that the neckline and arms make smooth transitions into each other. Adjust accordingly and separate.
-
Align and tape together the side seams. Check that the lengths match and that the arm opening curve is smooth. If you want the front or back to be longer than the sides, leave it as is. If you want the bottom hem to be parallel, make those adjustments now. Separate.
-
Now it’s time to make a mock-up (or toile) and check the fit! Trace the pattern onto your muslin, making sure to mark where the waist is. Use a basting stitch and contrasting thread color to assemble. Don’t worry about finishing the arm/neck holes and hem nicely. Cut those areas at the line, leaving no seam allowance. Also, don’t worry about adding extra fabric for the button closures. Just sew up the back as if there is no opening. You should still be able to slide it over your head. After the sides and shoulders are sewn, try it on without turning it! It should sit comfortably but not tightly.

-
I ended up dropping the neckline another inch and widening it out slightly. Use a pen or marker to make your adjustments directly onto the fabric if desired. Then mark the vertical line you would like your ruffles to emerge from on the front and back. Going a little wider at the top and bringing them in closer together towards the waist helps create the illusion of a smaller waist, which is how I placed mine. Once this is marked, take a ruler and measure how wide you want your ruffles to be at the shoulders, shoulder blades, and at bust. Mark measurements and placement onto the fabric. Mine was 2” at the shoulder, 1” at the bust, and shoulder blades. Mark your waist if it does not match the one previously marked and decide how wide you want your shirring to be. Mine was 1.5” wide

-
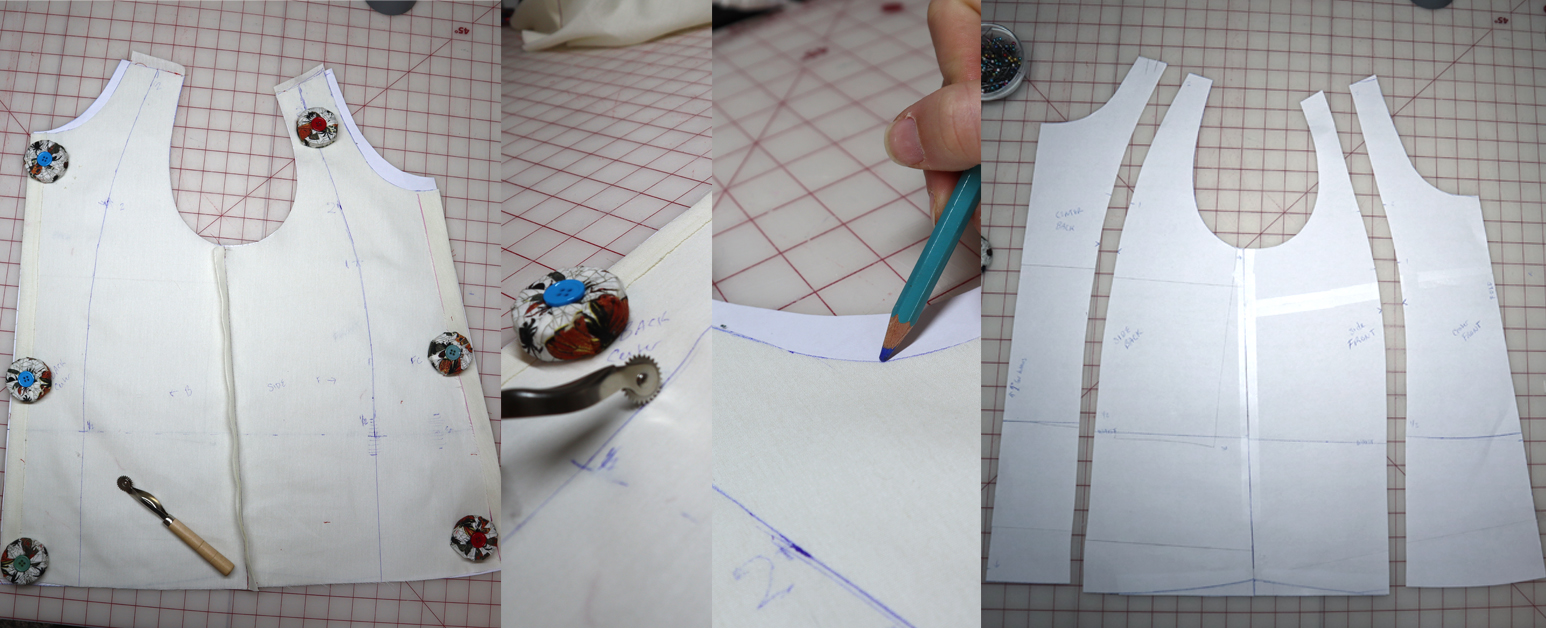
Once all of these markings and measurements have been made, remove the mock-up and undo the front, back, and shoulder stitches. Lay flat. Use your curve ruler to make the newly marked lines smooth and elegant. Mark the to-be-shirred section at the waist clearly. Tape your paper pattern together at the sides, lay your mock-up on top and transfer the changes using a pencil and/or tracing wheel. Cut along the ruffle lines to create 3 pattern sections. Front center, side, and back center.
-
Now, if you are happy with your mock-up, it's time to cut out your real fabrics! We will start with the ruffles. On your pattern, measure the length from your front waist to your shoulder and then from your shoulder to the back waist. These together are the length of your ruffles. But, in order to make them, you know, ruffle, multiply that number by 1.75 or 175%. That is the length of fabric you will need to make each of your ruffles. To figure out the width, take your widest ruffle measurement (mine was 2”), add ½” for seam allowance and multiply it by 2. Mine totals 5”
Length Width
(Desired length X 1.75) by (Desired width + seam allowance) X 2
-
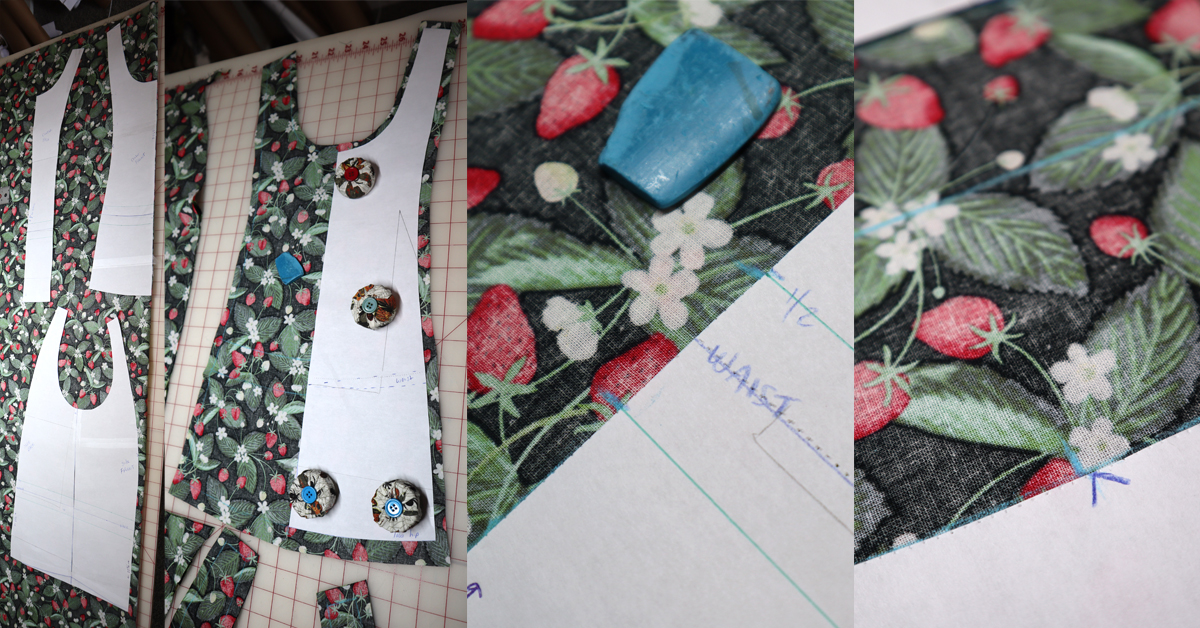
With a clear plan as to how all of your pieces are going to fit onto your fabric (I like to draw a little map as shown below), cut out your ruffle strips and fold in half, right sides facing out. Mark where the shoulder seam, bust, and shoulder blade points will meet (initial measurement x 1.75) and mark their widths. Draw a smoothly transitioning line between the points, with both ends tapering to 1”. Cut off excess on raw edges, leaving the fold intact.
-
Iron flat and use the gather stitch to sew two even, parallel lines of stitches ¼” and ⅖” away from the raw edges, leaving several inches of thread at each end. I like to use two different colors of thread for my bobbin and top threads to help differentiate the ends. While holding the bobbin threads, push the fabric together to create the ruffle. Match its length to the measured length of the bodice slits and tie off threads to hold in place. Put aside.
-
Layout your bodice pieces onto your folded fabric. Front center on the fold. Back next to it with several inches of space next to the center back (where we will add fabric for the buttons). Place the side piece below these both. Trace all pieces and onto fabric using chalk or erasable marker/pen. Make sure to mark the waist section to be shirred and any other connection points.
-
With the back piece on the fabric and traced, extend the center back 2.5”. End the extension at the top of the shirred portion as that will be a straight seam. This will become the button panel. Add seam allowances to all except the center edge of the extension and cut out. It should look like the far right image below:

-
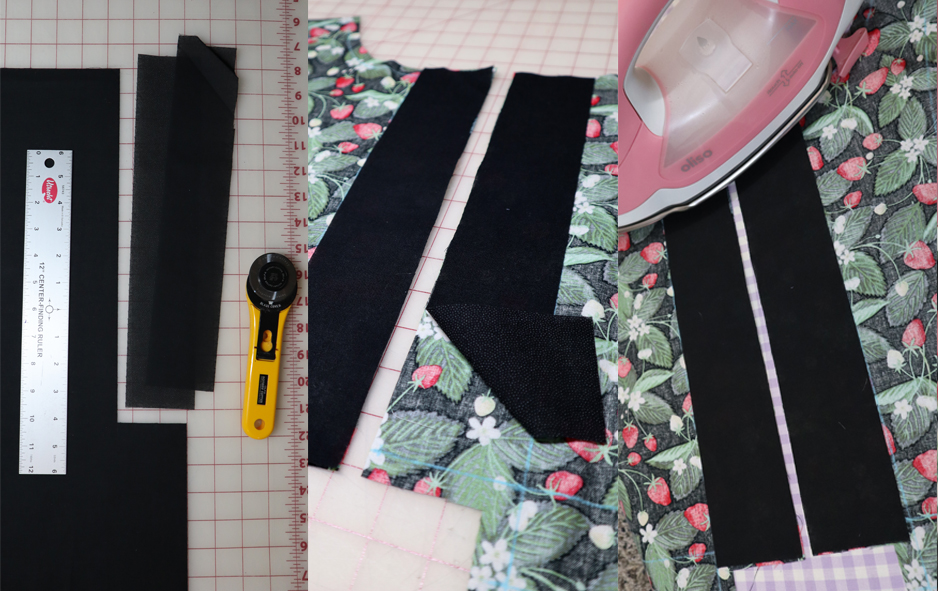
Next, we are going to add some interfacing to the button panel. Measure the length of the newly added button panel including seam allowances and the width from the original center backline to the raw edge. Cut out two pieces of interfacing with these measurements. Lay your back pieces on your ironing board with the interfacing in place and press. Flip and press again. Fold over ¼” of the vertical center back raw edge and press. Repeat for the other side.
-
Gather your shirring thread, an empty bobbin and a whole lot of patience. To wind your bobbin, put the end of the shirring thread through the hole of your bobbin and wind it with only enough tension to make it lay smooth. It shouldn’t be stretching at all. Try and wind in evenly back and forth so there are no center or side bumps. Fill in as much as you think your shirt will need. I wound mine just over half full. Pop it into your machine or bobbin case and thread it as normal. On mine, I had to hold the bobbin in place and pull with some tension to get it to go through the final curve of the bobbin holder. Thread the upper thread as normal, using a color that matches your fabric. Use this to pull up your bobbin thread and leave several inches of tails. Your machine should be set to a straight stitch. Depending on how much you want it to gather, that will determine your stitch length. The longer the stitch, the more it will gather. Mine was set at a length of 4.

-
Practice a few times on a scrap of fabric to make sure your settings are right. It will not look like it is gathering much at all until your 3rd or 4th row so do several rows. Do NOT use your automatic thread cutter or the elastic thread will spring back inside your machine. Always leave 3-4” of tails. Once you are happy with the settings, begin on your actual pieces on the markings you made. Backstitch at every beginning and end of a row to hold your shirring thread in place. I would recommend not cutting the threads after each row but instead turning and continuing while still backstitching at each beginning and end. Sew rows approx. ¼ - ½” from each other depending on the look you want to achieve. I sewed 7 rows ¼” apart. If they are not gathering as much as you would like, use your iron to steam the shirring a little until it contracts. Do NOT touch the iron to the fabric or thread or your thread could melt. Finish all 5 sections.

All of your pieces should look like this:

-
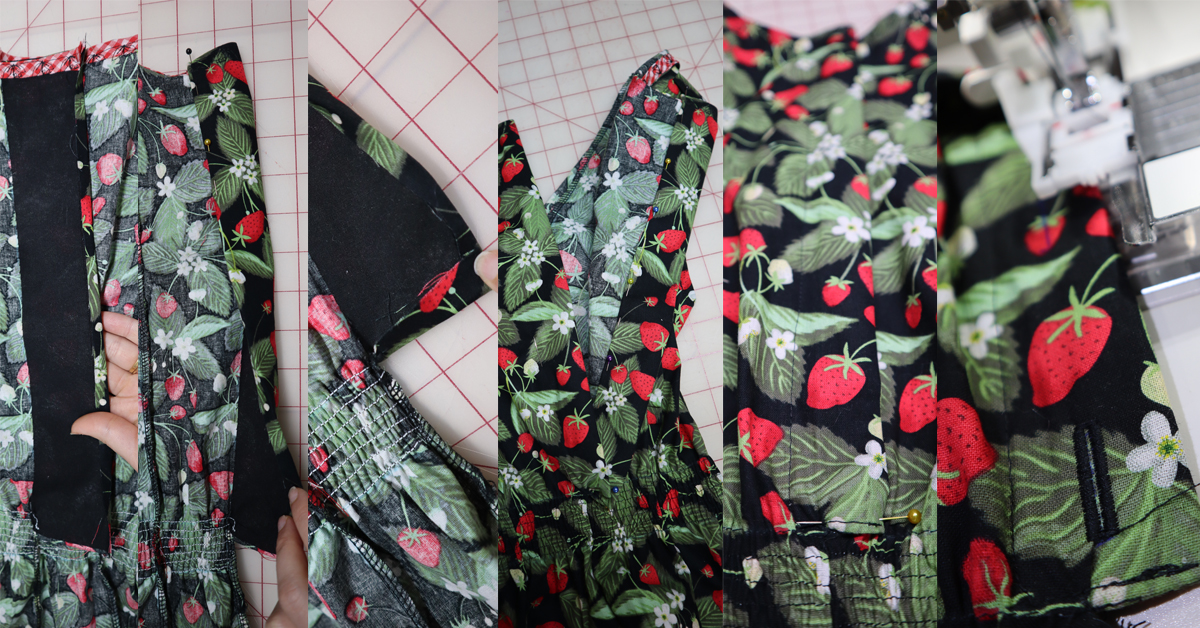
After you are happy with all of your shirring, it’s time to assemble! Start by connecting the shoulder pieces of the front center and back centers. Sew, serge (if desired), and press backward. Next connect the shoulder portions of the side pieces to themselves, forming the complete armhole. Sew, serge (if desired), and press backward.

You should now have three separate pieces and two ruffles, like this:

-
Begin adding the ruffles by first sewing the front center and front of the side panels together to just above the shirred waist. Sandwich one ruffle strip between the front and side piece, aligning the bust, shoulder, and shoulder blade mark you previously made. Pin together until you reach the bottom of the back of the shirt. The ruffle should end just above the shirred waist at the back. Repeat for the other side. Sew these pieces together with a basting stitch and check to see if you are happy with the placement. If everything is ever, sew with a straight stitch, serge, and press (avoiding the shirred waist).

-
We are nearing the finish line! Now it’s time to finish the neck and arm openings with some bias tape. I made mine with checkered cotton to give it a pop of color but using premade is absolutely fine! Measure and cut the needed lengths to go all around the neckline to the very edges of the stabilized button panel and the armholes with an overlap of at least an inch. Pin the bias tape to the neckline, making sure the crease closest to the edge lands exactly where you want your neckline edge to be. Straight stitch along that crease.
-
For the armholes or any closed circle openings, I like to begin pinning the bias tape under the arm with the tip folded over towards you. That way, when the end of the bias tape is pinned in place, it holds the fold in place and when you turn it, there are no raw edges showing. Again, pin the bias tape where the crease closest to the raw edge is exactly where you want the opening to be. Straight stitch along that crease. Trim off any extra fabric that extends past the bias tape.

-
Fold over, iron and pin the bias in place. With the bias tape pinned in place, topstitch it in place. You can use a straight stitch ¼” from the edge or a decorative one like I have.

-
Sew and serge the back center from the top of the shirred waist to the bottom raw edge. Serge entire bottom edge and fold up and under ½-1”. Iron and pin in place. Use the stretch zig zag stitch to finish.

22. Now for the final step! The buttons! Fold in the vertical raw edges of the button panel ¼” and press. Fold up the bottom edge of each panel ¼”. Fold them in again until that same vertical folded edge touches the edge of interfacing and slightly overlaps it, hiding it. Sew a straight line ¼” from that double folded edge. Pin both panels in place, one on top of each other, and mark your desired buttonhole placements. I did 5 total. Unpin and use your machine to sew buttonholes to match your button size.
-
Fray check each sewn buttonhole and iron to dry quickly. Cut open your buttonholes, pin panels in place again, and use your removable pen or mark to mark where each button needs to be placed. I like to run the pen up and down the buttonhole and then determine the halfway point of the mark. Measure between each button placement to check if they are even. Use your machine to sew your buttons on by hand. With your button panels buttoned-up, pin the bottom edge of your outermost button panel and sew it in place! Viola! You're done! Step back, ignore the tiny mistakes we all make, and breathe in your accomplishment! Pop it on and give yourself a hug!
After you finish making your amazing top, please be sure to snap a photo and share!
We don’t want to miss out so be sure to tag:
@janomemaerica
@seams.come.true
And hashtag:
#janome
#janomemakes