Welcome to the official Janome.com Blog Page!

  • 7/14/2021

    Janome Maker Carolyn Norman has leveled up her wardrobe using the Janome Circular Attachment! 

    Carolyn will reveal how easy it is to use the beautiful built-in decorative stitches on your Janome machine to personalize your wardrobe whether store-bought or hand-sewn. This method can also be used on other sewing projects like bags, home decor, and even quilts!  


    I saw a Ready-To-Wear top that inspired me to try creating some circular designs on a tunic.  My tunic is me-made but you could easily do the same thing on a purchased tunic or top.  

    Here's how I made it happen ~

    Skill Level:  Intermediate

    Time to complete the circles:  4-6 hours; additional hours if you sew your garment.

    Project Supply List:

    Janome Circular Attachment

    A picture containing diagram

Description automatically generated


    Compass & pencil

    Sulky Total Iron On/Tear Away Stabilizer

    Schmetz Universal #70 Needle

    Small screwdriver included in Accessory Kit

    Amann Group Isacord 100% polyester ombre thread or a rayon thread of your choice

    4" small sharp scissors

    I am sewing on a Janome 9450QCP but the Circular Attachment is available for other models.

    The pattern for the top is The Katie by MimiGStyle


    Application of the Design:

    1.  Follow the instructions included in the packaging for the Circular Attachment to attach it to your sewing machine.

    A picture containing sewing machine, appliance, indoor

Description automatically generated

    2.  Determine where on your garment you want your design to be.  I put the design on my garment pieces before sewing them together.

    3.  If you are embellishing RTW, try it on and make light marks where you’d like the designs; for something you’re making, hold the pattern pieces up to yourself and mark the center of the circle.  You may want to use the compass to draw out the smallest circle which you can stitch first. 

    A picture containing cloth

Description automatically generated

    4.  After you've made a mark to begin stitching out your circles, apply your interfacing and place the stabilized fabric on the sharp point of the Circular Attachment, place the black cap back on, and lock the bar into place. 

    5.  Decide what decorative stitches you want to use. I would suggest making a few samples on scrap fabric to see how the stitches lay on the fabric.  If using a RTW garment, I would suggest using a less dense stitch so it doesn't change the fit of the garment. 

    6.  For my garment, I started from the outside of the row of stitching farthest from the pin working inwards.

    A picture containing sewing machine, appliance

Description automatically generated


    7. The largest circle was on the back of the shirt and consisted of 8 rows (10 inches wide) using 4 different design patterns:

        - Outer circle 1 row - Quilt stitch #33

        - Next 3 rows - Quilt stitch #22

        - Next 4 rows - Quilt stitch #23

        - Center of the circle - Satin Stitch #8

    8.  After determining the order of using the designs, sew each circle until you reach the last point of your design.

    9.  I decided to make my last round of designs 1" from the center point. 

    10. When adding the next row of stitches, I aligned the side of my presser foot with the row of stitching.  This allowed the space between the stitches to be the same for each row.

    A picture containing indoor, gun

Description automatically generated

    11. When coming to the end of the circle, adjust to a slower speed to ensure that the stitches join cleanly.

    A picture containing indoor, gun, weapon

Description automatically generated

    12. If while stitching, you're unsure of how the design is progressing, stop sewing (with the needle in the down position) and lift your foot.  You can smooth out your fabric or check how the stitching is going without causing the machine to lose its place.

    A picture containing indoor

Description automatically generated

    13. Here's what a finished circle looks like after completion. I added a design to the center to cover the hole from the pin.


    I added circles to the back of my tunic ~

    A person with long hair

Description automatically generated with low confidence

    Several sizes of circles to the bottom front of my tunic. You can choose one color or more for a completely different look! 

    A picture containing person, outdoor, standing, posing

Description automatically generated


    I also added one on the elbow of the sleeve for an extra design pop! You can add a variety of sizes of circles and decorative stitches to create a gorgeous statement piece! 

    A picture containing person, outdoor

Description automatically generated

         A picture containing outdoor, tree, ground, person

Description automatically generated    A person wearing a white dress

Description automatically generated with medium confidence


    A Few Tips to make using the Circular Attachment easier:

    - When you take the screw out of the package, put it in a magnetic pin cushion holder so it will not be lost.

    - Gently ease the fabric - because the machine will do all of the circular stitching but if you're sewing on a large piece of fabric or a full garment, you will need to make sure ALL of the fabric is easing around the pin. 

    - I found it easier to let the machine perform the circular pattern stitching further away from the pin.  You will need to manage the fabric more as you get closer to the pin.

    You too can add any type of circle design or embellishment to your garment, a bag, a hat, or a new make.  Give it a try! It's a new way to experience the wonderful abilities your sewing machine has to enhance a RTW or new garment make.


  • 7/13/2021


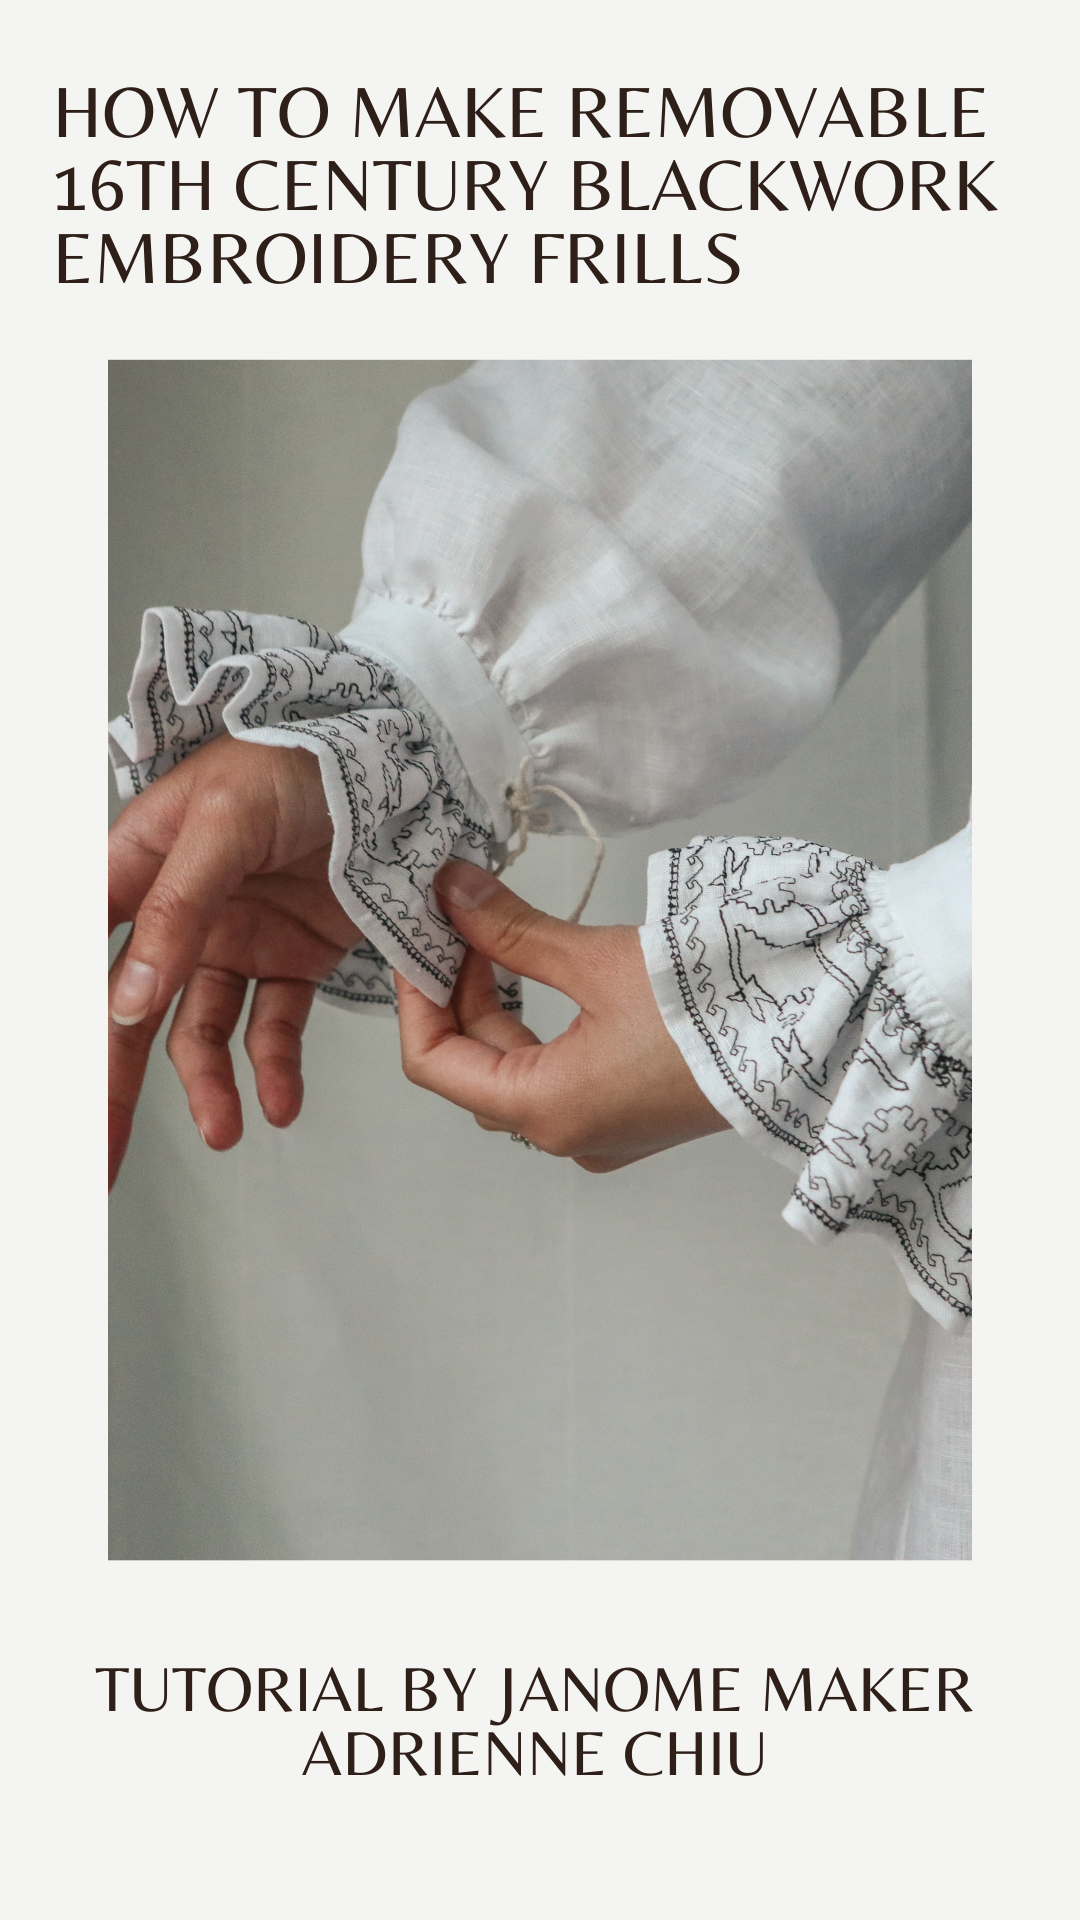
    Do you have an interest in historical costuming? With more events opening up it is time to get stitching up costumes, cosplay, or garments!  Janome Maker Adrienne Chiu from Wax Sealed Costumes utilized the embroidery feature on her Skyline S9 to create these lovely magnetic removable 16th-century blackwork embroidery frills. 


    Planning ahead for when renaissance faires can safely happen again, I’ve started to work on my first more historically accurate/inspired mid-16th century outfit. I pre-ordered the new Typical Tudor book from The Tudor Tailor, but publication is delayed until this spring. Last winter, I was able to pattern test for them, and since I’m starting from the skin out, I chose the shift pattern. I made it from some shift weight linen and linen thread from Burnley and Trowbridge and sewed it with my Janome Skyline S9

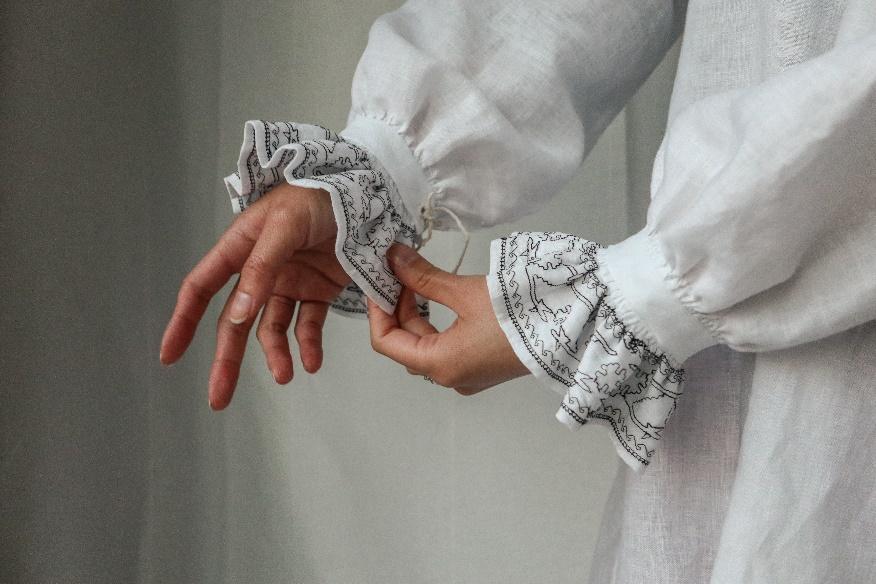
    Fancy wrist cuffs and neck ruffs in the 16th century were made to be detachable so that the smock or shift could be easily laundered separately. These would be sewn/basted on, which is what I’ve done with my 18th-century engagements in the past. The guild I attend renaissance faire with does historical European martial arts demonstrations and wrist frills don’t fit in my gauntlets without getting crushed. Unpicking and resewing cuffs multiple times a day isn’t practical, so I chose to make magnetic removable cuffs to easily take them on and off during the day. 

    Here’s how to make your very own magnetic removable blackwork embroidery cuffs!

    I started off with designing my blackwork embroidery for the cuffs. While searching for inspiration, I noticed that an element in Jane Seymour’s frills in this painting looked like shields. I took that as a base and changed up the design to add in a sword and halberd, so my cuffs would be on theme for my ren faire guild. 

    Jane Seymour was painted by Hans Holbein In 1536. Zoom in to all the gorgeous details here: https://artsandculture.google.com/asset/egE1bExAbnBDgg

    This was my first time digitizing machine embroidery. I started off in Adobe Photoshop and quickly realized I needed to switch to Adobe Illustrator so that I could import the vector file into Stitch Era, the program I used to convert the vectors into machine embroidery files. 

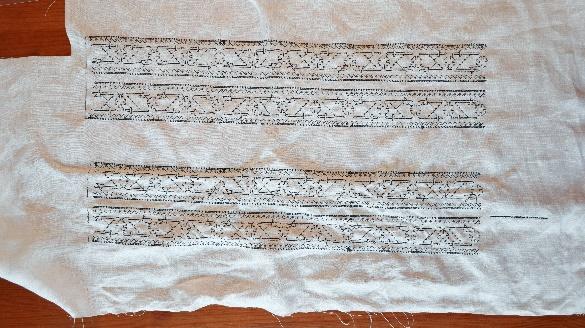
    I did test stitch runs – after the first one, I realized one element was too small and making the whole design inefficient, so I took it out entirely. Hand-done blackwork embroidery, particularly with the Holbein stitch, creates a reversible piece, but with machine embroidery, the backside doesn’t perfectly match the front (especially if you use thinner bobbin thread as I do), so I mirrored the design and folded the piece in half to create two “good” sides of the frill.

    Now it was time for the real deal. This is my first time stitching a repeating/continuous machine embroidery pattern, so I’m still learning the best ways to line pieces up. I added a piece of draping tape to the hoop grid as an extra reference marker. The Skyline S9 also has features to move the hoop/needle to each corner of the piece, which I used to check alignment. I also jumped ahead in the stitch count to check alignment in a few key spots in the middle of my piece.

    I stitched my design out on the RE20a hoop and did three repeats to get the length I wanted, which is slightly longer than the frill piece in my Tudor Tailor pattern. This is the biggest hoop for the Janome Skyline S9 with 170x200mm of usable space. The backside is stabilized with Sulky Solvy Water Soluble Stabilizer – I have a tearaway stabilizer, but my design has so many small stitches, it would be very tedious to tear all those out, so I went with a washable one. 


    My two lengths of embroidery were washed and dried to remove the water-soluble stabilizer. I cut these out with a ½” seam allowance. 


    On each short end, fold them right sides together, stitch, clip the corner, turn, and press to create the double-sided embroidery piece.


    To make the sewable magnets, I chose small magnets because I wanted to make sure they fit inside the cuff, were soft and relatively unobtrusive. Ready-made sewable magnets I could find were all wider in diameter, thicker, and covered with plastic. Comfort is key as I’d be some of wearing these inside gauntlets while sparring. 


    I cut small lengths of linen from leftovers, folded them over to encase the magnets, and used pins to hold the magnets in place while getting it aligned to sew on the machine (the magnet will want to stick to the needle plate). Start at one corner, sew a straight line to the edge of the magnet, keep the needle down, lift the presser foot, rotate the whole piece 45 degrees, bring down the presser foot and keep sewing. Repeat until all four sides are sewn and the magnet is fully encased. I went with 3 magnets along my cuff and you’ll need a set for the shift cuff and the removable frill cuff, so a total of 12 magnets. 

    Use the gathering stitch setting and sew at least two rows of stitches along the raw edge side and pull on the bobbin threads to gather the frill to the cuff length.


    Cut out cuff bands that match the cuffs you use on your shift sleeve end. Sewing your new sewable magnets to one side and then fold in half lengthwise and press. If you plan on sewing buttonholes or eyelets to your sleeve cuffs, keep that in mind and leave some space for those/don’t block it with your magnets. (I went with eyelets for mine)

    Pin your gathered frill to your cuff, right sides, and raw edges together, and sew. (Note: if you happen to have a preferred side of your frill to show on the outside, then sew the cuff band such that the magnets will also be on that side). Then fold and sew the short ends (like you did with the frills), clip, and turn them right side out. You should be ready to turn in the raw edge of the cuff band and encase the raw edges of your frill now. Since this won’t be visible, I chose to machine sew the cuff band down with the dual feed foot. 

    Use the same method to sew the magnets to the cuff of your shift. I used a Clover water soluble marker to make sure the magnets are aligned and be sure to triple check you have the magnets facing the right way so the two cuff bands will stick together! Remember the note from above? For the strongest connection, I sewed the magnets to the wrist-facing layer of the sleeve cuff and the outer-facing layer of the removable cuff. The finished removable cuff will attach along the inside of your sleeve cuff. 


    Since the sleeve-side cuff will be visible, I chose to hand whip stitch the inside of the band to the sleeve. 

    If your embroidery design has some jump threads, remember to clean those up. I was so eager to keep working on my cuff, I didn’t trim these until the end, and the gathered frill made it a little harder, so I recommend doing this right after you finish embroidering. 

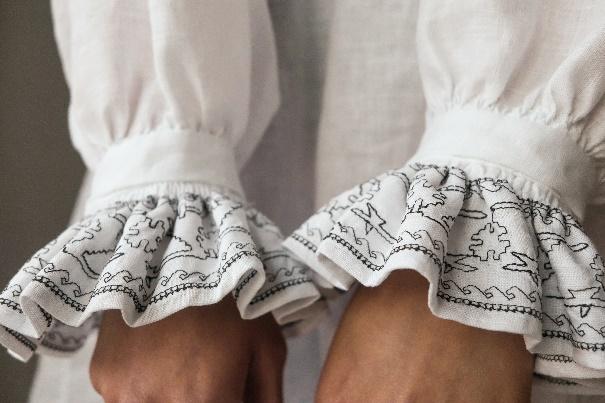
    And there you have it. Magnetic removable blackwork embroidery cuffs – perfect for when you don’t feel like being so fancy or they’re getting in the way of putting on gauntlets. You can use this magnet method to make other accessible clothing accessories as well!


  • 7/7/2021

    Christmas in July is a time-honored tradition that started July 25, 1933, at a camp in Brevard, NC.  You can read more about its origin on the Southern Living website  HERE.

    Janome Maker Melanie Call from A Bit of Scrap Stuff has started the Good Tiding Quilt Along to get your Christmas in July celebration and your Christmas sewing started early! 


    A Bit of Scrap Stuff Blog #ABitofScrapStuff #GoodTidingsQAL #GoodTidingsQuilt #Rileyblakedesigns

    Hi Janome Friends! It's Melanie Call from A Bit of Scrap Stuff Blog or @ABitofScrapStuff . I'm a Janome Maker that sews and quilts with the Janome Continental M7 ... it's an amazing machine for quilt piecing AND free motion quilting!

    I'm so excited to host the Good Tidings FREE Quilt Along that starts on July 7th. I will be sharing the Good Tidings Quilt Pattern section each week starting Wednesday, July 7th - on my A Bit of Scrap Stuff Blog.  PLUS there will be prizes from Riley Blake Designs, Fat Quarter Shop, and Oliso so be sure to join in!

    A Bit of Scrap Stuff Blog #ABitofScrapStuff #GoodTidingsQAL #GoodTidingsQuilt #Rileyblakedesigns

    All About Christmas designed by J.Wecker Frisch for Riley Blake Designs is perfect for the Good Tidings Quilt. I loved being able to fussy cut the Christmas Typography fabric for the star block centers. The Story  fabric was perfect for the large border.

    A Bit of Scrap Stuff Blog #ABitofScrapStuff #GoodTidingsQAL #GoodTidingsQuilt #Rileyblakedesigns
     

    Gather Up your fabric so you can start cutting on July 7th

     
    --- Good Tidings Quilt Fabric Requirements --- 
    • (9) Fat eighths or 1/8 yard cut Star Points
    • 1/2 yard * Star center [* 1 yard if fussy cutting fabric *If using Christmas Typography - make sure there are 3 full repeats of CHRISTMAS for fussy cutting.]
    • 3/4 yard background
    • 1/4 yard red patchwork corners
    • 1/4 yard green patchwork corners
    • 1/2 yard black patchwork corners
    • 2/3 yard sashing
    • 1/8 yard sashing corner
    • 2/3 yard inner border
    • 1 1/4 yard outer border  [* 2 yards if fussy cutting fabric]
    • 2/3 yard binding
    • 4 yards backing

    *Fabrics used in cover quilt --- Riley Blake Designs – All About Christmas (available HERE)
    A Bit of Scrap Stuff Blog #ABitofScrapStuff #GoodTidingsQAL #GoodTidingsQuilt #Rileyblakedesigns

    I hope you can join in for the Good Tidings Quilt Along! I can't wait to see your fabric selections! Be sure to share your fabric pulls on Instagram with #GoodTidingsQAL
     
    I'll be back on July 7th with Cutting Instructions.
     
    A Bit of Scrap Stuff Blog #ABitofScrapStuff #GoodTidingsQAL #GoodTidingsQuilt #Rileyblakedesigns
     
    Be sure to follow me on Instagram @ABitofScrapStuff and on my A Bit of Scrap Stuff Blog for more fabric fun!

    Have a great day and happy quilting! 
    Be sure to keep tuned in to what Melanie is creating by visiting:

    My Blog: A Bit of Scrap Stuff - https://abitofscrapstuff.blogspot.com My Quilt Patterns - https://www.etsy.com/shop/ABitofScrapStuff My Instagram: @ABitofScrapStuff -https://www.instagram.com/abitofscrapstuff/

  • 7/6/2021

    It is officially mushroom season! Can you think of a better way to celebrate than to make a darling mushroom skirt? Janome Maker Vivien from Fresh Frippery is well known for her amazing historical costumes but is sharing a whimsical DIY Mushroom Skirt tutorial for you to make for any age or size! 


    I adore the red and white toadstool mushrooms known as Amanita muscaria (aka fly agaric) and wanted to make a cute skirt inspired by them. I've worn it in my photos with a monogram cardigan and big fluffy petticoat for a 1950s style look, but this skirt could be styled with a romantic shirt and a flower crown for a cottage core outfit. The front half of the skirt has a flat waistband for a smooth look while the back half of the skirt has an elasticated waistband for comfort and for adjustability!


    SKILL LEVEL: Beginner/intermediate


    TIME REQUIRED: 4-5 hours


    WHAT YOU WILL NEED (exact amounts depend on your measurements):


    • 2 or more yards of red cotton fabric
    • 1 yard or various scrap pieces of white cotton fabric
    • 3-4 yards or more of white pleated trim or lace
    • a strip of interfacing the same size as your waistband
    • thread, elastic, pins, scissors, chalk, etc.


    Before you begin you'll want to take a few basic measurements: your waist circumference, and the desired length of your skirt. For the latter, you'll want to measure from the smallest part of your waist to wherever you would like the skirt to stop (above the knee, below the knee, etc.) Use the diagram below to convert those measurements into A, B, and C for the pattern pieces.


    Using the pattern diagram as a guide, use chalk to mark the rectangles on red fabric. Cut out your front and back skirt panels, front waistband, and back waistband. Use the front waistband as a pattern to cut out a piece of interfacing the same size, then iron or sew the interfacing to the front waistband.


    Note: the 5-inch width of the waistband pieces will result in a final 2-inch tall waistband (once it is folded over with 1/2 inch seam allowances). If you want a shorter or taller waistband you can adjust the width when cutting.


    Fold the red waistband pieces in half lengthwise and iron to mark a crease down the center.


    Cut circles and ovals out of your white fabric in a variety of sizes from 3-5 inches wide. These will become the mushroom spots. The number of spots depends on personal preference and the size of your spots and skirt, but for reference, I have 28 total on my skirt.


    Pin the mushroom spots onto both the front and back skirt panels in a scattered, random pattern. Leave enough room at the top, bottom, and sides for seam allowance and hemming. (There are half inch seam allowances on the side and top, and you will want the bottom 2 inches free).


    Use your machine's appliqué stitch (shown below on my Skyline S9) to attach all the spots to your skirt panels. (If you do not have an appliqué stitch on your machine model you can use a zigzag stitch but it is recommended you use a white fabric not prone to fraying). If you are using the appliqué stitch start with your needle just outside the mushroom spots.


    Sew up the side seams and press open flat.


    ATTACHING THE BACK WAISTBAND:


    Sew the WRONG side of the back skirt panel to the RIGHT side of the back waistband with a 1/2 inch seam allowance. (This means you will start by putting one of the long edges of the waistband against the top inside edge of the skirt). You should have the ends of the waistband extend slightly past the seam. Sew down the long edge then flip up the waistband up, creating a clean finish on the inside of the skirt.


    Using the ironed center crease to help you, fold half of the waistband over towards the outside of the skirt, then tuck under the seam allowance.


    Pin down the edge of the waistband on the outside of the skirt and topstitch. You will now have a channel to thread your elastic through.


    Cut a piece of elastic the same length as what your final back waistband will be. (This is half your waist measurement plus another inch, for 1/2 inch seam allowance on each end). I used a 1-inch wide piece of elastic to reduce bulk, but you can use up to 2 inches wide if preferred.


    Insert the elastic through the back waistband channel, which will cause the waistband to gather up. (A tip: Use a safety pin to anchor one end of the elastic to the waistband so it doesn't get lost as you use a second closed safety pin attached to the other end of the elastic to thread it through the channel).


    Securely stitch down each end of the elastic inside the waistband channel.


    ATTACHING THE FRONT WAISTBAND:


    Gather the front skirt panel across the top edge into a final width equal to half your waist size. To do this, sew 2 rows of straight stitches 1/4" apart, then pull both threads at the same time to gather the skirt into the desired width.


    Attach the front waistband in a similar manner to the back waistband by first sewing the WRONG side of the skirt panel to the RIGHT side of the waistband. Make sure the ends of the front waistband (with the seam allowance folded over) overlaps the raw edges of the back waistband. Flip up the waistband and turn your skirt over to look at the outside.


    Similar to the method used for the back waistband, flip half of the front waistband over to the outside front of the skirt, tuck in the raw seam allowance, and pin down, covering the gathered portion.


    Top-stitch the front waistband along the bottom edge and the sides where it meets the back waistband. Also top-stitch across the top edge of the entire top front/back waistbands of the skirt.


    ADDING TRIM:


    To mimic the gills of the mushroom you'll want to add trim to the hem of the skirt. I've used a pleated chiffon trim but you can also use lace or a plain white fabric ruffle.


    Measure the bottom circumference of your skirt. You will need to cut some trim the same length plus an extra inch for seam allowance. Sew the ends of the trim together to make a big circle. Pin the top edge of the trim UPSIDE DOWN to the hem of the skirt.


    Remove the original pins as you fold the bottom up, then over again, to cover all raw edges and re-pin. Stitch where the pins indicate.


    Press the hem flat. If your trim is sheer you'll want to press the red fabric upwards behind the main skirt panel so that it doesn't hang down behind the trim. (This folded hem is to add a little extra body to the hem of the skirt. If you prefer, you can also serge the trim to the skirt but should shorten the panels and trim accordingly).


    Enjoy your mushroom skirt!


  • 7/6/2021

    Save time and have more quilts finished by machine binding your quilt! Janome Maker Melanie Call from Machine Binding Tutorial with Janome M7! 


    A close-up of a map

Description automatically generated with low confidence


    Hello Janome Friends! I'm Melanie from A Bit of Scrap Stuff (Blog or Instagram) and today I'm sharing my favorite technique for machine binding! 


    I absolutely love machine binding my quilts, pillows, and projects because it is durable, quick, and looks fabulous! This is how I bind 99.999999% of all of my projects. It is the way ;). 

    Ready to Learn: Machine Binding

    *I'm sewing on a Janome M7 - so your Janome sewing machine screen/controls may look a bit different.


    Supplies:

    A picture containing text, appliance

Description automatically generated


    Step 1: Make Binding

    • If multiple strips of fabric are needed - sew 2.5"binding strips together on the bias to make 1 long binding strip. Sewing strips together on the diagonal (bias) creates fewer bulky seams.

    • Janome M7 settings. A foot, straight stitch, 1.8 stitch length *May also use Dual Feed Holder with UD Foot (walking foot) if preferred

    Text

Description automatically generated with medium confidence

    • Place left binding strip right side up. Then place the next binding strip perpendicular right sides together Draw a diagonal line on the wrong side of the top fabric as shown below.

    Qr code

Description automatically generated with low confidence

    • Stitch along a drawn diagonal line. Trim 1/4" away from the sewn line. Hint- make sure you have sewn your binding strips correctly together before trimming.


    • Press binding strip in half (wrong sides together). The binding strip will measure 1.25" in width when folded wrong sides together

    A picture containing indoor, footwear

Description automatically generated


    Step 2: Attach Binding to BACK of quilt/pillow/project

    • Attach Dual Feed Foot Holder (walking foot) with 1/4" OD foot attached (top foot in photo). Needle position 1/4", Stitch Length 2.0, and activate Dual Feed button on screen (highlighted in yellow in photo below). I prefer to use my Dual Feed Foot for attaching binding as the machine is sewing through multiple layers (quilt top, batting, quilt backing, plus double-fold binding).

    A picture containing text, appliance

Description automatically generated


    A picture containing text, indoor

Description automatically generated


    • Starting about 6" from the end of the binding tail, place binding on BACK of project. Line up raw edges of binding and raw edges of the project. Attach/Sew with 1/4" seam allowance until you are about 3" from the corner.

    A picture containing indoor, appliance

Description automatically generated


    • Mitering Corner of Binding. Draw a line 1/4" from edge of project. Continue sewing until you reach the drawn line. Back Stitch. Stitch off the project at a 45-degree angle (see yellow arrow below) - this helps with the next step. Cut thread and remove the quilt from the machine.

    A picture containing text

Description automatically generated


    A picture containing text, fabric

Description automatically generated

    Fold binding upwards so edge of binding aligns with edge of project and stitched line from previous step when you stitched off the project at a diagonal to the corner.


    • Fold binding down so the folded edge of binding aligns with the raw edge of the project. Attach a wonder clip to hold the binding in position. Begin stitching 1/4" from the edge of the project. Backstitch. Repeat at all corners to miter.

    A picture containing text, fabric

Description automatically generated


    • Stop stitching about 10" from the beginning. 

    A picture containing text

Description automatically generated


    • Overlap binding tails by 2 3/8". Draw a line and cut on the drawn line. I find a 2 3/8" overlap makes my binding fit best. Traditionally the overlap would be 2 1/2" since that is the original width of the binding.

    A picture containing text, fabric

Description automatically generated


    • Sew 2.5"binding tails together on the bias. Unfold binding tails. Place fabric on the left-right side up. Then place other binding tail perpendicular right sides together. Draw a diagonal line on the wrong side of the top fabric as shown below. Sewing binding tails on the diagonal (bias) reduces seam bulk.

    A picture containing fabric, gift wrapping

Description automatically generated


    • Stitch along a drawn diagonal line. Refold binding and check that your binding is the correct size THEN trim 1/4" away from the sewn line. Finish attaching binding with 1/4" seam. Backstitch over beginning stitches to secure start/stop.

    A picture containing fabric

Description automatically generated


    A picture containing text, fabric

Description automatically generated


    Step 3: Stitch Binding to FRONT of Project


    • Change to Dual Feed Open Toe UD Foot, Dual Feed Key selected, Needle Position Center, and Stitch Length 2.0

    A picture containing text, indoor, screenshot, several

Description automatically generated


    • Wrap binding to the front of the project and secure with wonder clips. Bring up the bobbin thread before stitching to prevent thread knot on the back of the project. Stitch 1/8" away from the folded edge of the binding.

    A person standing next to a machine

Description automatically generated with low confidence


    • Continue stitching until about 3" away from the corner. Fold binding on the unstitched side up and hold down. Then fold binding from the stitched side over the project to create a mitered corner. 

    A picture containing indoor, decorated

Description automatically generated


    A close-up of a computer keyboard

Description automatically generated with low confidence


    • Stitch to corner. Raise presser foot (leave the needle in DOWN position). Rotate project. Lower presser foot and continue stitching down the binding. Repeat for all mitered corners. Backstitch over beginning stitches to secure. 

    A picture containing appliance

Description automatically generated


    A picture containing fabric

Description automatically generated


    Congratulations your project is now bound and ready to be loved!


    A picture containing text, fabric

Description automatically generated


    Tutorials are available for Oh Happy Day Pillow front (HERE) and attaching an exposed zipper for pillow backing (HERE)


    A picture containing indoor, decorated

Description automatically generated


    Be sure to follow me for more sewing fun and more examples of machine binding! A Bit of Scrap Stuff Blog (here) or Instagram (here).


    Happy Sewing!
    Melanie Call


Prev ... 11 12 13 14 15 16 17 18 19 20  ... Next 

Tags

#freesewingtutorial 4th of July Applique Block of the Month Bunny Carolina Oneto Christmas Continental M7 Cosplay Cosplay Tutorial Costume Crafting Decorative Stitches DIY DIY Accessories DIY Father's Day Gift DIY skirt Embroidery Everyday Applique Father's Day Fiesta Weave Lunch Mats Fiesta! Four Fabric Quilted Project Bag Free Bag Pattern Free Pattern Free Quilt Pattern Free Sewing Free Sewing Pattern Free Sewing Tutorial free skirt tutorial Free tutorial Fun Projects Garment Sewing Good Tidings Quilt Along Green Goddess Dress Handmade Gifts Heidi Proffety Historical Costume Tutorial Holiday Sewing Home Decor How To How to Machine Bind How to Make a Quilt How to Make a Quilt. Free Quilt Pattern How to Make Panties How to Quilt How to Sew How to sew a top Janome Janome 9450 Janome AirThread2000D Janome Artisan Janome Artistic Digitizer Janome Conitential M7 Janome Continental M7 Janome HD3000 Janome Maker Janome MamoryCraft 15000 Janome MemoryCraft 15000 Janome MemoryCraft 6700p Janome S9 Janome Sewing Machine Janome Skyline S7 Janome Skyline S9 JanomeHD9 Lifestyle Machine Embroidery Maureen Cracknell MDW Melanie Call Memory Craft 15000 Moon Garden QAYG Quilt Block Mother's Day gift Napkins Patriotic Pattern Pillow Pillows Project QAYG Quilt Block Quilt Quilt As You Go Quilt Block Quilt Block Pattern Quilted Project Bag Quilting Quilting How to Quilt Rainbow Block of the Month Rainbow Quilt Block of the Month Rainbow Quilt BOM Reversible Zippered Pillow Rolled Hem Foot Scrappy Star Pillow Sew Sewing Sewing Machine Sewing Project Sewing Tutorial Skyline S9 SkylineS9 Stuffie Summer Sewing Project The Hype Tutorial Valentine's Day
DEALERS
The TWO Closest Dealers to you are:
196 Boston Post Road , Orange CT, 06477
203-878-1654
19 PUTNAM AVENUE , PORT CHESTER NY, 10573
914-934-2934
Find Additional Dealers