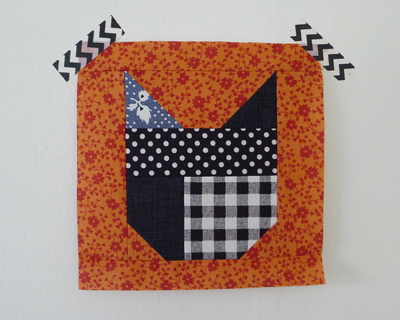
Instructions for a 6" Square: These directions will make a 6” x 6” finished quilt block. The block will measure 6½” x 6½” with seam allowance and 6” x 6” after it is sewn into your project.
![]()
Fabric: for Face and Ears
- A – 1 piece 4” tall x 4½” wide (pieced, if desired)
- B – 2 pieces 2” x 2” each
Background
- C – 1 piece 2” x 4½”
- D – 2 pieces 1½” x 1½” each
- E – 2 pieces 1½” x 5½” each
- F – 2 pieces 1” x 6½” each
Instructions
Step 1: Make the Ears
- With right sides together, place each ear piece B on top of background piece C, aligning the pieces along the outside edges of piece C.
- Use a fabric marker to draw a diagonal line from the upper left to the bottom right corner of the piece B on the left (left ear). Draw a diagonal line from the lower left to the upper right corner of the piece B on the right (right ear).
- Sew along the marked lines to create diagonal seams. Trim away the excess fabric to leave 1/4" seam allowances and press the seams open to finish the ear unit.
![]()
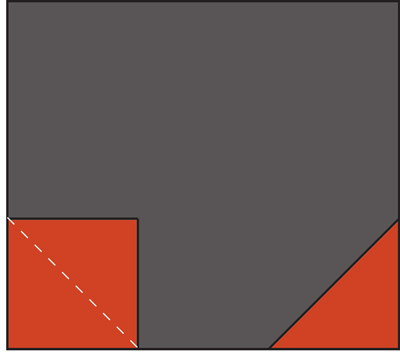
Step 2: Make the Cat Face
- With right sides together, place each background piece D on top of face piece A, aligning the pieces in the lower left and lower right corners of piece A.
- Use a fabric marker to draw a diagonal line from the upper left to the bottom right corner of the piece D on the left. Draw a diagonal line from the lower left to the upper right corner of the piece D on the right.
- Sew along the marked lines to create diagonal seams. Trim away the excess fabric to leave 1/4" seam allowances and press the seams open to finish the face unit.
![]()
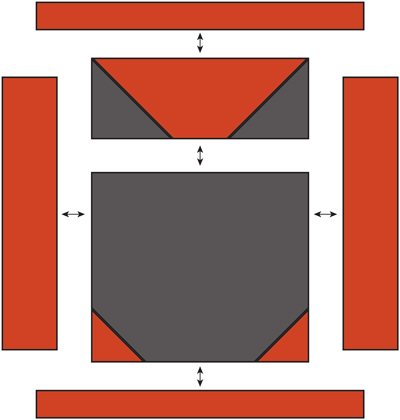
Step 3: Finish the Block
- Sew the ear unit to the top of the face unit.
- Sew 1 background piece E to the left and 1 piece E to the right side of the block.
- Sew 1 background piece F to the top and 1 piece F to the bottom of the block.
Instructions to me a 20" Block : These directions will make a block that measures 21” x 21” unfinished (including seam allowances). If you use the block to make a quilted pillow cover, as I did, use a 1/2" seam allowance to sew together the front and back, leaving a 20” x 20” finished pillow cover.
If you decide to use the large block in a quilt, you may wish to trim the block to 20½” x 20½” before sewing it into your project using a 1/4" seam allowance. Doing so will result in a 20” x 20” finished quilt block.
![]()
Fabric for Faces and Ears
For each of the 10 cats, you will need:
- 1 face piece A, 4” tall x 4½” wide (pieced, if desired)
- 2 ear piece B, 2” x 2” each
Fabric for Background
1/2 yard of neutral solid fabric at least 43” wide, cut as follows:
Cut 1 strip 5½” x width of fabric. Subcut into:
- 4 piece H, 3¾ ” x 5½” each
- 7 piece G, 1½” x 5½” each
- 2 piece I, 1¼” x 5½” each
Cut 1 strip 4½” x width of fabric. Subcut into:
- 10 piece C, 2” x 4½” each
- 20 piece D, 1½” x 1½” each
Cut 1 strip 2¼” x width of fabric. Subcut into:
- 2 piece K, 2¼” x 21” each
Cut 1 strip 1½” x width of fabric. Subcut into:
- 2 piece J, 1½” x 21” each
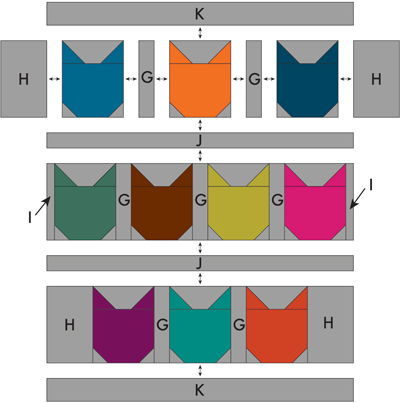
![]()
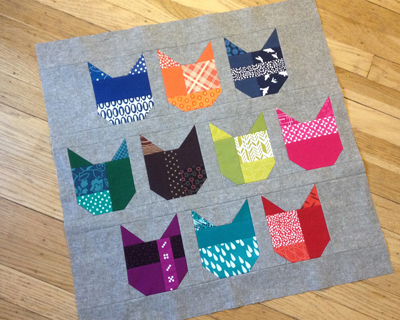
Making the Block
Step 1: Make the Cats
- Refer to the directions for making the 6” block to make 10 pieced cats, omitting the background pieces E and F described in Step 3.
Step 2: Finish the Block
- Refer to the diagram above to arrange the cats in 3 rows, with 3 cats in Rows 1 and 2, and 4 cats in Row 2. Sew together the cats in each row, sewing a background piece G between each cat, as shown in the diagram.
- Sew 1 background piece H to the left side and 1 piece H to the right side of Rows 1 and 3. Sew 1 background piece I to the left side and 1 piece I to the right side of Row 2.
- Sew together the 3 rows, sewing a background piece J between each row, as shown in the diagram. Sew 1 background piece K to the top and 1 piece K to the bottom to finish the block.
Using the Block to Make a Pillow Cover
This block can be used to make a cover for a 20” x 20” pillow form using your preferred quilting and finishing techniques and sewing the front and back of the pillow cover together using a 1/2" seam allowance.