Projects

Moon Garden QAYG Quilt Block

Created By:

Maureen Cracknell

Skill Level: Beginner

How to make a Moon Garden quilt block using Quilt As You Go!

This Moon Garden quilt block is made with the quilt as you go technique. Using your Janome sewing machine and cotton quilt batting as the foundation, as each block is pieced together, the batting is attached and quilting is added "as you go." The pattern itself is a fun play on the traditional log cabin style quilt block, with an on-point twist, inspired by the prints and colors in my Designer's Palette for Art Gallery Fabrics that are featured in this tutorial. Let's get started!

Janome Supplies Required
Materials List:
  • Janome Sewing Machine (Horizon Quilt Maker Memory Craft 15000)
  • Walking foot (optional)
  • Fabric -- a mix of ten prints/solids (Half Yard Maureen Cracknell Designer's Palette for AGF)
  • Cotton quilt batting measuring 13" square or larger (Hobbs Tuscany Supreme 100% Unbleached Cotton) 
  • Neutral thread (Aurifil 50wt 2021 Natural White)
  • Scissors or rotary cutter/mat
  • Iron (optional)
Moon Garden QAYG Quilt Block Supplies

Moon Garden Block Fabric Diagram


Instructions

Step 1. Cutting the fabrics: 

  • Fabric 1 -- cut one 3" square
  • Fabric 2 -- cut one 2" x 3" and one 2" x 4.5"
  • Fabric 3 -- cut one 2" x 4.5" and one 2" x 6"
  • Fabric 4 -- cut one 2" x 6" and one 2" x 7.5"
  • Fabric 5 -- cut one 2" x 7.5" and one 2" x 9"
  • Fabric 6 -- cut two 2" x 9"
  • Fabric 7 -- cut two 2" x 9"
  • Fabric 8 -- cut one 2" x 6" and one 2" x 7.5"
  • Fabric 9 -- cut one 2" x 6" and one 2" x 7.5"
  • Fabric 10 -- cut four 2.5" x 3"
Cutting 1

Step 2. Quilt Block Assembly:

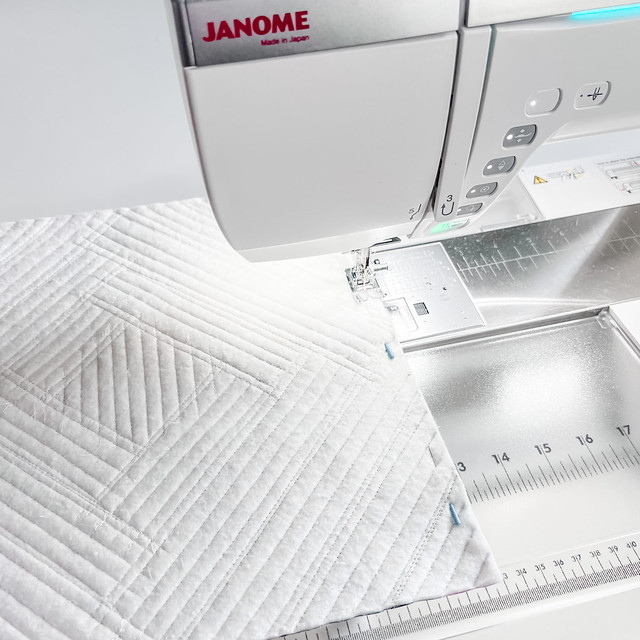
Begin by setting the Utility straight stitch on your Janome at 4.5 width (standard on my machine) and a length of 3.0.

Set Janome Stitch Length

Next, prepare the 100% cotton batting square and be sure it measures a 13" square or larger. Use a mat, ruler and pen, or fold to finger press a crease, to mark the center of the batting square.

Step 1

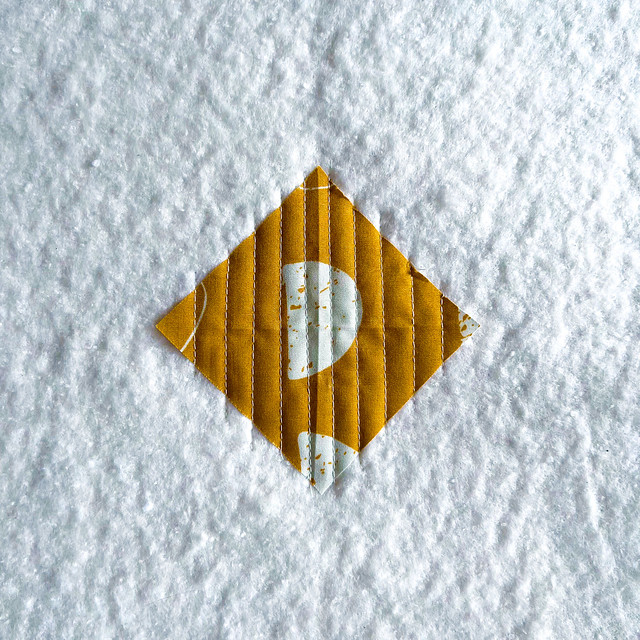
Place the 3" square of fabric at the center of the batting square, crease the fabric piece if needed to match up with the batting center. Pin fabric in place.

Step 1a

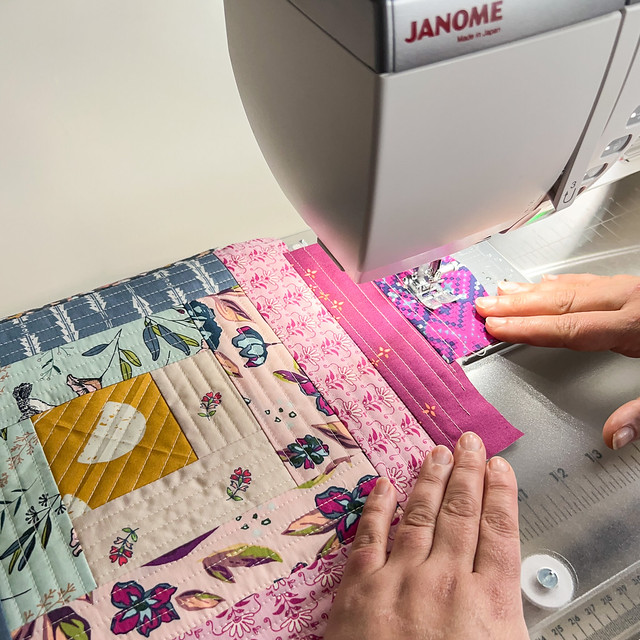
Using your Janome sewing machine, sew straight lines spaced 1/4" to 1/2" apart to quilt to attach the center fabric to the batting.

Step 1b

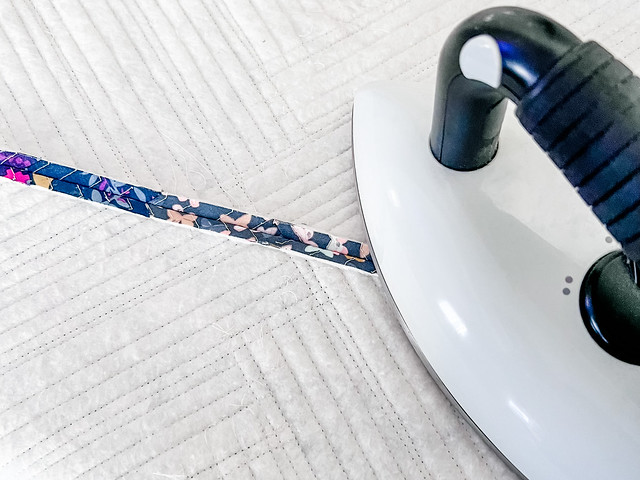
Next place the Fabric 2 piece measuring 2" x 3" on top of the center fabric with right sides together, matching raw edges. Attach the piece using a 1/4" seam, flip and use iron or simply finger press open. Again, sew straight lines spaced 1/4" to 1/2" apart to quilt to attach that fabric to the batting.

Step 2

Step 2c

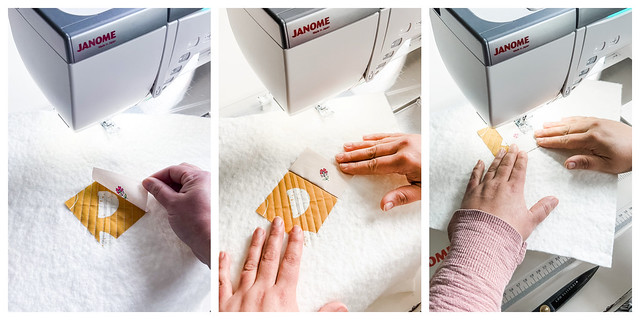
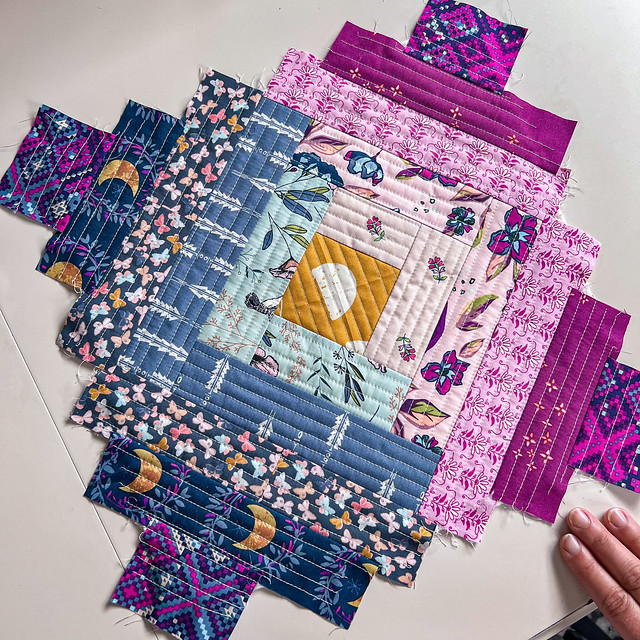
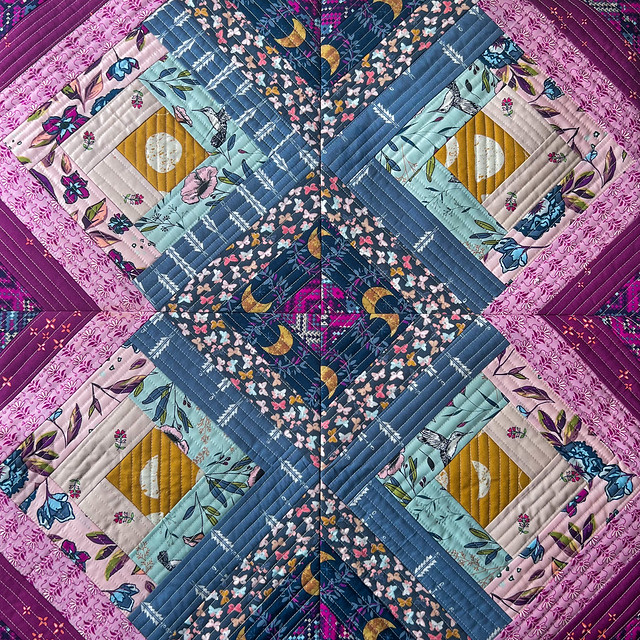
Following the fabric diagram and photos below, continue to add the next fabric in the same way, working your way continuously around the center square. Stitch, flip and finger press or iron press open each fabric. Keep consistent straight stitch quilting as you work your way around, adding each fabric piece to reach the outer corners of the batting square. Keeping a consistent 1/4" seam allowance as you add each fabric piece is also the key to create uniform blocks.

Moon Garden Block Fabric Diagram

Piecing Steps

Step 3

Piecing Step Continued

Piecing Step Finished

Piecing step

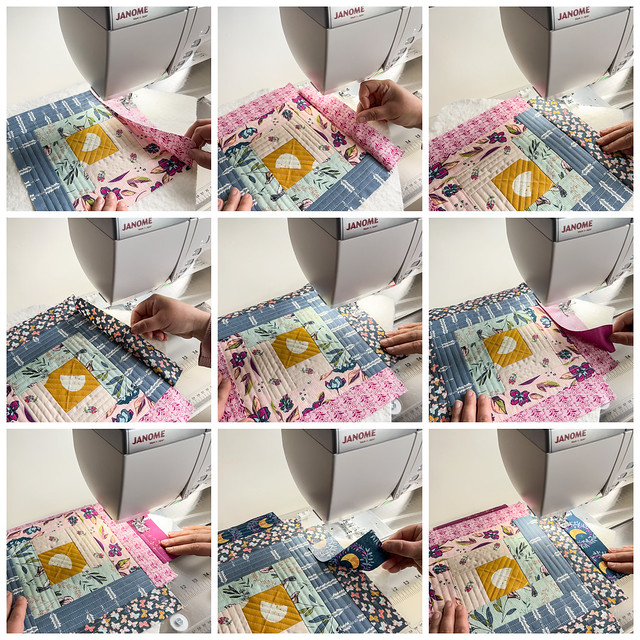
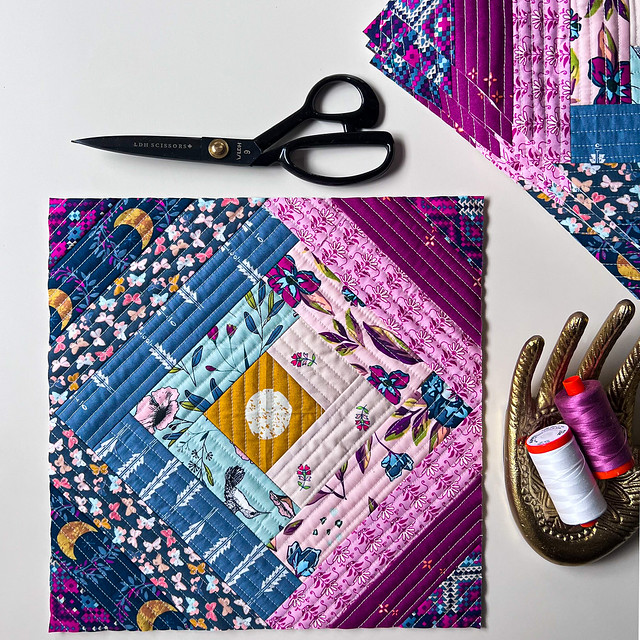
Now that your Moon Garden block is complete, and the batting completely covered with the fabric pieces, it's time to square it up and cut away the excess fabric and batting.

Finished Pieced Block before Trimming

Step 3. Trimming the Quilt Block:

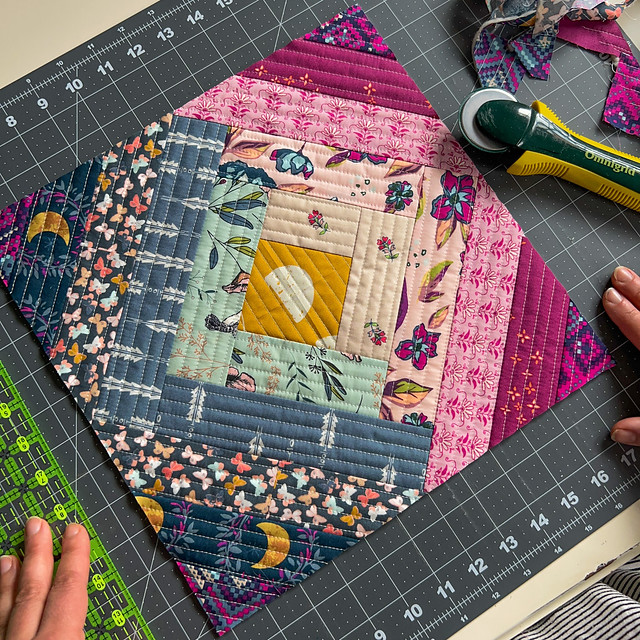
Begin trimming by centering the block on a cutting mat using a ruler to line up the center of the quilt block with the center of the mat. This block will be trimmed to measure 12.5" square.

Block Centered

First, measure 6 1/4" from the center of the block to one edge and use a ruler and rotary cutter to trim away excess from that side. Repeat, measuring 6 1/4" from the center to the opposite side now and trim. Next, rotate the block and center again to trim up the two remaining sides. Use ruler and rotary cutter again to trim away the excess, measuring 6 1/4" from the center to trim one side and then the other, for a squared up block that measures 12.5".

Trimming Step

Moon Garden Block Trimmed

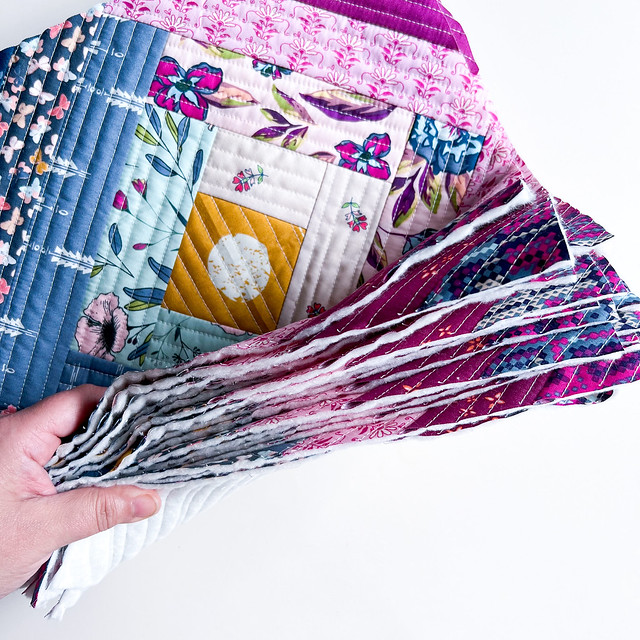
Now that the first Moon Garden QAYG Quilt Block is finished, you can turn it into a pillow, bag, whatever your creative heart desires, or of course you can keep on going to make as many as you'd like to create any quilt size you wish!
Step 4. Tips for Making a Moon Garden Quilt:

Moon Garden QAYG Quilt Blocks

Twenty Blocks

When these 12.5" blocks are joined together to additional blocks, they finish at a 12" square. 
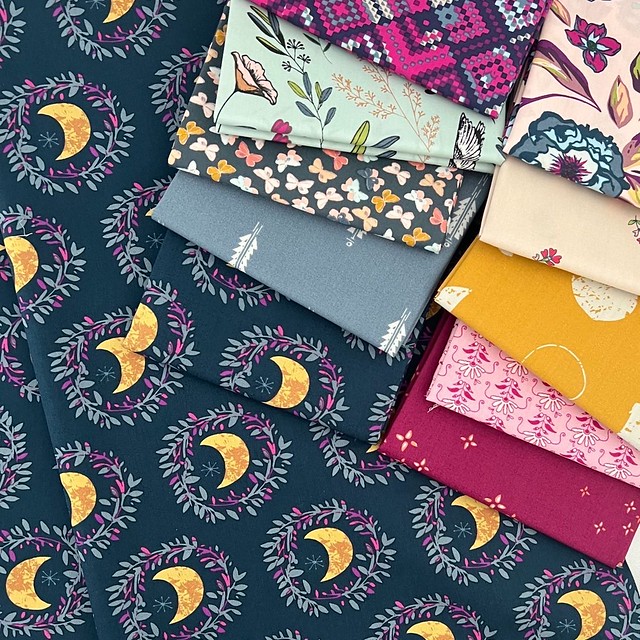
I'm using a half yard bundle of the ten prints included in the Maureen Cracknell Designer's Palette for Art Gallery Fabrics which will yield a twenty-block, throw size Moon Garden Quilt that finishes at 48" x 60." 
Note: To make a larger quilt with more than twenty Moon Garden blocks, more than a 1/2 yard of fabrics 6 and 7 will be needed.

Moon Garden Quilt Kit available at Lady Belle Fabric

Using the twenty-block 4 x 5 layout, there are two different quilt looks you can achieve using this layout depending on which way you choose to orient the Moon Garden blocks.

Moon Garden QAYG Quilt Layout Options

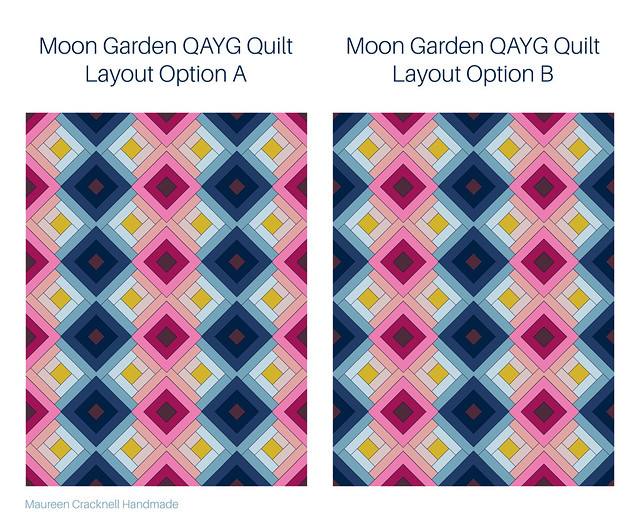
I'll be using Option A to finish my quilt, with the pink and purple palette fabrics meeting in the middle and on both sides of the quilt.

Moon Garden Quilt Blocks

Tips for finishing: 

To join the qayg blocks, place two quilted quilt blocks right sides together, matching up all ends and pin in place.

Pin Blocks Together

Sew along one outer edge using a 1/4" seam allowance to attach.

Sew Blocks Together

Using a hot iron with steam, press the seams open to reduce any the bulk.

Press Seams Open

Continue sewing together the qayg quilt blocks, pressing all seams open as you go.

Sew Together Blocks

Four Moon Garden Blocks Together

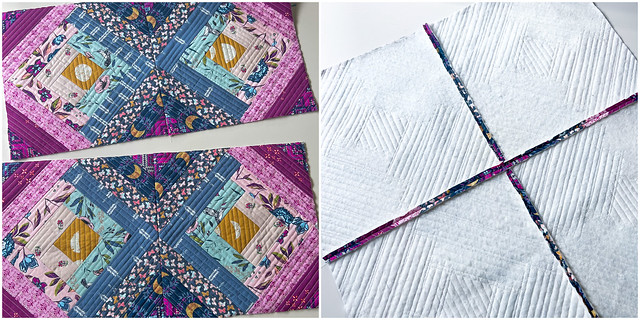
When it comes time for finishing the quilt, start by pin or spray basting the finished qayg quilt top to the backing fabric. Again using the straight stitch with length set at 3.0, simply stitch your way down from the top of the quilt to the bottom, sewing about 1/4" to 1/2" from one side of the seam line created from where the quilt blocks have been joined. This begins attaching the qayg quilt top layer to the quilt backing layer.

Final Quilting

Next, repeat this step stitching 1/4" to 1/2" along the other side of the seam line, again stitching from top to bottom. Once this minimal quilting is added from top to bottom, rotate the quilt layers and now stitch from one side to the other, stitching 1/4" to 1/2" along both sides of the seam line again. When finished, this creates a neat double stitch square grid like pattern on the backside of the finished quilt.

You can also finish the quilt using minimal hand quilting or traditional quilt tying to attach the qayg quilt top to the quilt backing layer.

Just as with any quilt, once the layers are fully attached, trim away any excess quilt backing fabric and bind to finish!

Moon Garden QAYG Quilt Block

I hope you enjoy this Moon Garden QAYG Quilt Block Tutorial!
Everyone is Talking about Moon Garden QAYG Quilt Block
Reviews


Tako
Beautiful
Wednesday, November 23, 2016

cpindzola
Around the Table Dresden Placemats
Saturday, December 17, 2016

I like the concept, but the directions are "sloppy." Nowhere in the supply list does it mention the felt or the batting (how much?). Also, I would never use a high loft batting in a placemat, or a table runner, as I think that it would be too unstable for a glass. The next time I make these, I will cut out the batting (I use flannel) and spray baste it to the wrong side of the Dresden plate before I put the Dresden plate on the felt to cut out. I have not yet washed the finished placemat, and am hoping that the single layer of felt does not curl up, or become distorted after washing/drying.
Txmaid
Fun Great Gift!
Tuesday, February 21, 2017

MargieARK
Teatime Quilted Tablecloth
Friday, February 24, 2017

I made this today but your cutting directions need to be changed. You only need 4 of color 1 and color 3 4.5 squares for the triangles. Also the inner border, you only need 2 cuts as WOF is long enough to cut each in half to fit the sides.
MickelSews
Great Machine
Wednesday, August 30, 2017

I've had this machine for only a week now. I bought it used from a lady who makes her own clothes, but she no longer needed the machine. During the purchase, she noted that she is almost sad that it's better to give it away because of how well the machine performed. (I also bought it along side a computerized machine of another brand.} She demoed the machine for us, showing it worked and gave us everything (including the box it came in!) She took amazing care of this machine. I have used it a few times now, and the directions for threading were easy to follow (albeit my hands are quite large so the lower looper was a pain, but that is no fault to the machine or brand.) And I recommend this machine to anyone who wants to learn to serge and wants a machine that can grow with them. I will happily use this machine time and time again.
rvstan
S9 Review
Sunday, February 25, 2018

I love, love, love my S9! It's sews and embroiders beautifully and it's simplicity of use amazes me. I would recommend this machine for both a beginner and an experienced seamstress. If I would ask anything of Janome it would be to upgrade the programming to run a larger hoop size. I understand that it can't get much wider but there is most definitely room for it to go longer. That is the only limitation of this machine.
pjmnana
PJMNana
Monday, February 26, 2018

I purchased a Memorycraft 15000 a few years ago and it was the best purchase I ever made! This machine can do just about anything you would would ever want! I love the capability of using the Acuedit app to set up my embroidery pattern on my Ipad and then download it to the machine! I love how my embroidery looks upon completion and I love all the good lighting it has to light up your workspace. That way you don’t need to worry about where to set up your machine. It also has plenty of room to do machine embroidery on any size quilts! There are many decorative stitches from which to choose that are outstanding! It’s hard to choose which one to use! There are so many great features it is hard to decide what I love the most. If you want to buy only one machine to last a lifetime, I would recommend this one!
KLWash
S9 Review
Sunday, February 24, 2019

The S9 is amazing. I learned to sew by hand when I was just 5 and in my grandmothers way as she was quilting. I took seeing classes in high school until they would no longer let me sign up. The S9 makes me appreciate my current skills as well as motivate me to want to learn more. This machine is awesome.
SewSueMe2002
Horizon Memory Craft 15000
Thursday, November 19, 2020

My Janome Horizon Memory Craft 15000 is fantastic! I love, love, love this machine! When I came across the Eye for and Eye embroidery design today, I wanted to make it. However, the embroidery file is missing. Nothing downloads when I select the download button. Please help!
Jillfmischo
Treat Bag fun!
Monday, August 16, 2021

I made the Halloween treat bag for my new granddaughter and I’m sure it will last for years. No embroidery machine so I appliquéd the lettering. Need a little more skirt fabric for a better gathered look, and I used thin double-bias tape for the skirt hem, over edge stitch on skirt sides. I’m pleased with my results!
elenaz
Very helpful tutorial
Wednesday, October 25, 2023

I want to say thank you for teaching me this method of applique. I was able to do it with a small letters. This method is the best so far from all of those I've seen and tried.
plonkar
So useful
Thursday, November 30, 2023

I'd like to express my gratitude for teaching me this appliqué method. I successfully applied it with small letters, and, so far, it's the most effective among all the methods I've seen and tried.

DEALERS
The TWO Closest Dealers to you are:
1900 CENTRE ST , WEST ROXBURY MA, 02132
(617)323-6200
443 MOODY STREET , WALTHAM MA, 02453
781-893-3331
Find Additional Dealers