By: Danielle Amato
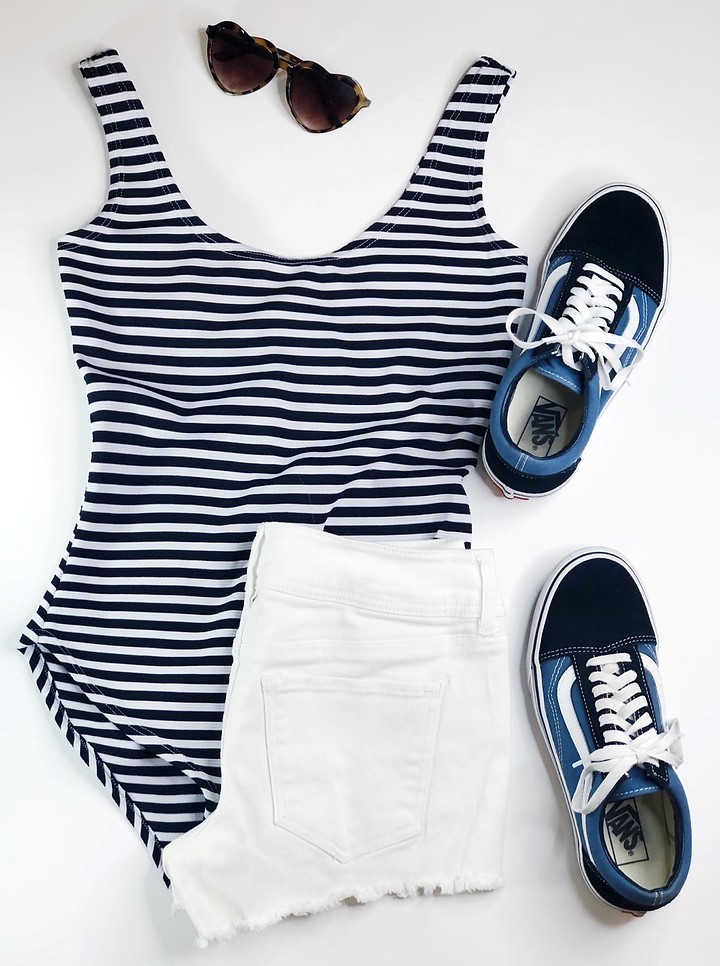
So I've had this nautical striped interlock knit fabric sitting in my fabric cabinet for who knows low long. Every time I opened the cabinet, it would remind me that it was dying to be turned into some kind of nautical/beach-y/summer-y garment. So- no time like the present right?
I gave myself the time I needed to get back into what it felt like to be in design school again and let myself drape the fabric on my dress form. It felt so good to be creating something again all based on my own judgements of how the fabric fit on the dress form.
While draping a bodysuit may not be the peak of creativity, it reenergized me to want to get back into it, and do bigger and better things.
If you are new to draping, draping with knit fabric is a great place to start because it is very forgiving when it comes to fit and silhouette and you don't always need to worry about anything too technical such as darts (unless you want them in your design).
And if you'd like to make your life even EASIER, I suggest using the Janome Airthread 2000D. It is the easiest thing to thread and makes sewing with knits a complete breeze. I love Janome machines with all of my heart and soul, so this one is a must.
PREPARATION OF FABRIC:
You want to make sure that your cross grain is running horizontal to the body (this direction will typically have the most stretch).
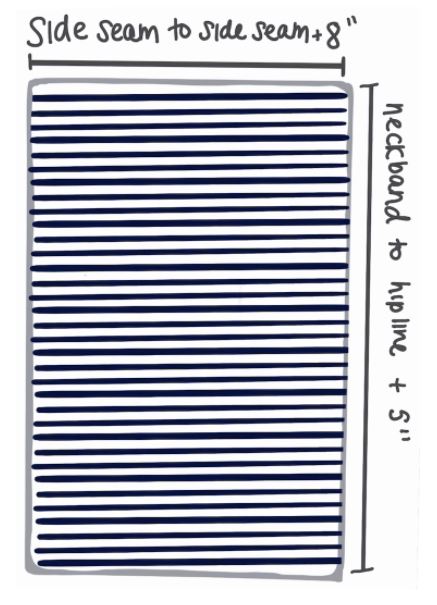
You will need two pieces of fabric, front and back.
-The length will be the measurement from the neck band to the hipline, plus 5 inches.
-The width will be the fill width across the front (from side seam to side seam at hipline), plus 8 inches.
Find the center front and center back of each piece by folding them in half. I folded my pieces in half and pressed them to make a crease down the center so I didn't have to make any marks on my fabric.
DRAPING STEPS:
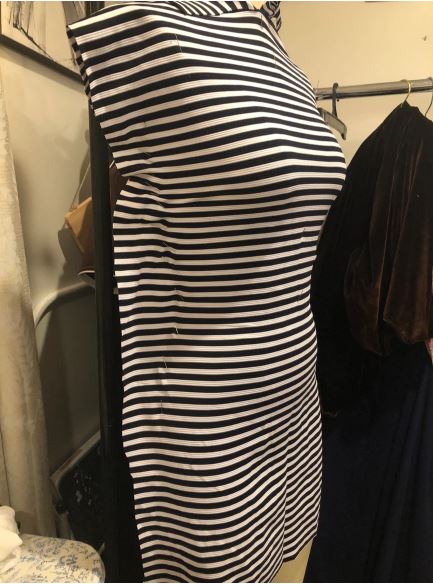
- Pin the front piece to the dress form along center front with your centered crease line.
- Smooth the fabric across the chest up to the shoulder and pin.
- Smooth the fabric across the armhole and to the side and pin. You will want to add a little tension by stretching the fabric against the dress form to ensure a snug fit.
- As you get to the waist, you will notice that you have to "force" the fabric a bit to get it to fit tight to the waist. This is okay!
- Continue to smooth and fit the fabric down to the hipline.
- To get the fabric to lay flat along the shoulders, you may have to slash the top of the fabric at the neck to release some of the tension.

- Once you have your fabric fitted smoothly to the dress form, you can begin marking the side seams and armholes. You can also cut away excess fabric, but be sure to leave enough to add your seam allowance.
- You can begin to cut away some of the extra fabric towards the bottom to start shaping the crotch of the bodysuit. Remember to leave enough fabric to add seam allowance. I left 5/8" at the crotch to fold over and stitch as my placement for the snaps.
You can start marking your neckline to any shape you'd like. I went with a low scoop neck (not pictured here). Mark your desired neckline, and remember as you cut away excess fabric, leave enough for seam allowance. I used a 5/8" hem with a twin stretch needle to finish my neckline, so I made sure to leave 5/8" seam allowance. (I used 5/8" seam allowance for everything to keep it simple and easy).

Repeat these steps for the back piece.
~For a symmetrical fit~
Mark one side of your dress form completely and accurately. You can then take the fabric off of the dress form, and fold along that center front/center back crease that you made, and trace the marked side onto the opposite side.
You can see in this photo that I have my back piece folded down the center back, and I cut both halves to match.
Time to break out your serger!!!
SEWING INSTRUCTIONS:
- Stitch front and back right sides together, at shoulders and side seams.
- Fold neckline and armholes in 5/8" and topstitch using a twin stretch needle (on regular sewing machine) for best results.
- Fold each side of the leg openings in 5/8" and topstitch with twin stretch needle.
- Fold the short edges of the crotch opening 5/8" and topstitch with twin stretch needle.
- I used two sew on snaps for the closure. I sewed them towards the outer edges of the crotch opening like you would see on a regular once (lol).
- You're done!!!