Projects

Stitch Sampler Pincushion

Created By:

Annabel Wrigley

Skill Level: Beginner

The perfect stitch reference is also the sweetest pincushion. This is a fun way to create a stitch sampler that is not only useful but also a lovely way to store your pins.

When I was teaching kids sewing classes, one of their most favorite projects was using all the decorative stitches on the machine to make their own special fabric. They would then turn their fabric into little bags, pillows and even the sweetest little bracelets. This got me thinking…….how could we utilize the stitches on our machines to make something sweet but also useful as a stitch reference? A sewing machine stitch sampler!

If you are like me, you may feel a little overwhelmed with all the beautiful decorative stitches on your machine. I sew on the continental M7 and just love the very wide variety of stitches available.

I loved the idea of making something that is super useful, but that also acts as a guide to help me easily see all my favorite stitches in one place instead of having a ton of scrap pieces of fabric that I test on.

I really love to have all my different pins organized for my projects, so a pincushion was the perfect way for me to see the stitches for future projects but also keep everything super organized in my studio.

Janome Supplies Required

. Scrap of fabric, you can make it any size, but only a small piece is required.

. Any kind of sturdy stabilizer, the same size as your fabric piece - I prefer Pellon SF101

. Bright contrasting thread

. Fiber fill stuffing - I prefer fiber fill for this due to its dense, almost steel wool texture

. 4 small pom poms

. The usual suspects of basic sewing supplies.

Instructions
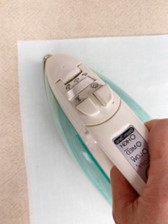
  1. I always recommend stabilizing your fabric prior to playing with the stitches. My go to, especially for pincushions is Pellon SF101. It’s a woven stabilizer with heat activated adhesive on one side and it makes my stitches stay super flat and perfect.

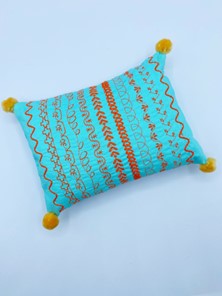
2. Start with a piece of fabric that is larger than your overall pincushion size. i like to complete my stitches and then fold the fabric in half and sew around 3 sides. For example, for a 7 x 5” pincushion, I would cut my piece of fabric to measure 11 x 16”. You can make your pincushion any size you like but I like this size for my abundance of pins!


3. Start by making sure you have a nice fresh needle in your machine. Now is also a good time for a good machine clean out. ( Baby dust bunnies can really affect the look of your stitches)I like to use a microtex super sharp needle for my decorative stitches but you may choose to use a universal needle.


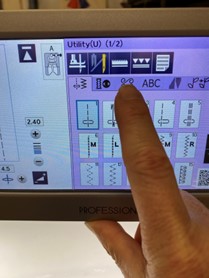
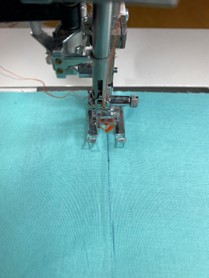
4. Make sure that you have attached the correct foot for these stitches, your machine will show the foot selection on the screen after you have selected the stitch - In most cases it will be F foot.


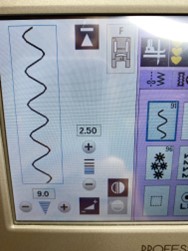
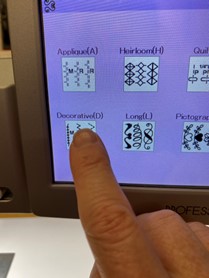
 To select the decorative stitches on the machine, press the decorative stitch button and then  choose your preferred type of decorative stitch, there are so many to choose from.


5. Using an erasable marker, draw a straight line down the center of the fabric piece, I prefer to sew with the stitches running lengthwise. Sew your first line of decorative stitching.

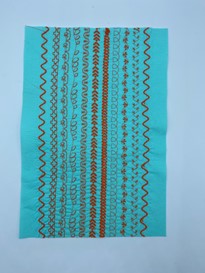
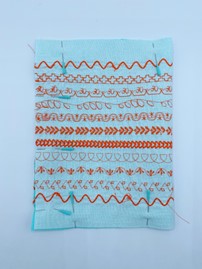
6. Continue sewing lines with all of the stitches that you love until you have completely filled your fabric piece. Try to leave around an inch free on both sides to allow for seam allowance - you don’t want to hide any of those beautiful stitches.

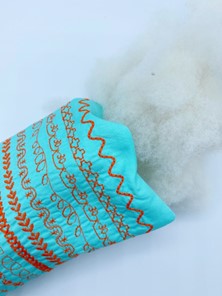
7. Fold your fabric piece in half, with RST, pin and sew around 3 sides, leaving a small hole on one end for stuffing.

8. Turn right side out and stuff with Fiber fill

9. 

Hand sew the hole closed and add some little pom poms if you choose.

 Make one or make a few, they make the most perfect gift for your sewing pals and are also the most simple and fun project for kids. Think of all the cute doll pillows they can make!!

The best part, whenever you are looking for the perfect stitch for your project but are not sure how it will look, you can refer to the pincushion as your guide!

PS, my favorite Continental M7 stitch is number 91!

Everyone is Talking about Stitch Sampler Pincushion
Reviews


Tako
Beautiful
Wednesday, November 23, 2016

cpindzola
Around the Table Dresden Placemats
Saturday, December 17, 2016

I like the concept, but the directions are "sloppy." Nowhere in the supply list does it mention the felt or the batting (how much?). Also, I would never use a high loft batting in a placemat, or a table runner, as I think that it would be too unstable for a glass. The next time I make these, I will cut out the batting (I use flannel) and spray baste it to the wrong side of the Dresden plate before I put the Dresden plate on the felt to cut out. I have not yet washed the finished placemat, and am hoping that the single layer of felt does not curl up, or become distorted after washing/drying.
Txmaid
Fun Great Gift!
Tuesday, February 21, 2017

MargieARK
Teatime Quilted Tablecloth
Friday, February 24, 2017

I made this today but your cutting directions need to be changed. You only need 4 of color 1 and color 3 4.5 squares for the triangles. Also the inner border, you only need 2 cuts as WOF is long enough to cut each in half to fit the sides.
MickelSews
Great Machine
Wednesday, August 30, 2017

I've had this machine for only a week now. I bought it used from a lady who makes her own clothes, but she no longer needed the machine. During the purchase, she noted that she is almost sad that it's better to give it away because of how well the machine performed. (I also bought it along side a computerized machine of another brand.} She demoed the machine for us, showing it worked and gave us everything (including the box it came in!) She took amazing care of this machine. I have used it a few times now, and the directions for threading were easy to follow (albeit my hands are quite large so the lower looper was a pain, but that is no fault to the machine or brand.) And I recommend this machine to anyone who wants to learn to serge and wants a machine that can grow with them. I will happily use this machine time and time again.
rvstan
S9 Review
Sunday, February 25, 2018

I love, love, love my S9! It's sews and embroiders beautifully and it's simplicity of use amazes me. I would recommend this machine for both a beginner and an experienced seamstress. If I would ask anything of Janome it would be to upgrade the programming to run a larger hoop size. I understand that it can't get much wider but there is most definitely room for it to go longer. That is the only limitation of this machine.
pjmnana
PJMNana
Monday, February 26, 2018

I purchased a Memorycraft 15000 a few years ago and it was the best purchase I ever made! This machine can do just about anything you would would ever want! I love the capability of using the Acuedit app to set up my embroidery pattern on my Ipad and then download it to the machine! I love how my embroidery looks upon completion and I love all the good lighting it has to light up your workspace. That way you don’t need to worry about where to set up your machine. It also has plenty of room to do machine embroidery on any size quilts! There are many decorative stitches from which to choose that are outstanding! It’s hard to choose which one to use! There are so many great features it is hard to decide what I love the most. If you want to buy only one machine to last a lifetime, I would recommend this one!
KLWash
S9 Review
Sunday, February 24, 2019

The S9 is amazing. I learned to sew by hand when I was just 5 and in my grandmothers way as she was quilting. I took seeing classes in high school until they would no longer let me sign up. The S9 makes me appreciate my current skills as well as motivate me to want to learn more. This machine is awesome.
SewSueMe2002
Horizon Memory Craft 15000
Thursday, November 19, 2020

My Janome Horizon Memory Craft 15000 is fantastic! I love, love, love this machine! When I came across the Eye for and Eye embroidery design today, I wanted to make it. However, the embroidery file is missing. Nothing downloads when I select the download button. Please help!
Jillfmischo
Treat Bag fun!
Monday, August 16, 2021

I made the Halloween treat bag for my new granddaughter and I’m sure it will last for years. No embroidery machine so I appliquéd the lettering. Need a little more skirt fabric for a better gathered look, and I used thin double-bias tape for the skirt hem, over edge stitch on skirt sides. I’m pleased with my results!
elenaz
Very helpful tutorial
Wednesday, October 25, 2023

I want to say thank you for teaching me this method of applique. I was able to do it with a small letters. This method is the best so far from all of those I've seen and tried.
plonkar
So useful
Thursday, November 30, 2023

I'd like to express my gratitude for teaching me this appliqué method. I successfully applied it with small letters, and, so far, it's the most effective among all the methods I've seen and tried.

DEALERS
The TWO Closest Dealers to you are:
196 Boston Post Road , Orange CT, 06477
203-878-1654
19 PUTNAM AVENUE , PORT CHESTER NY, 10573
914-934-2934
Find Additional Dealers