Projects

Vinyl Project Bag

Created By:

Melanie Call

Skill Level: Intermediate

Hi Janome Friends! It's Melanie from A Bit of Scrap Stuff (Blog) (Instagram). Today I'm sharing a tutorial on making a Vinyl Project Bag. I absolutely love Vinyl Project bags as they are perfect for storing sewing/quilting/cross stitch/ embroidery projects PLUS they are perfect for travel and for kiddos to store all of their treasures.  The vinyl front makes it easy to know what is inside your bag... plus no raw fabric seams!

I will be creating this project on my Janome M7 - which is SEW fabulous! I've been sewing on this machine for almost 3 years and I love how easy it is to use and it stitches beautifully.

Janome Supplies Required

  • 2 Fat Quarters = (1) Bag Front, (1) Bag Back
  • 1/2 Yard = Zipper Fabric, Handle, Binding
  • 14.5" x 14.5" Vinyl (I prefer 16 gauge)
  • 16" Nylon Zipper 
  • 16" x 16" Scrap Batting OR Soft n Stable OR Pellon Fusible Fleece
  • Wonderclips
  • Optional - Wonder Tape 1/4" (double sided adhesive)

* Cookbook Fabric Designed by Lori Holt for Riley Blake Designs

* Zipper by Lori Holt for Riley Blake Designs


Instructions

Tutorial - Vinyl Project Bag 14.5" x 14.5"


Cutting

  • Bag Front (1) 16" x 16"
  • Bag Back (1) 16" x 16"
  • Batting (1) 16" x 16" -  If I want my bag to have a bit more support I will use (2) layers of batting - this makes it similar to Soft n Stable, but I can use my batting scraps 
  • Vinyl (1) 14.5" x 14.5"
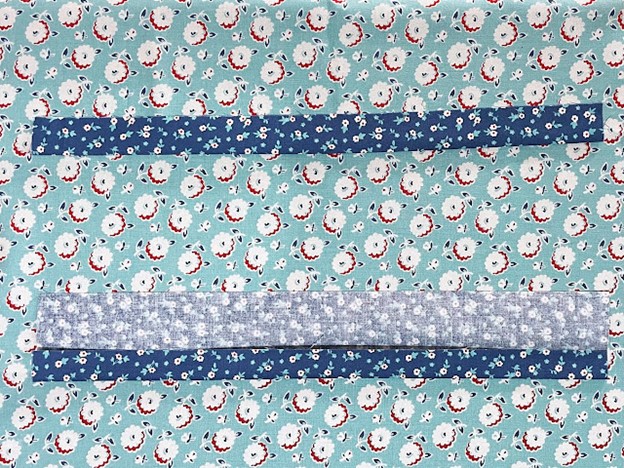
  • Zipper Fabric Bottom (1) 3" x 14.5"
  • Zipper Fabric Top (1) 2" x 14.5"
  • Handle (1) 4" x 9"
  • Binding (2) 2.5" x 40"WOF


Bag Assembly


1. Layer and adhere all 3 layers together. I prefer to use Odif 505 basting spray to hold my layers together.

  • Bag Front Fabric  - right side facing up (TOP)
  • Batting (MIDDLE)
  • Bag Back Fabric - right side facing down (BOTTOM)

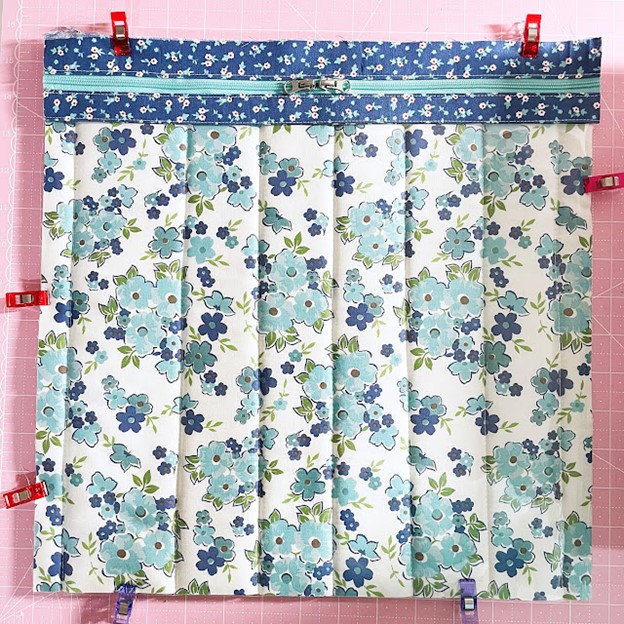
2. Quilt as desired. I chose straight-line quilting 2" apart. I marked my quilting lines using a Hera Marker. I'm using the Janome 9mm AcuFeed Foot with Single Holder with stitch length 3.5.


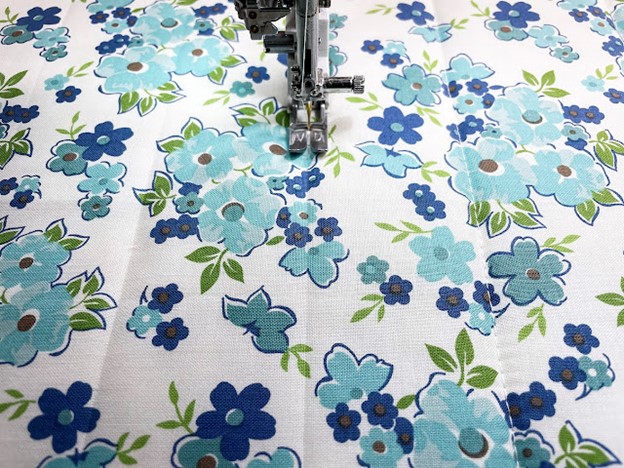
3. TRIM quilted Bag Front/Batting/Bag Back to 14.5" x 14.5"


4.  Make Double Fold Binding  (Zipper Bottom Fabric 3" x 14.5")

  • Iron Fabric in half to create a crease line in center of fabric strip
  • Bring fabric edge to center crease line and press
  • Repeat with other side


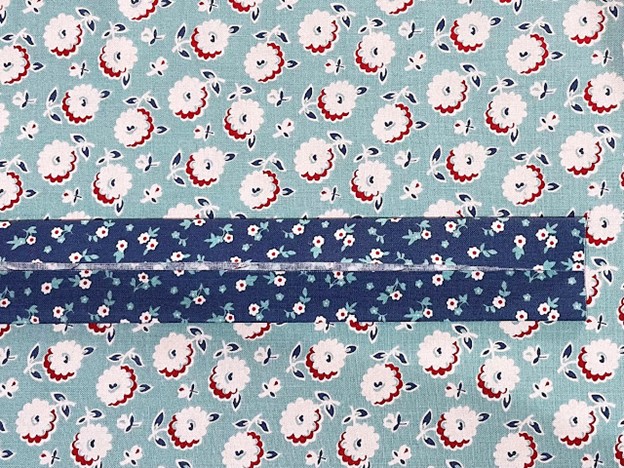
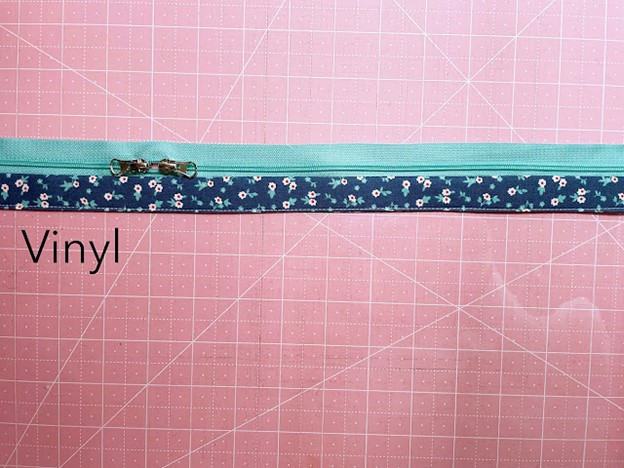
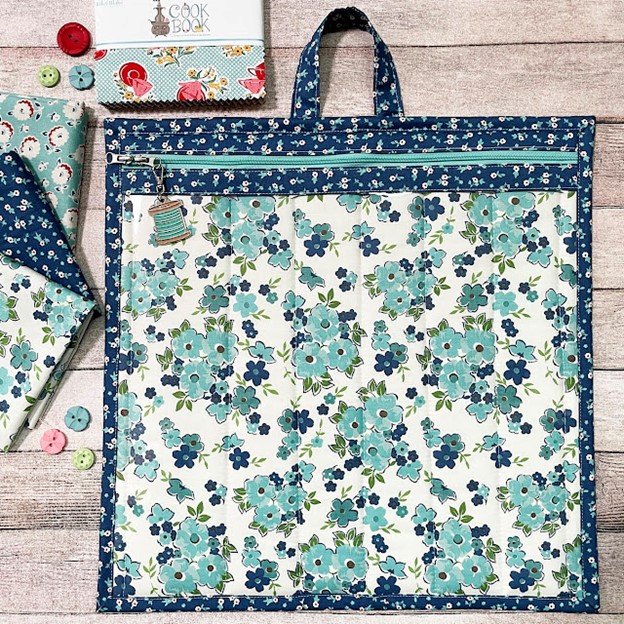
5. Place vinyl into the double fold binding to enclose vinyl edge. Use wonder clips to hold vinyl inside.


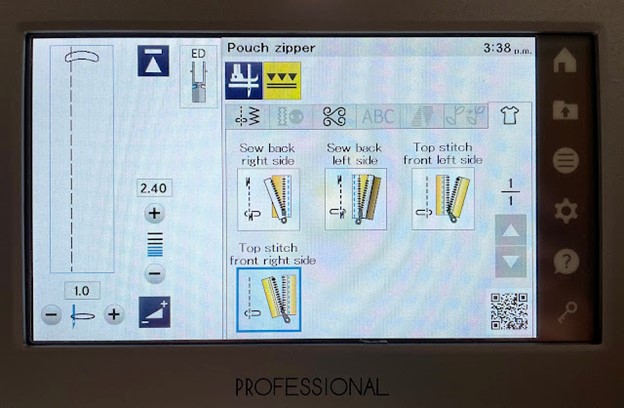
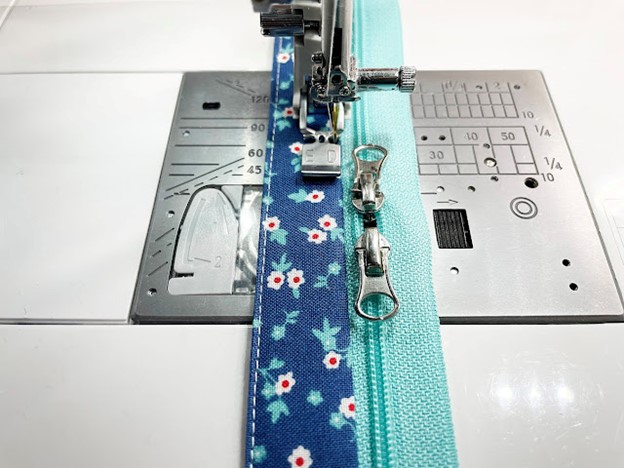
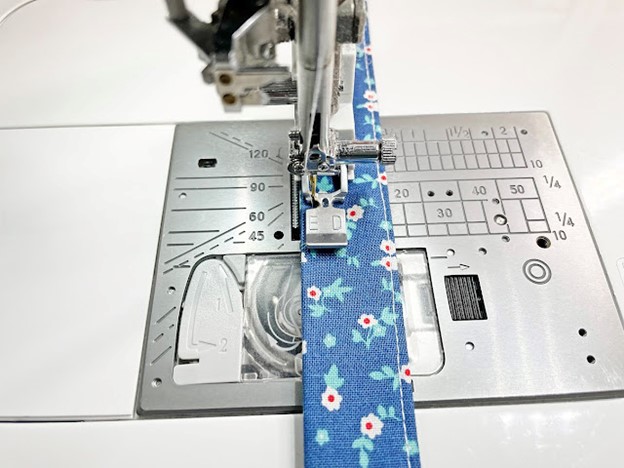
6. Top stitch along fabric edge to secure to vinyl. I like to use the Zipper Foot attachment for the AcuFeed Foot with Single Foot Holder and stitch length 2.4. Screen shot below of Janome M7 screen 


7.  Place Vinyl with Double Fold Binding on top of the bottom of Zipper Tape. I like to use double-sided Wonder Tape to hold the zipper in place. 


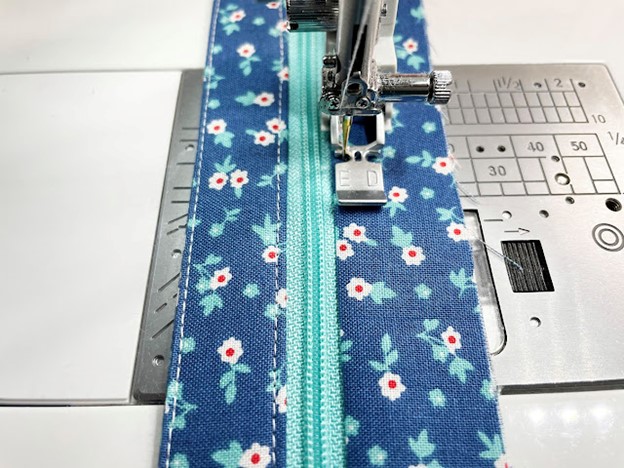
8. Topstitch Vinyl with Double Fold Binding to Zipper Tape. 


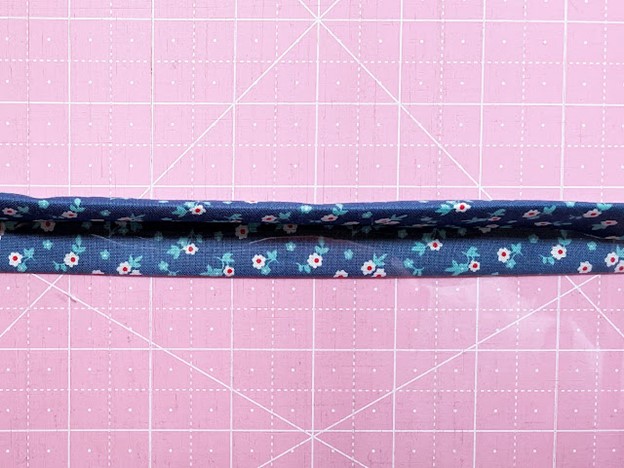
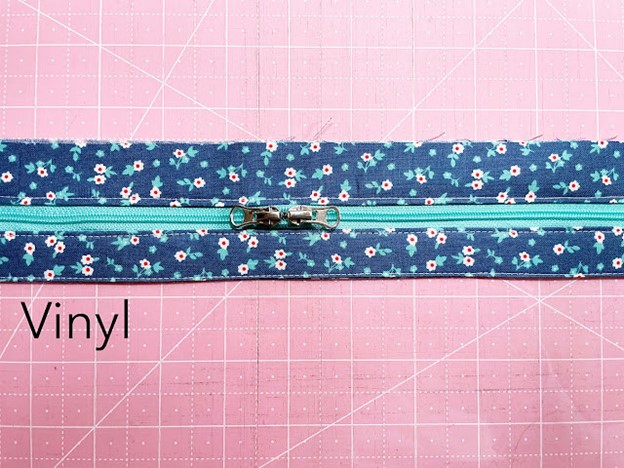
9. Single Fold Binding with Fabric Zipper Top (2" x 14.5"). Iron fabric together in half (wrong sides together). Place folded crease on top of zipper. Make sure it is lined up with previously attached Vinyl Fabric Binding. Trim off excess zipper ends - be sure zipper pull is in middle of bag so you don't accidentally trim off zipper pull.


10.  TRIM bottom of vinyl of Vinyl Bag Front with zipper attached to 14.5" x 14.5".


11. Place Vinyl Bag Front on top of Quilted Bag Back. Use Wonder Clips to hold together. Sew together with a 1/8" seam allowance. (A small seam allowance is used so stitching line will be hidden in binding).


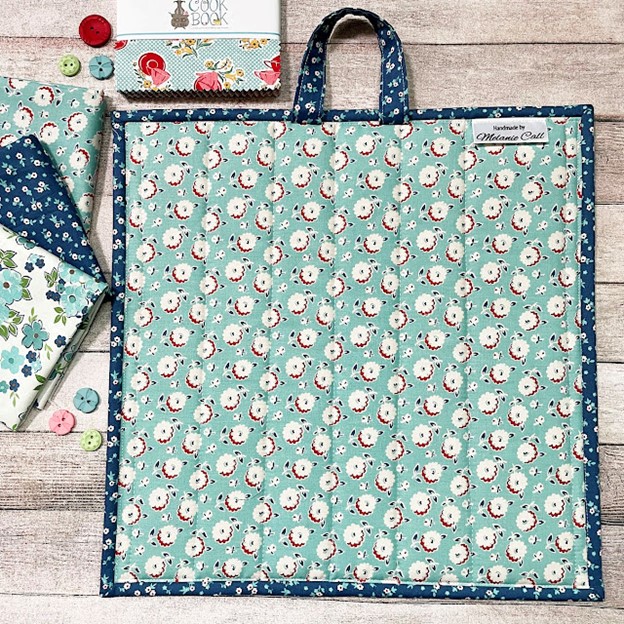
12. Bag Handle (Cut size 4" x 9". Finished size 1" x 9")

  • Iron Fabric in half to create a crease line in center of fabric strip
  • Bring fabric edge to center crease line and press
  • Repeat with other side
  • Fold closed so raw edges are hidden. Handle measures 1" x 9"


  • Top stitch both sides of bag handle.


13.  Sew bag handle to back side of Vinyl Project Bag.  Mine is attached 5.5" from bag sides. Oops - I forgot to take a picture of this step before I added binding. Attach your handle BEFORE binding as the binding will secure the handle and hide the raw edges.


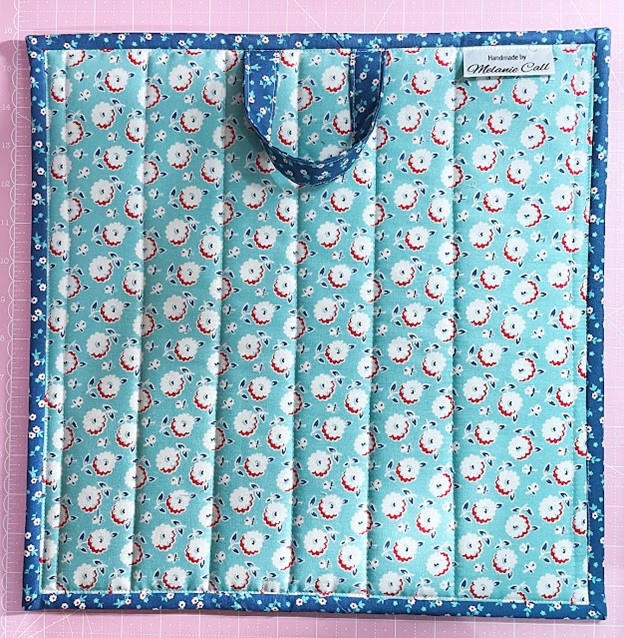
14. Bind as desired. I prefer to completely machine bind my projects. Machine Binding Tutorial HERE


I hope you had fun making your Vinyl Project Bag! 


Be sure to follow me on Instagram @ABitofScrapStuff and on my A Bit of Scrap Stuff Blog for more sewing fun!


Melanie Call


Everyone is Talking about Vinyl Project Bag
Reviews


Tako
Beautiful
Wednesday, November 23, 2016

cpindzola
Around the Table Dresden Placemats
Saturday, December 17, 2016

I like the concept, but the directions are "sloppy." Nowhere in the supply list does it mention the felt or the batting (how much?). Also, I would never use a high loft batting in a placemat, or a table runner, as I think that it would be too unstable for a glass. The next time I make these, I will cut out the batting (I use flannel) and spray baste it to the wrong side of the Dresden plate before I put the Dresden plate on the felt to cut out. I have not yet washed the finished placemat, and am hoping that the single layer of felt does not curl up, or become distorted after washing/drying.
Txmaid
Fun Great Gift!
Tuesday, February 21, 2017

MargieARK
Teatime Quilted Tablecloth
Friday, February 24, 2017

I made this today but your cutting directions need to be changed. You only need 4 of color 1 and color 3 4.5 squares for the triangles. Also the inner border, you only need 2 cuts as WOF is long enough to cut each in half to fit the sides.
MickelSews
Great Machine
Wednesday, August 30, 2017

I've had this machine for only a week now. I bought it used from a lady who makes her own clothes, but she no longer needed the machine. During the purchase, she noted that she is almost sad that it's better to give it away because of how well the machine performed. (I also bought it along side a computerized machine of another brand.} She demoed the machine for us, showing it worked and gave us everything (including the box it came in!) She took amazing care of this machine. I have used it a few times now, and the directions for threading were easy to follow (albeit my hands are quite large so the lower looper was a pain, but that is no fault to the machine or brand.) And I recommend this machine to anyone who wants to learn to serge and wants a machine that can grow with them. I will happily use this machine time and time again.
rvstan
S9 Review
Sunday, February 25, 2018

I love, love, love my S9! It's sews and embroiders beautifully and it's simplicity of use amazes me. I would recommend this machine for both a beginner and an experienced seamstress. If I would ask anything of Janome it would be to upgrade the programming to run a larger hoop size. I understand that it can't get much wider but there is most definitely room for it to go longer. That is the only limitation of this machine.
pjmnana
PJMNana
Monday, February 26, 2018

I purchased a Memorycraft 15000 a few years ago and it was the best purchase I ever made! This machine can do just about anything you would would ever want! I love the capability of using the Acuedit app to set up my embroidery pattern on my Ipad and then download it to the machine! I love how my embroidery looks upon completion and I love all the good lighting it has to light up your workspace. That way you don’t need to worry about where to set up your machine. It also has plenty of room to do machine embroidery on any size quilts! There are many decorative stitches from which to choose that are outstanding! It’s hard to choose which one to use! There are so many great features it is hard to decide what I love the most. If you want to buy only one machine to last a lifetime, I would recommend this one!
KLWash
S9 Review
Sunday, February 24, 2019

The S9 is amazing. I learned to sew by hand when I was just 5 and in my grandmothers way as she was quilting. I took seeing classes in high school until they would no longer let me sign up. The S9 makes me appreciate my current skills as well as motivate me to want to learn more. This machine is awesome.
SewSueMe2002
Horizon Memory Craft 15000
Thursday, November 19, 2020

My Janome Horizon Memory Craft 15000 is fantastic! I love, love, love this machine! When I came across the Eye for and Eye embroidery design today, I wanted to make it. However, the embroidery file is missing. Nothing downloads when I select the download button. Please help!
Jillfmischo
Treat Bag fun!
Monday, August 16, 2021

I made the Halloween treat bag for my new granddaughter and I’m sure it will last for years. No embroidery machine so I appliquéd the lettering. Need a little more skirt fabric for a better gathered look, and I used thin double-bias tape for the skirt hem, over edge stitch on skirt sides. I’m pleased with my results!
elenaz
Very helpful tutorial
Wednesday, October 25, 2023

I want to say thank you for teaching me this method of applique. I was able to do it with a small letters. This method is the best so far from all of those I've seen and tried.
plonkar
So useful
Thursday, November 30, 2023

I'd like to express my gratitude for teaching me this appliqué method. I successfully applied it with small letters, and, so far, it's the most effective among all the methods I've seen and tried.

DEALERS
The TWO Closest Dealers to you are:
196 Boston Post Road , Orange CT, 06477
203-878-1654
19 PUTNAM AVENUE , PORT CHESTER NY, 10573
914-934-2934
Find Additional Dealers