Cutting:
Label your pieces as you cut them out so that it’s easy to keep track of them.
![]()
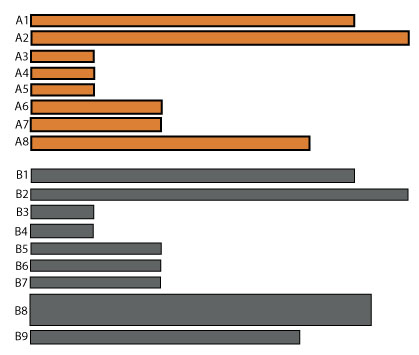
Fabric A:
1. Cut out
A1 = 36” x 1.25”
A2 = 42” x 1.5”
A3, A4, A5 = 7” x 1.25”
A6, A7 = 14.5” x 1.5”
A8 = 31” x 1.5”
Fabric B:
2. Cut out
B1 = 36” x 1.5”
B2 = 42” x 1.25”
B3, B4 = 7” x 1.5”
B5, B6, B7 = 14.5” x 1.25”
B8 = 38” x 3.5”
B9 = 30” x 1.5”
![]()
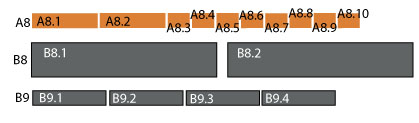
3. Cut A8 into two 6.5” x 1.5” and eight 2.25” x 1.5” pieces. Label as indicated above.
4. Cut B8 into two 19” x 3.5” pieces, label as indicated above.
5. Cut P9 into four 7.5” x 1.5” pieces and label as indicated above.
Making the pillow top:
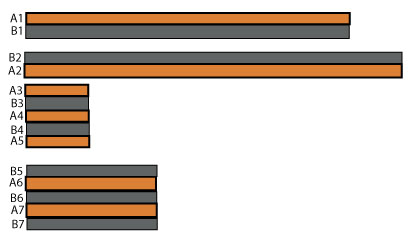
It is key to keep a uniform scant ¼” seam allowance for this pillow to turn out the correct size.
![]()
1. Piece together A1 and B1
2. Piece together B2 and A2
3. Piece together A3, B3, A4, B4, A5
4. Piece together B5, A6, B6, A7, B7
![]()
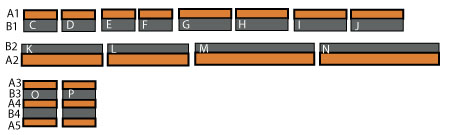
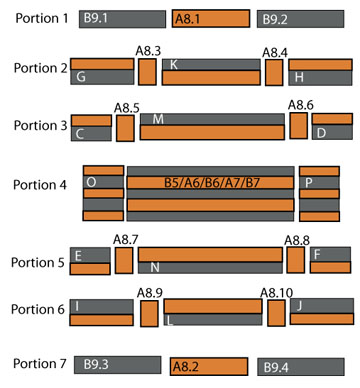
5. Cut A1/B1 portion into four 3.5” wide and four 5.5” wide pieces. Label as indicated above.
6. Cut B2/A2 portion into two 8.5” wide and two 12.5” wide pieces. Label as indicated above.
7. Cut A3/B3/A4/B4/B5 into two 3.5” wide pieces. Labe as indicated above.
![]()
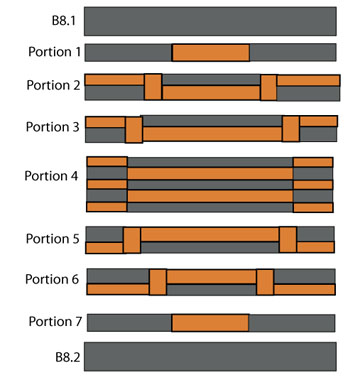
8. Assemble portions 1 through 7 as shown above.
![]()
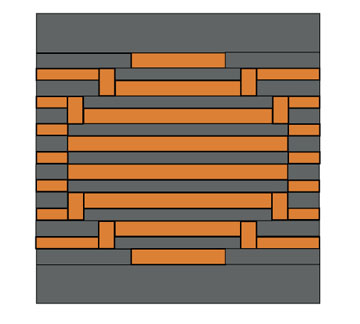
9. Working top to bottom, sew B8.1, portions 1 through 7 and B8.2 together. Your pillow top is all done!
![]()
Assembling the pillow sleeve:
11. Layer the pillow top, batting and backing fabric, pin baste and quilt as desired.
12. Working with the backing pieces of fabric, fold and press a ½” of the 19” edge down, and then fold another ½” and press again. Sew in place to close off the edge. Repeat with the second backing piece.
13. Layer your three pillow pieces, right sides together, layering the two back pieces so that they overlap.
14. Using a ½ inch seam allowance, sew all the way around the perimeter of the pillow.
15. Trim the corners, and turn right side out. Fill with your pillow form and you’re all done!