Cutting Instructions:
(WOF means width of fabric)
(LOF means length of fabric)
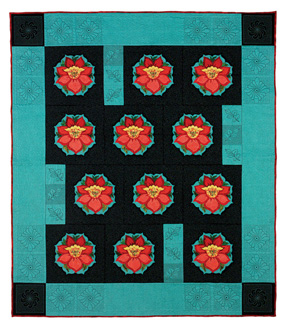
Quilt will measure 63" x 71" prior to quilting, and will be trimmed to size after quilting.
Black appliqué background blocks:
Cut 3 - 13½" strips (WOF) From each strip, cut 3 - 13½" blocks to yield 12 total
(These blocks will be trimmed to 12½" x 12½" once the appliqué has been completely stitched.)
Black corner border blocks:
Cut 1- 12" strip (WOF) From this strip, cut 4 - 12" blocks
(The borders will be trimmed to 7" once the machine quilting has been completed. The extra width is needed for hooping.)
Turquoise fabric – important – please cut in order stated, prior to cutting appliqué. Turquoise small blocks:
Cut 2 - 4½" strips (WOF). From one strip, cut 9 - 4½" blocks. From the second strip, cut 3 - 4½" blocks to yield 12 total
Turquoise border strips: Cut 2 - 12" strips (WOF). From these, cut 40½" border pieces
Cut 2 - 12" strips (LOF). From these, cut 48½" border pieces
(The borders will be trimmed to 6½" once the machine quilting has been completed. The extra width is needed for hooping.)
Appliqué:
Cut turquoise fabric for appliqué from remaining large piece.
Follow instructions in pattern for appliqué.
Backing:
Cut fabric into two 2 yard pieces. Trim off selvedge edges and sew together lengthwise for a backing which measures approximately 72" x 88".
![]()
Constructing the Quilt:
1. Fuse the appliqué as instructed in the Quilt Poetry pattern. Cut 12 - 9" squares of interfacing. Spray squares with temporary basting spray and center on the back of the appliqué blocks. This will stabilize the block while stitching around the appliqué. It can be trimmed off outside the appliqué with a duck billed scissor once the stitching has been completed.
Using the open toe foot, stitch around the appliqué. Use a variety of complimentary threads to enhance the project.
Hints and Tips about stitching the appliqué down:
I find it’s easiest to sew decorative stitches around appliqué if I set the speed control slider to about half speed. Always do these stitches in the needle down position so the needle stays safely in the fabric when you pause to pivot. Use the Open Toe Craft Foot, so you can see the edges of the shapes. It’s a good idea to practice on a little sample fabric with some shapes fused to it.
Experiment with a variety of stitches. Try varying width and length to achieve a look you like. Pay attention to the stitch pattern and learn the rhythm of the stitch. This will help you determine when and where to pivot.
Here are some stitches I enjoy using on appliqué:
-A narrow, slightly open zig zag. (Stitch #8) Try setting width 2.0 and length .5. Pivot on the outside of the appliqué shape.
-The triple stretch stitch. (Stitch #5) Try shortened to 2.2 or 2. Stitch about 1/16" inside the edge of the appliqué shape.
-The sculpture stitch. (Stitch #9)
-An appliqué stitch. (Stitch #18) Try setting width 3.0 and length .4.
-A patchwork stitch. (Stitch #38) Try setting width 3.0 and length 1.2.
-Another patchwork stitch. (Stitch #32) Same settings as the previous stitch. I like both of these stitched so the center line runs right along the edge of the appliqué. 2. When stitching down the appliqué is complete, trim interfacing on back of blocks around the outside of the appliqué using a duck billed scissor. Be very careful not to snip into the fabric.
3. Add embroidery to the appliqué design. Choose 2 x 2 embroidery design #4. Enlarge it to 102%. Stitch this on each flower center to line up about ½" from bottom of flower center. You may want to add some extra stabilizer under the embroidery motif.
4. Using a square ruler, trim the appliqué blocks to measure 12½" x 12½".
5. Sew together sets of three 4" blocks using the ¼ inch seam foot. Press seams in one direction.
6. Following the layout diagram, sew the appliqué blocks together with the sets of small blocks in rows. Press seams, use layout guide to help determine how to press seams when seamlines will meet. (Such as between the first and second row.) It is helpful to press these seams in an opposing manner.
7. Again follow the diagram and join the four rows.
8. Sew the shortest border strips to the top and bottom of the quilt. Press seams toward border.
9. Sew a 12" black square to each end of the longer border strips. Sew these borders to the sides of the quilt. Press seams towards border.
10. Layer the quilt. I use basting spray, but you may baste traditionally also.
11. Using a Walking Foot, “stitch in the ditch” between all the blocks, etc.
12. Using a Free Motion Foot, stitch around the outside of the appliqué and possibly some inside the appliqué motif. (You can also add quilting inside the appliqué motif once the quilting in the block background has been done.)
Quilting with the stippling designs:
Background quilting in appliqué blocks:
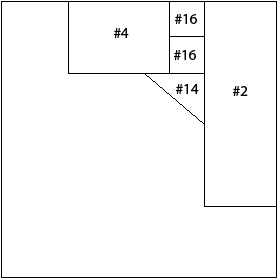
1. Begin by making a quarter quilting design for the background of the appliqué block. Choose Acufil design #4. On the design edit screen, resize to 84% and rotate 90 degrees. Choose Acufil design #2 and resize to 84%. Choose stippling part #16 and resize 96%. Choose stippling part #14. Duplicate it once. Rotate to fit the small spaces. The shape should quilt about 6" out from each corner of the block.
See drawing below for how to arrange the sections. Set them up in the corner of the grid and you can then use the plastic template lined up directly on the corner seamlines for placement of the quilting on the quilt.
![]()
2. Quilt each corner of the block with turquoise thread on top and black thread in the bobbin. Bring the bobbin thread up to the top and trim at the beginning of each segment.
(I found it helpful to reduce the auto tension 2 so none of the black thread shows on the top.)
See the dashed lines in the layout diagram to get an idea of how the motifs will lie on each corner of the appliqué block.
Quilting the small blocks:
I found it helpful to reduce the embroidery speed to the slowest setting for these blocks.
1. Choose stippling design #4, the leaf. Select it in the second mode with the stippling around the leaf. Reduce to 85% and center on the grid.
2. Using black thread, quilt this motif in the top small square in the first row. Also quilt it in the middle small squares in the second and third row, and in the bottom small square in the fourth row.
3. Next choose just the leaf, reduce to 85% and reverse it. Stitch the reversed leaf on the remaining small blocks in the second and third row. In the first and third row, stitch the reversed leaf in the middle small blocks.
4. Finally, choose just the leaf, reduce it 85% and stitch in the remaining small block in the first and fourth row.
(In the layout diagram, the double arrow indicates the leaf with stippling around it.. and the direction it faces. The single arrows indicate the leaf without stippling and the directions they face.)
Quilting the Border cornerstone blocks:
1. Choose stippling design #3 in the third mode with the stippling and the outline. Increase the size 120%. Line the edges up in the top corner of the grid, one square in from the edge.
2. When hooping, line the plastic template up on the block so the edge of the grid falls directly on the seamlines. Using turquoise thread, quilt out the corner blocks.
3. This quilting will be in the center of the corner blocks, about ½" from all sides. See dashed lines in diagram to show how the motif will look centered in the block after trimming borders at the end of the project..
Quilting the motifs in the borders:
1. Choose stippling design #12 without the stippling and border. Increase in size 120% and rotate 45 degrees. Line the edges of the motif in the top corner of the grid, one square in from the edge. Choose stippling design #17 and put it on the top right corner of the 12 motif. Duplicate it and flip horizontally – place this piece on the top left corner of the motif. Again duplicate the first #17 piece, flip it vertically and put it on the bottom right corner of the motif. Duplicate that, flip horizontally and put it on the bottom left corner of the motif.
2. Using the plastic template, line the corner of the grid with the inner border seam and the cornerstone seam. Quilt the motif with black thread. You can keep turning the quilt so the template is always lined up directly on the seams.
3. For the second motif in each border, place a line about 1/8" away from the edge of the first motif. Use that line, and the inner seamline to line up the template on the quilt.
(I found that I liked to stop the machine a stitch or two before it finishes each of the corner stippling design, then pull the threads to the top so I could thread them to the underside, tie and bury them in the batting.)
4. See the layout diagram to get an idea of where to line up the motif on the quilt.
Quilting the remainder (middle areas) of each border:
1. Choose Acufil design #3. Enlarge 108%. Duplicate and flip one piece vertically. Line the two shapes up to the edge of the top and bottom of the grid, and one square in from the edge of the grid on the left.
2. Use the plastic template to line the hoop up, with the edge of the template on the seam line.
3. In the top and bottom border, stitch two of these 8" sections (with turquoise thread) to fill the middle space. In the side borders, stitch three of the sections to fill the space. I used turquoise thread in the bobbin for these sections too, since I was stitching on turquoise fabric – I didn’t want any chance for black bobbin thread coming through.
4. See the layout diagram to get an idea of where to line up the motif on the quilt.
5. If desired fill in some of the remaining space with turquoise thread and free motion quilting, but essentially the quilting is done at this point!!
6. Run a basting stitch 6½" from the inside of the quilt in the borders. Ensure the quilt is straight and trim the borders to 6¾" if using ¼" binding or to 7" if using ½" binding.
7. Bind the quilt.
© 2008. Jane Spolar