Lessons
Select from the following lessons:
Using Quiet Mode
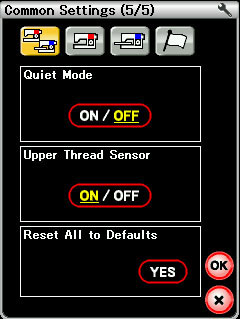
Quiet Mode allows you to adjust the sound of the machine for nighttime or quiet time use.
- To Access Quiet Mode:
- Select Set:

- Advance pages to Common Settings Page 5.
- Select On to engage Quiet Mode (see screen).
- To deactivate this mode, select Off.
Twin Needle Mode
In order to sew with a twin needle, you must choose Twin Needle Mode. When this mode is selected, the machine will not allow you to sew certain stitches, which are not compatible with Twin Needle operation. When the Twin Needle mode is engaged, you will notice that all incompatible stitches are grayed out on the screen.
To Activate Twin Needle Mode:
- Select the Twin Needle Guard Button (top row, second to the left, also look for the button at the end of top row in all decorative stitches menus):

- To deactivate, select the Twin Needle Guard Button. A warning will ask you to check your needle. Press Ok.
Free Motion Sewing
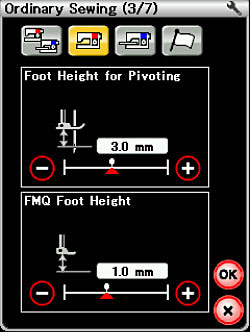
You can adjust the foot height for Free Motion Quilting (FMQ) depending on the thickness of the fabrics and batting you are using. You can set the height of the foot to control the downward pressure placed on the fabric, so that the pull of the fabric is the most comfortable for you.
Adjusting the Free Motion Quilting Foot Height:
- Place the Free Motion Quilting foot on the machine.
- Touch the Stitch Mode Selection Icon (bottom left):

- Select Decorative and Quilting modes (second row, third button, has heart pattern):

- Select Quilt Mode (Q) -- see *NOTE below:

- Select the Set key:
- Select the Ordinary Sewing Mode key (second to the left with red):

- Page forward one page, and lower the feed dogs by selecting the Feed Dog down key:

- Page forward one more page, until you get to the FMQ height screen (see screen).
- Use the + and – keys to select the desired foot height.
- Press OK.
- Test the height, and adjust as necessary by following steps 4-8 above.
*NOTE: Quilting Stitch #1 is appropriate for FMQ stippling, however any stitch can be selected for sewing in this mode. Experiment with moving the fabric with different decorative stitches to determine how they will look when Free Motion sewing.
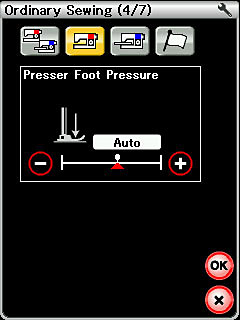
You can set the presser foot pressure to a desired setting to accommodate certain delicate fabrics, such as velvet or silks. Set the pressure higher for fabrics that slide easily. Set it lower for those that may be damaged by the downward pressure of the presser foot.
- Select the Set key:
- Select the Ordinary Sewing Mode key (second to the left with red):
- Page forward 4 screens to get to the Presser Foot Pressure screen (see screen).
- Adjust the pressure as desired. Press OK.
Set the Sensitivity of the Remaining Bobbin Thread Alert

The Remaining Bobbin Thread option is very handy for alerting you when your bobbin is about to run out. Depending on your project, and the amount of thread you may need at one time, you may want to adjust the sensitivity of the Remaining Bobbin Thread alert.
- Select the Set key:
- Select the Ordinary Sewing Mode key:
- The options for Remaining Bobbin Thread are on the first page (see screen).
- Use the + and – keys to adjust the sensitivity. Press OK when finished.
Adjusting the Auto Tension
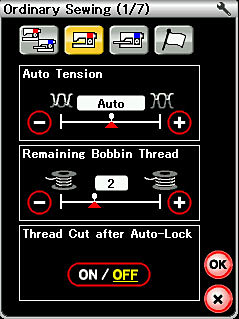
Automatic Tension is wonderful for most projects, but for certain techniques or fabrics you may want to adjust the tension manually.
- Select the Set key:
- Select the Ordinary Sewing Mode key:
- The options for adjusting the Auto Tension are on the first page (see screen).
- Use the + and – keys to adjust the tension. Press OK when finished.
Transferring designs to CF card/USB memory Stick without software
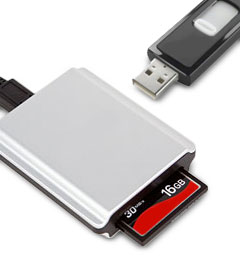
Transferring a design from your Janome Embroidery machine to a USB Stick or ATA Card (compact flash card) without the use of Janome software is a simple process. The ATA card USB stick size maximum to use with this machine is 4 GB. Please also note that the card should not be used as a storage device for all of your design files, this will slow down response time for your machine to retrieve a file.
To write the design to the USB or ATA card on your computer:
- Insert the flash media into your computer.
- Launch My Computer or Windows Explorer. Find the design on your computer that you want to write to the flash media. Right click on the design to get a pop-up menu. Click Copy.
- Maneuver to drive letter for your USB or ATA media and double-click on it to show the EMB folder, and then double-click on the EMB folder so you see the Embf folder. Now, right-click on the Embf folder and choose paste to place your design into the Embf folder.
This is how it should look when properly setup:
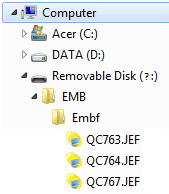
Tip: If you wish to make your own custom-named folders, these folders need to be created inside of the EMB folder i.e. EMB>Flowers, the Flowers folder will contain your floral .jef files. Custom folders can be created on your PC in Windows Explorer. Once you have located the drive letter of your USB or ATA card, double-click on the EMB folder, you will see the Embf folder, right-click in a blank area and choose New>Folder, name the folder, now you can move .jef files into the folder using steps 1-3 above. Inside the EMB folder you will now see the Embf folder as well as your custom-named folder.
To read the design on the MC12000:
- Remove the flash media from your computer. Insert it into the 12000.
- Touch Embroidery Mode key.
- Touch the Open mode key.
- Touch ATA Card or USB Memory.
- Touch the Embf folder and choose your design.
Memory Craft 12000 using Horizon Link:
- Open Horizon Link. Insert a USB stick.
- Select the Embroidery Edit icon.
- Click on the View Embroidery icon.
- On the right side of the screen is your computer information. Locate the desired design. Double click to bring the design to the Horizon Link edit screen.
- Click on the Process icon.
- Click on Write a Design icon. The Write a Design window will open.
- Double click on the Removable disk. Embf folder should appear.
- Double click on Embf folder to open.
- Click on the arrow above design name to send the design to the Embf folder in the USB stick.
Note: You can change the name of the design by selecting Rename and typing in a new name.
At your MC12000:
- Remove the USB stick from your computer and place in one of the MC12000 USB ports.
- Select the Embroidery mode. Select Open File icon.
- Select the USB port.
- Select the Embf folder.
- If your design is not on the opening page, use the arrow keys below the design selection screen to scroll through the USB stick until you see your desired design.
- Select the design to bring to the Ready to Sew screen.
Note: Do not use the USB stick to store all of your designs. Only place on your stick designs that you wish to sew. This will shorten the processing time when you insert the USB stick into your machine.
To transfer designs directly from Horizon Link to the MC120000:
- Connect your computer and the MC12000 using a USB cable.
- Power on and select the Embroidery mode on your machine.
- At computer, open Horizon Link.
- Select Embroidery Edit icon.
- Click on the View Embroidery icon.
- On the right side of the screen is your computer information. Locate the desired design. Double click to bring the design to the Horizon Link edit screen.
- Click on the Process icon.
- Click on Send - located in Link Manager.
- Look at your MC12000, the design should appear on the Edit screen.
- To sew, press OK and the screen will appear on the Ready to Sew screen.
Note: The Horizon Link will only open Janome format designs - .jef. .jef+ and .jbx