Projects

Simple Quilted Zip Pouch

Created By:

Maureen

Skill Level: Intermediate

A TutorialHow to make a Simple Quilted Zip Pouch!

This Simple Quilted Zip Pouch is quick to make, uses minimal materials, and is a great project for practicing simple straight-line quilting and French Seams! Let's get started!

Instructions

Simple Quilted Zip Pouch

A Tutorial: How to make a Simple Quilted Zip Pouch!

This Simple Quilted Zip Pouch is quick to make, uses minimal materials, and is a great project for practicing simple straight-line quilting and French Seams! Let's get started!

Finished Zip Pouch

Materials List:

Janome Sewing Machine (Horizon Quilt Maker Memory Craft 15000)
walking foot and zipper foot for your sewing machine (optional)
two pieces 7.5" x 9.5" for the outer fabric (Woodland Keeper by Maureen Cracknell for AGF)
two pieces 9" x 11" for the inner fabric (Gloria by Maureen Cracknell for AGF)
two pieces 2.5" x 9" for the binding fabric (Woodland Keeper by Maureen Cracknell for AGF)
two pieces measure 8" x 10" quilt batting (Hobbs Tuscany Supreme 100% Unbleached Cotton) 
nylon zipper 9" long
coordinating thread (Aurifil)
cord for zipper pull
Hera Marker or water soluble pen and ruler for marking quilt lines (optional)
basting spray or basting pins (optional)
scissors or rotary cutter/mat
iron

Simple Quilted Zip Pouch Supplies

Step 1. Preparing the Pouch Pieces:

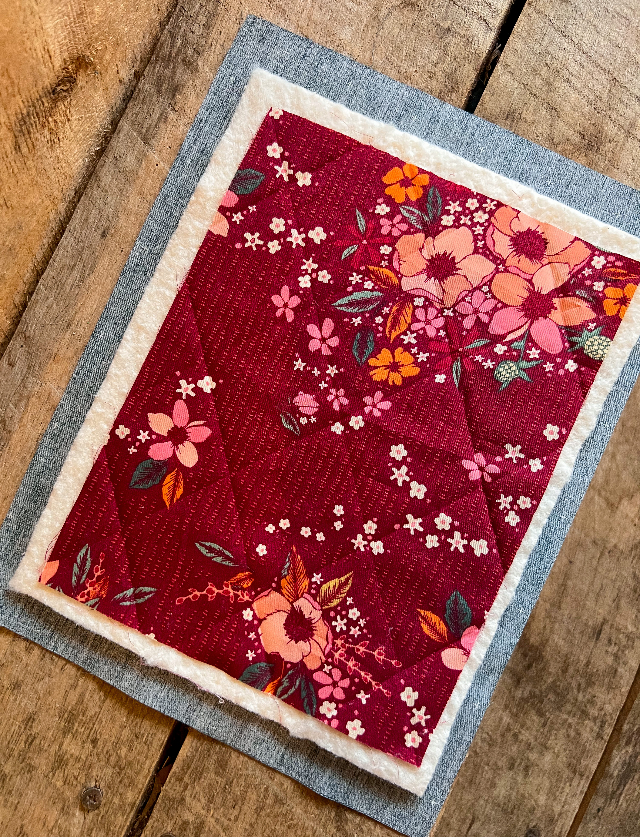
Start by placing one inner pouch fabric piece with the wrong side facing up on a flat work surface. Next, center onto that one cut of the cotton batting. Finally, center the outer fabric right side facing up onto the batting. Repeat this step with the other pouch fabrics and batting and be sure all layers of both pouch sides are smooth and free of wrinkles. You can use spray to baste these layers together or pin baste after the next step.

Layer Pouch Pieces

Use a Hera Marker or water-soluble pen and the ruler to mark the right side of the outer fabric to create diagonal diamonds 1.5 - 2 inches apart from one another (your choice). Begin by lining up your cutting ruler from the top left corner to the bottom right corner and use the Hera Marker or pen to mark a diagonal line across the right side of the ruler. Mark the next line, parallel to the first, 1 or 2 inches to the right. Continue to mark parallel lines every inch or two across the right side of the outer fabric. Then, using your first marked line as a guide, repeat for the left side. Now place the ruler from the top right corner to the bottom left and repeat marking lines in this new direction just as you did previously.

Mark Quilting Lines

Step 2. Quilt the Pouch Pieces:

If you prefer to pin baste, this is the time to pin baste the layers together before quilting. You can also attach the walking foot to your machine before quilting the layers together. Now with the straight stitch length set at 4.0 begin quilting by first stitching lines going in one direction, starting in the center and moving out, following the marked lines. Then quilt over all of the perpendicular lines in the same manner.

Machine Quilt with Straight Stitch

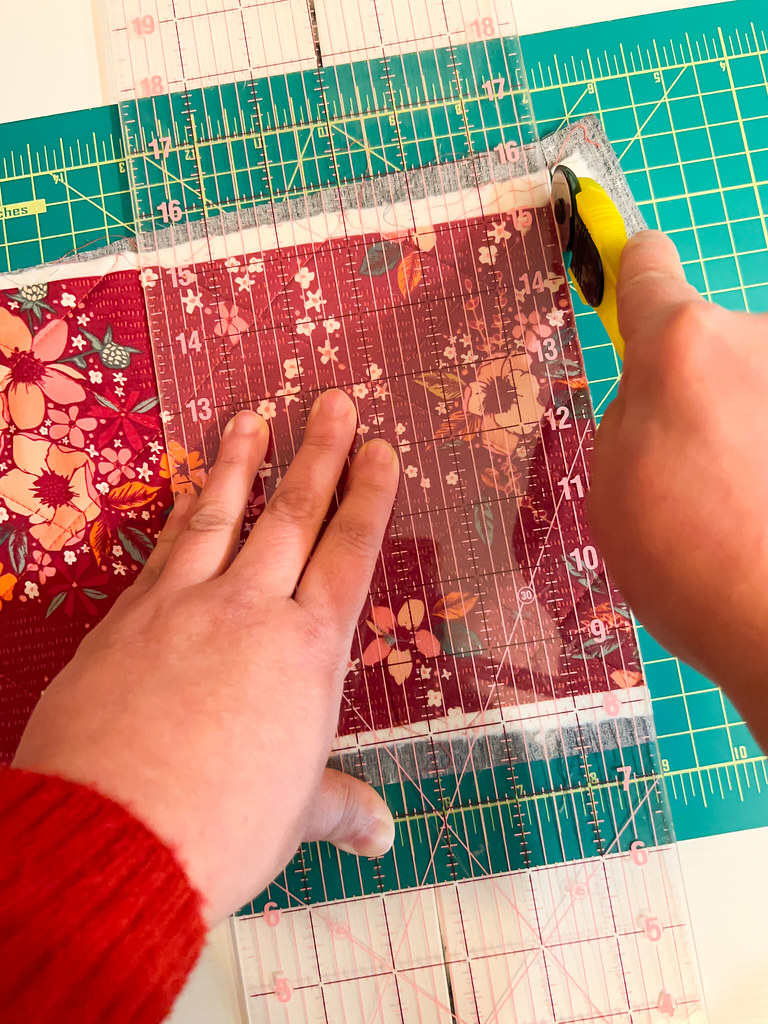
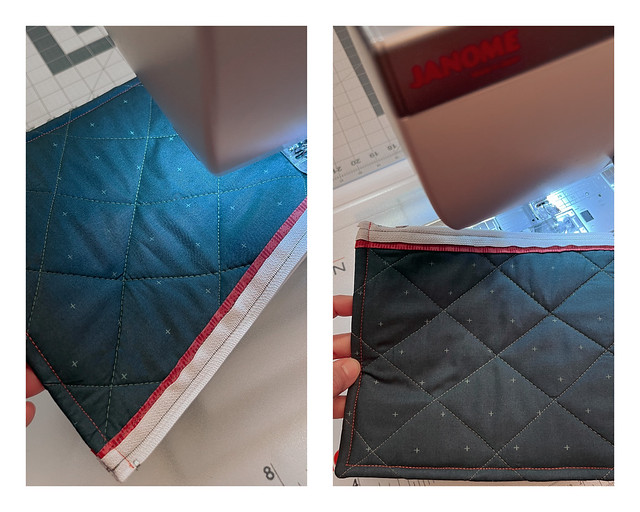
Once both pouch pieces are completely quilted, press well, and trim away access batting and fabric to measure two pieces measure 7" x 9."

Trim To Size

Quilted and Trimmed Pouch Pieces

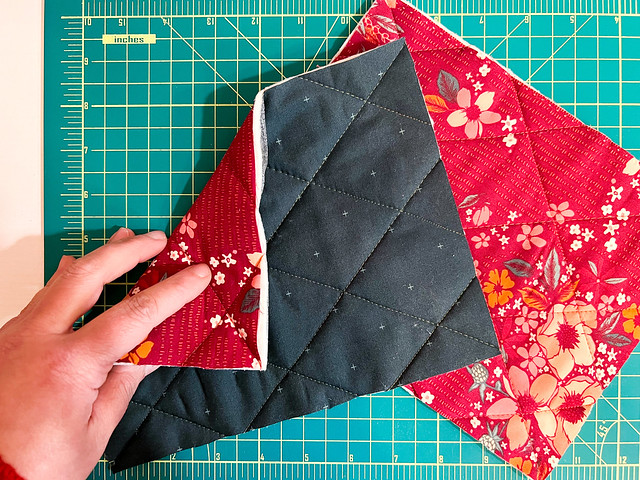
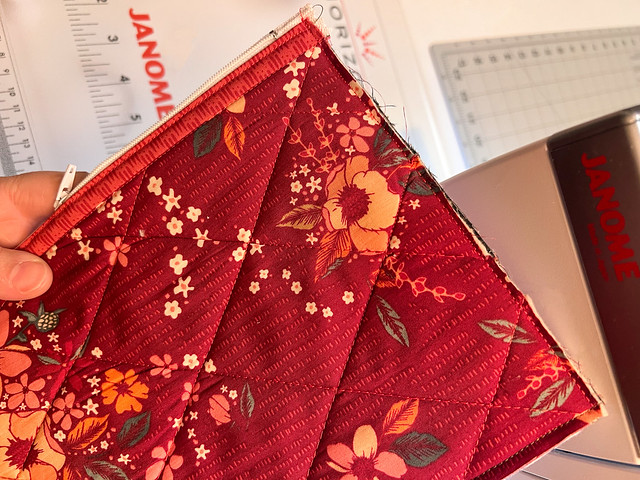
Prepare the two binding pieces measuring 2.5" x 9" by folding them in half and set the fold by pressing them with an iron. Align the open edge of one binding piece along the top edge of one quilted pouch piece. Pin in place and attach by sewing 1/4" from the outer edge, moving the pins as you go. Fold the binding over to cover the raw edge and attach by sewing in the ditch along the binding edge, catching the folded edge on the back side. Repeat this step with the second pouch piece.

Place Binding Piece along Top Edge

Step 3. Attach the Zipper:

Attach a zipper foot for this step if you prefer to use one. Place the bound top edge of one pouch piece right side up onto the zipper. Begin by backstitching at the pull end of the zipper and top stitch just inside the bound edge, catching the zipper edge underneath, stopping at the zipper’s end and backstitch again.

Attach the Zipper

Attaching the Zipper

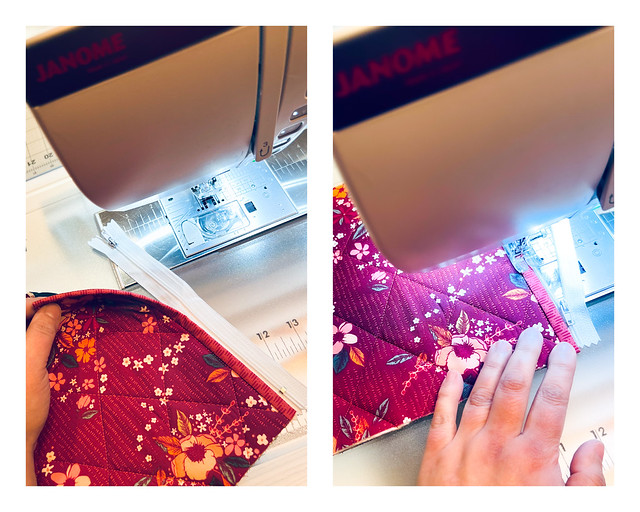
Next sew the remaining pouch piece to the other side of the zipper in the same manner, backstitching at the beginning and end.

Zipper Finished

Step 4. Finish with French Seams:

With the pouch still right sides out, zip it closed, and align the edges of the pouch pieces. Pin or clip together the sides and bottom of the pouch so they are perfectly aligned.

Align the Pouch Sides

Sew the three sides closed with a scant 1/8-inch seam allowance, backstitching at the beginning and end of the seam, and removing the pins or clips as you sew. Be careful when sewing at the pouch ends near the zipper. Clip away a tiny piece of both corners, on the outside of the seam, to remove some bulk.

Scant Seam To Attach Pouch Sides

Unzip the pouch enough to turn the entire piece inside out. Poke out the corners and press flat.

Turn Pouch Out

Now create the french seam by topstitching along the three sides with a 1/4"-3/8-inch seam allowance, backstitching at the beginning and end of the seams.

French Seams

Turn the pouch right side out, making sure to work the corners out. Zip it closed and press it flat one last time.

Finished

Add a cord, ribbon, or twine zipper pull and you’re all done!

Finished Zip Pouch

I hope you enjoy this tutorial!

Everyone is Talking about Simple Quilted Zip Pouch
Reviews


Tako
Beautiful
Wednesday, November 23, 2016

cpindzola
Around the Table Dresden Placemats
Saturday, December 17, 2016

I like the concept, but the directions are "sloppy." Nowhere in the supply list does it mention the felt or the batting (how much?). Also, I would never use a high loft batting in a placemat, or a table runner, as I think that it would be too unstable for a glass. The next time I make these, I will cut out the batting (I use flannel) and spray baste it to the wrong side of the Dresden plate before I put the Dresden plate on the felt to cut out. I have not yet washed the finished placemat, and am hoping that the single layer of felt does not curl up, or become distorted after washing/drying.
Txmaid
Fun Great Gift!
Tuesday, February 21, 2017

MargieARK
Teatime Quilted Tablecloth
Friday, February 24, 2017

I made this today but your cutting directions need to be changed. You only need 4 of color 1 and color 3 4.5 squares for the triangles. Also the inner border, you only need 2 cuts as WOF is long enough to cut each in half to fit the sides.
MickelSews
Great Machine
Wednesday, August 30, 2017

I've had this machine for only a week now. I bought it used from a lady who makes her own clothes, but she no longer needed the machine. During the purchase, she noted that she is almost sad that it's better to give it away because of how well the machine performed. (I also bought it along side a computerized machine of another brand.} She demoed the machine for us, showing it worked and gave us everything (including the box it came in!) She took amazing care of this machine. I have used it a few times now, and the directions for threading were easy to follow (albeit my hands are quite large so the lower looper was a pain, but that is no fault to the machine or brand.) And I recommend this machine to anyone who wants to learn to serge and wants a machine that can grow with them. I will happily use this machine time and time again.
rvstan
S9 Review
Sunday, February 25, 2018

I love, love, love my S9! It's sews and embroiders beautifully and it's simplicity of use amazes me. I would recommend this machine for both a beginner and an experienced seamstress. If I would ask anything of Janome it would be to upgrade the programming to run a larger hoop size. I understand that it can't get much wider but there is most definitely room for it to go longer. That is the only limitation of this machine.
pjmnana
PJMNana
Monday, February 26, 2018

I purchased a Memorycraft 15000 a few years ago and it was the best purchase I ever made! This machine can do just about anything you would would ever want! I love the capability of using the Acuedit app to set up my embroidery pattern on my Ipad and then download it to the machine! I love how my embroidery looks upon completion and I love all the good lighting it has to light up your workspace. That way you don’t need to worry about where to set up your machine. It also has plenty of room to do machine embroidery on any size quilts! There are many decorative stitches from which to choose that are outstanding! It’s hard to choose which one to use! There are so many great features it is hard to decide what I love the most. If you want to buy only one machine to last a lifetime, I would recommend this one!
KLWash
S9 Review
Sunday, February 24, 2019

The S9 is amazing. I learned to sew by hand when I was just 5 and in my grandmothers way as she was quilting. I took seeing classes in high school until they would no longer let me sign up. The S9 makes me appreciate my current skills as well as motivate me to want to learn more. This machine is awesome.
SewSueMe2002
Horizon Memory Craft 15000
Thursday, November 19, 2020

My Janome Horizon Memory Craft 15000 is fantastic! I love, love, love this machine! When I came across the Eye for and Eye embroidery design today, I wanted to make it. However, the embroidery file is missing. Nothing downloads when I select the download button. Please help!
Jillfmischo
Treat Bag fun!
Monday, August 16, 2021

I made the Halloween treat bag for my new granddaughter and I’m sure it will last for years. No embroidery machine so I appliquéd the lettering. Need a little more skirt fabric for a better gathered look, and I used thin double-bias tape for the skirt hem, over edge stitch on skirt sides. I’m pleased with my results!
elenaz
Very helpful tutorial
Wednesday, October 25, 2023

I want to say thank you for teaching me this method of applique. I was able to do it with a small letters. This method is the best so far from all of those I've seen and tried.
plonkar
So useful
Thursday, November 30, 2023

I'd like to express my gratitude for teaching me this appliqué method. I successfully applied it with small letters, and, so far, it's the most effective among all the methods I've seen and tried.

DEALERS
The TWO Closest Dealers to you are:
196 Boston Post Road , Orange CT, 06477
203-878-1654
19 PUTNAM AVENUE , PORT CHESTER NY, 10573
914-934-2934
Find Additional Dealers