Projects

How to Add Scallops to a Hem

Created By:

Lillia Whittington

Skill Level: Advanced

Hey there and welcome back! I’m Lillia, and today I am going to share how you can add this summer’s hottest trend to any hemline! It’s such an easy afternoon upcycle project. Plus, it adds the perfect pop of something special to any hem! Scallops may seem scary, but today’s post is going to share how to’s so you can add your own scallop finish to any hem!

Fabric and Notions Required

●      1-2 Fat Quarters

●      Flexible Measuring Tape

●      Clear Ruler

●      Paper Scissors

●      Fabric Scissors

●      Pen and Printer Paper

●      Pins

●      Iron

And finally, whatever you are adding your scallop hem to! If you are making pants into shorts, go ahead and cut the pants before you add the hem!

Instructions

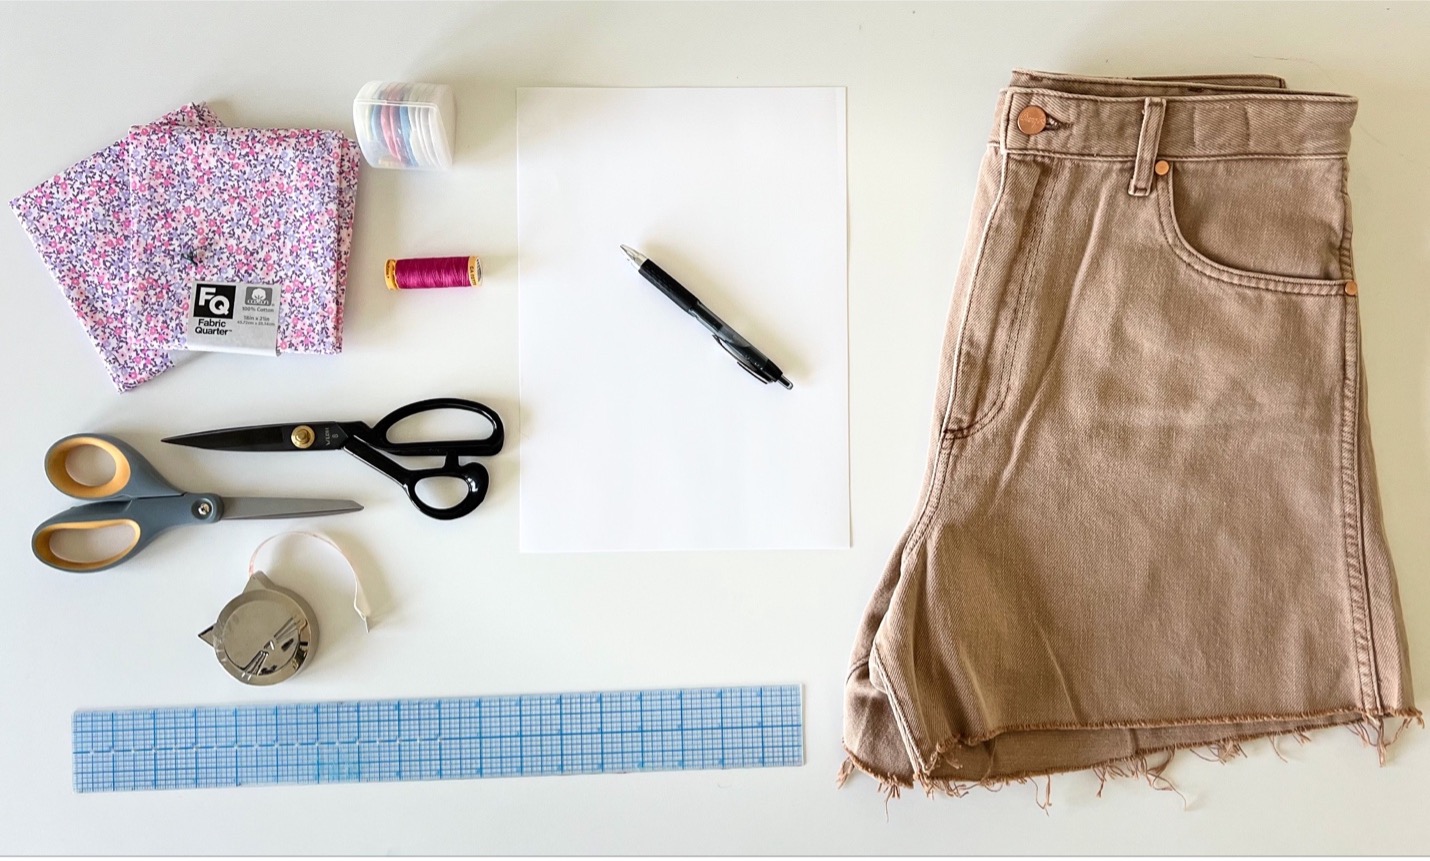
Sewing Level: Advanced

Sewing Time: 3-5 hours

Machines Used: Janome Skyline S9


Design your scallops

To make your scallops, you will need to do a bit of math to find out how many scallops you’ll need based on the circumference of your hemline! To start, you’ll measure the hemline of your project, then add 1 in (2.5 cm) to that measurement. Your equation will look like below:


Length of Hem Opening + Seam Allowance (Doubled) = Total length of Scallop Pattern


Now to find the number of scallops you want, you’ll divide the original leg length by the width of your desired scallops. For example, my hemline was 28in (71.1 cm), and I wanted 2 in (5 cm) wide scallops. So, after plugging my scallop width into my equation, I knew I needed 14 scallops. Your equation will look like this:


Length of Hem Opening / Width of Scallops = Number of Scallops Needed


The next bit of the equation is the depth and curve extension of your scallops. To find the depth, you’ll need to know the radius of your scallop. This is easy to find! Just divide your width in half, and boom! Done! Go over and down this number, and that will be the bottom of your scallop. Draw a straight line from point to point to point to create a small triangle. Find the center of the lines you just drew, and extend ¼ in out from the line and mark. This is your curve extension. Gently curve a line from the top point, through the dot with the curve extension, and to the bottom. Repeat for 4-5 scallops to make a small row. Add ½” in (1.25 cm) seam allowance to one side, then add ¼” in (.6 cm) to the edge of the scallops. Be sure to snip ¼” in in between the scallops at the seam allowance for the perfect curve!

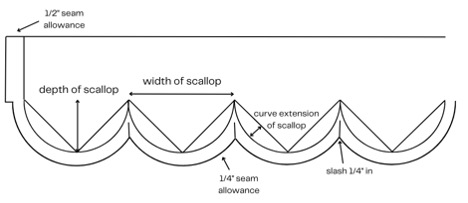
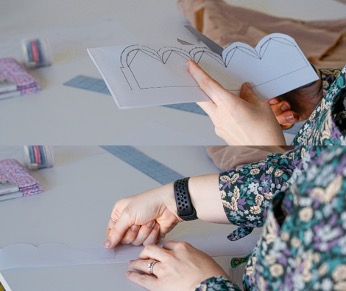
Fold your printer paper in half to make the two ends of your scallop piece. Determine the remaining number of scallops needed and trace your pattern, minus the 1/2 “ seam allowance on the side, on a second sheet of paper. Tape your patterns together, and you’ve got scallops!


Prepping your fat quarter

Snip and rip both edges of your fat quarter to find the straight grain of your fabric. Fold your fat quarter in half, and cut so you now have two strips of fabric. Sew with right sides together along the short edge of your fabric strips at 1/2 “ in seam allowance, then zig zag stitch down the center of the seam to prevent fraying. Press the seam to one side and get ready to cut your scallops!


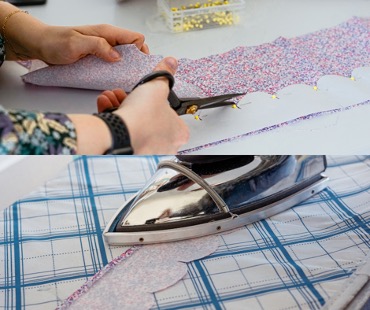
Cutting and prepping your scallops

Now that you have one long strip, place the scallop pattern on the top raw edge of the fabric. This will ensure a perfectly straight and on grain scallop, which helps achieve the perfect circle! Pin the scallops to the fabric and cut the scallops out, one for each hem you are sewing. (Pants = two, skirts = 1)

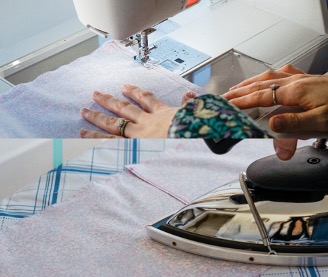
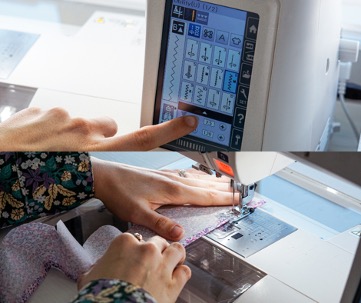
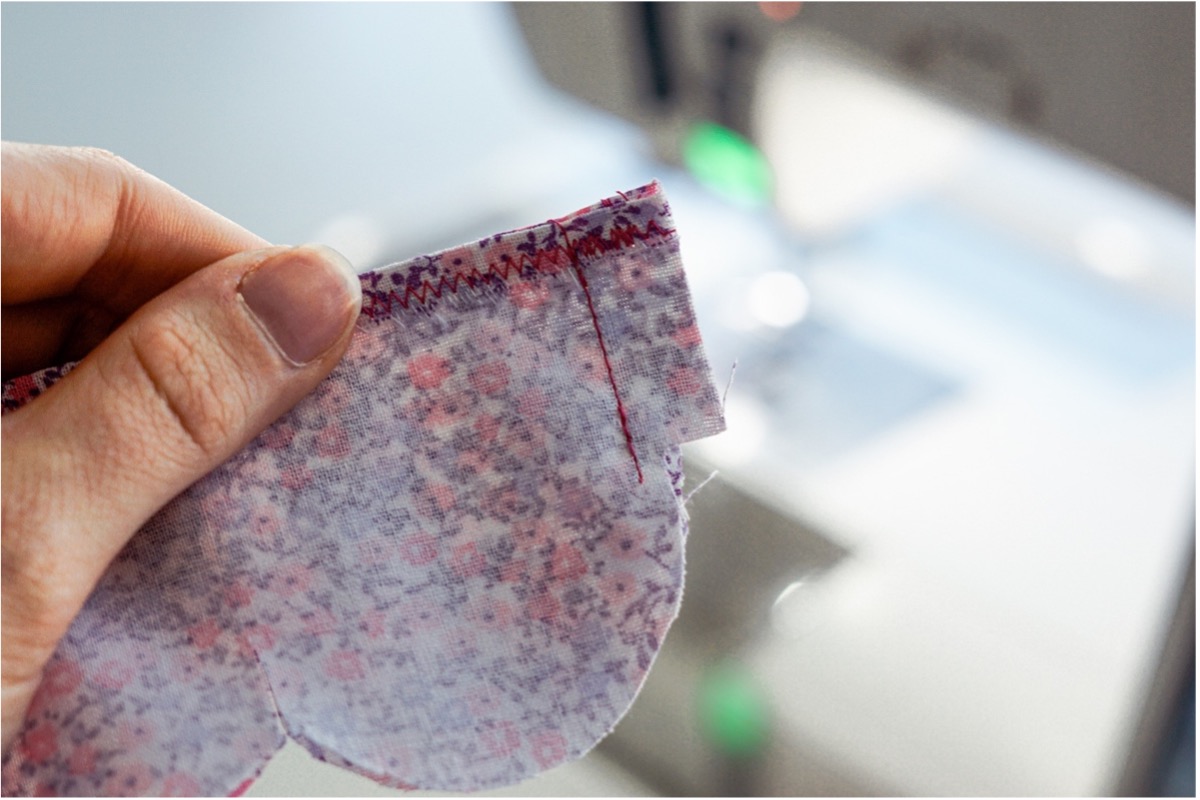
Fold the top edge of the scallop over and press at ¼” in to finish off this edge. Set your machine to a smaller zig zag stitch, and stitch across the top edge to secure the edge and prevent fraying. Sew a jog seam starting at ½” in seam allowance that will extend into your ¼ in seam

allowance by ¼ in. See example below. Press the seam open.


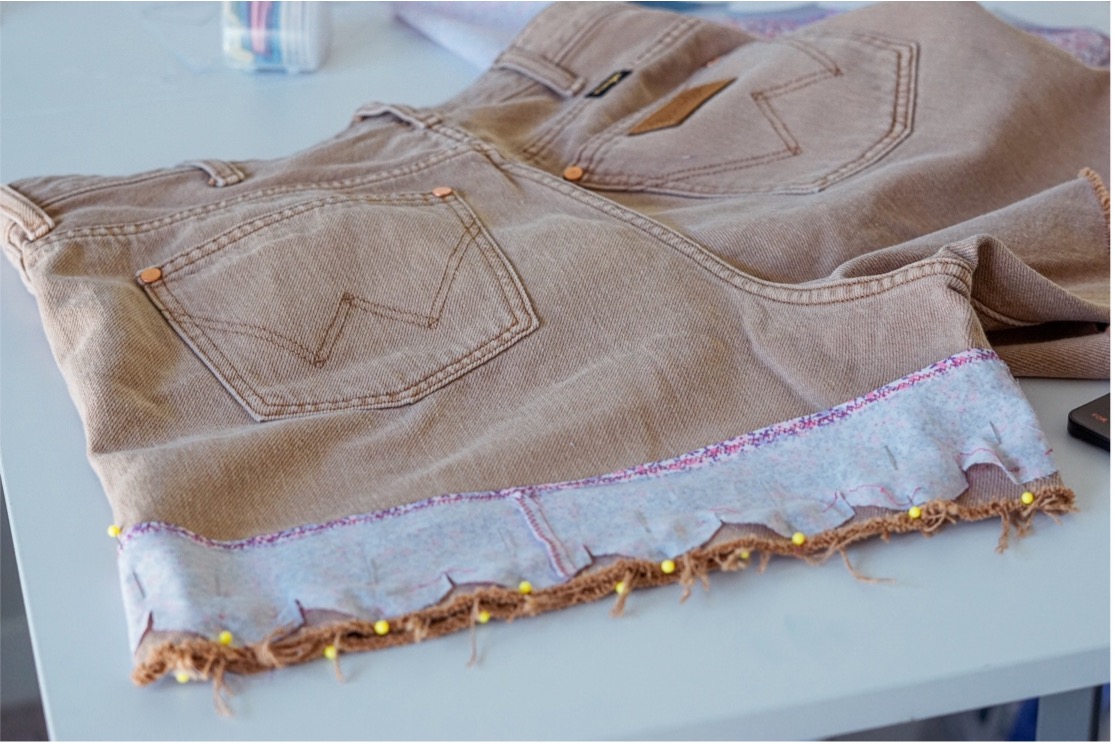
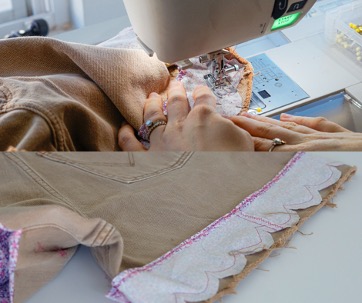
Add the scallops to the hem

Now you’ll place the right sides together on your hemline and your scallops, with the scallops touching the hemline. Pin the scallop seam at the inseam to hide the seam.

Start sewing from the inseam, and stitch the scallops at a ¼” in seam allowance. You’ll want to go slow to ensure a clean curve! To help get the curve, gently push the fabric towards the left, and pull from the back to the right. Do not pull hard, as this can break the needle. When you get to the top of the scallop, about ⅛” in over the slit you cut between each scallop, stop with the needle down, and pivot your garment to go down the next scallop. Remove pins along the way. Repeat on the other side for pants.


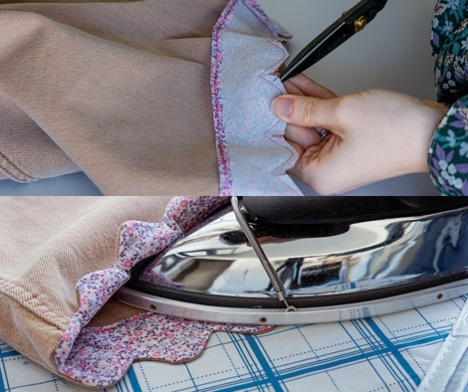
Finishing the scallops

After you’ve completed both sides of the hem, trim your fabric to the shape of the scallop hemline. I find trimming after helps prevent the scallops from slipping and potentially missing sewing the edge. Once this is trimmed, trim the seam allowance down to ⅛” in on the scallops. Gently clip the curves to release tension on the curves, so they form a smooth finish.

Once trimmed and clipped, turn the scallops towards the inside, putting the wrong sides together of the scallops and pants. Gently push out the scallops so the new hemline starts to form along the edge. Head to your iron and press the scallops with steam, if fabric allows, for the final finish. If any curves need to be released more, use your snips to snip the seam allowance to just before the stitch to release the tension.

Viola! Thats it! The hardest part of conquering scallops is the math. Have questions on how to make your perfect scallop? Feel free to reach out to me over on Tik Tok or Instagram on @just.lilliaa! Enjoy your new upcycled shorts for summer! I love mine with an oversized button down or a t-shirt. The scallops add the perfect feminine touch to any look!


Happy Sewing!

Everyone is Talking about How to Add Scallops to a Hem
Reviews


Tako
Beautiful
Wednesday, November 23, 2016

cpindzola
Around the Table Dresden Placemats
Saturday, December 17, 2016

I like the concept, but the directions are "sloppy." Nowhere in the supply list does it mention the felt or the batting (how much?). Also, I would never use a high loft batting in a placemat, or a table runner, as I think that it would be too unstable for a glass. The next time I make these, I will cut out the batting (I use flannel) and spray baste it to the wrong side of the Dresden plate before I put the Dresden plate on the felt to cut out. I have not yet washed the finished placemat, and am hoping that the single layer of felt does not curl up, or become distorted after washing/drying.
Txmaid
Fun Great Gift!
Tuesday, February 21, 2017

MargieARK
Teatime Quilted Tablecloth
Friday, February 24, 2017

I made this today but your cutting directions need to be changed. You only need 4 of color 1 and color 3 4.5 squares for the triangles. Also the inner border, you only need 2 cuts as WOF is long enough to cut each in half to fit the sides.
MickelSews
Great Machine
Wednesday, August 30, 2017

I've had this machine for only a week now. I bought it used from a lady who makes her own clothes, but she no longer needed the machine. During the purchase, she noted that she is almost sad that it's better to give it away because of how well the machine performed. (I also bought it along side a computerized machine of another brand.} She demoed the machine for us, showing it worked and gave us everything (including the box it came in!) She took amazing care of this machine. I have used it a few times now, and the directions for threading were easy to follow (albeit my hands are quite large so the lower looper was a pain, but that is no fault to the machine or brand.) And I recommend this machine to anyone who wants to learn to serge and wants a machine that can grow with them. I will happily use this machine time and time again.
rvstan
S9 Review
Sunday, February 25, 2018

I love, love, love my S9! It's sews and embroiders beautifully and it's simplicity of use amazes me. I would recommend this machine for both a beginner and an experienced seamstress. If I would ask anything of Janome it would be to upgrade the programming to run a larger hoop size. I understand that it can't get much wider but there is most definitely room for it to go longer. That is the only limitation of this machine.
pjmnana
PJMNana
Monday, February 26, 2018

I purchased a Memorycraft 15000 a few years ago and it was the best purchase I ever made! This machine can do just about anything you would would ever want! I love the capability of using the Acuedit app to set up my embroidery pattern on my Ipad and then download it to the machine! I love how my embroidery looks upon completion and I love all the good lighting it has to light up your workspace. That way you don’t need to worry about where to set up your machine. It also has plenty of room to do machine embroidery on any size quilts! There are many decorative stitches from which to choose that are outstanding! It’s hard to choose which one to use! There are so many great features it is hard to decide what I love the most. If you want to buy only one machine to last a lifetime, I would recommend this one!
KLWash
S9 Review
Sunday, February 24, 2019

The S9 is amazing. I learned to sew by hand when I was just 5 and in my grandmothers way as she was quilting. I took seeing classes in high school until they would no longer let me sign up. The S9 makes me appreciate my current skills as well as motivate me to want to learn more. This machine is awesome.
SewSueMe2002
Horizon Memory Craft 15000
Thursday, November 19, 2020

My Janome Horizon Memory Craft 15000 is fantastic! I love, love, love this machine! When I came across the Eye for and Eye embroidery design today, I wanted to make it. However, the embroidery file is missing. Nothing downloads when I select the download button. Please help!
Jillfmischo
Treat Bag fun!
Monday, August 16, 2021

I made the Halloween treat bag for my new granddaughter and I’m sure it will last for years. No embroidery machine so I appliquéd the lettering. Need a little more skirt fabric for a better gathered look, and I used thin double-bias tape for the skirt hem, over edge stitch on skirt sides. I’m pleased with my results!
elenaz
Very helpful tutorial
Wednesday, October 25, 2023

I want to say thank you for teaching me this method of applique. I was able to do it with a small letters. This method is the best so far from all of those I've seen and tried.
plonkar
So useful
Thursday, November 30, 2023

I'd like to express my gratitude for teaching me this appliqué method. I successfully applied it with small letters, and, so far, it's the most effective among all the methods I've seen and tried.

DEALERS
The TWO Closest Dealers to you are:
1900 CENTRE ST , WEST ROXBURY MA, 02132
(617)323-6200
443 MOODY STREET , WALTHAM MA, 02453
781-893-3331
Find Additional Dealers