Projects

Making Matching Ruffle Dresses

Created By:

Janelle Marie

Skill Level: Advanced

Last month, in March, I got to fulfill one of my lifelong dreams of taking a girls trip to the UK! As soon as the trip was set for springtime, I knew I wanted to make matching dresses for my friend Lauren and myself. I decided on something simple, classic and perfect for running through flower fields and towards castles.  Lauren Brown, an incredible artist herself (@LABIllustration on IG), gave me the inspiration for the off the shoulder puff sleeves and I wanted a ruffled hem for great movement.

Instructions


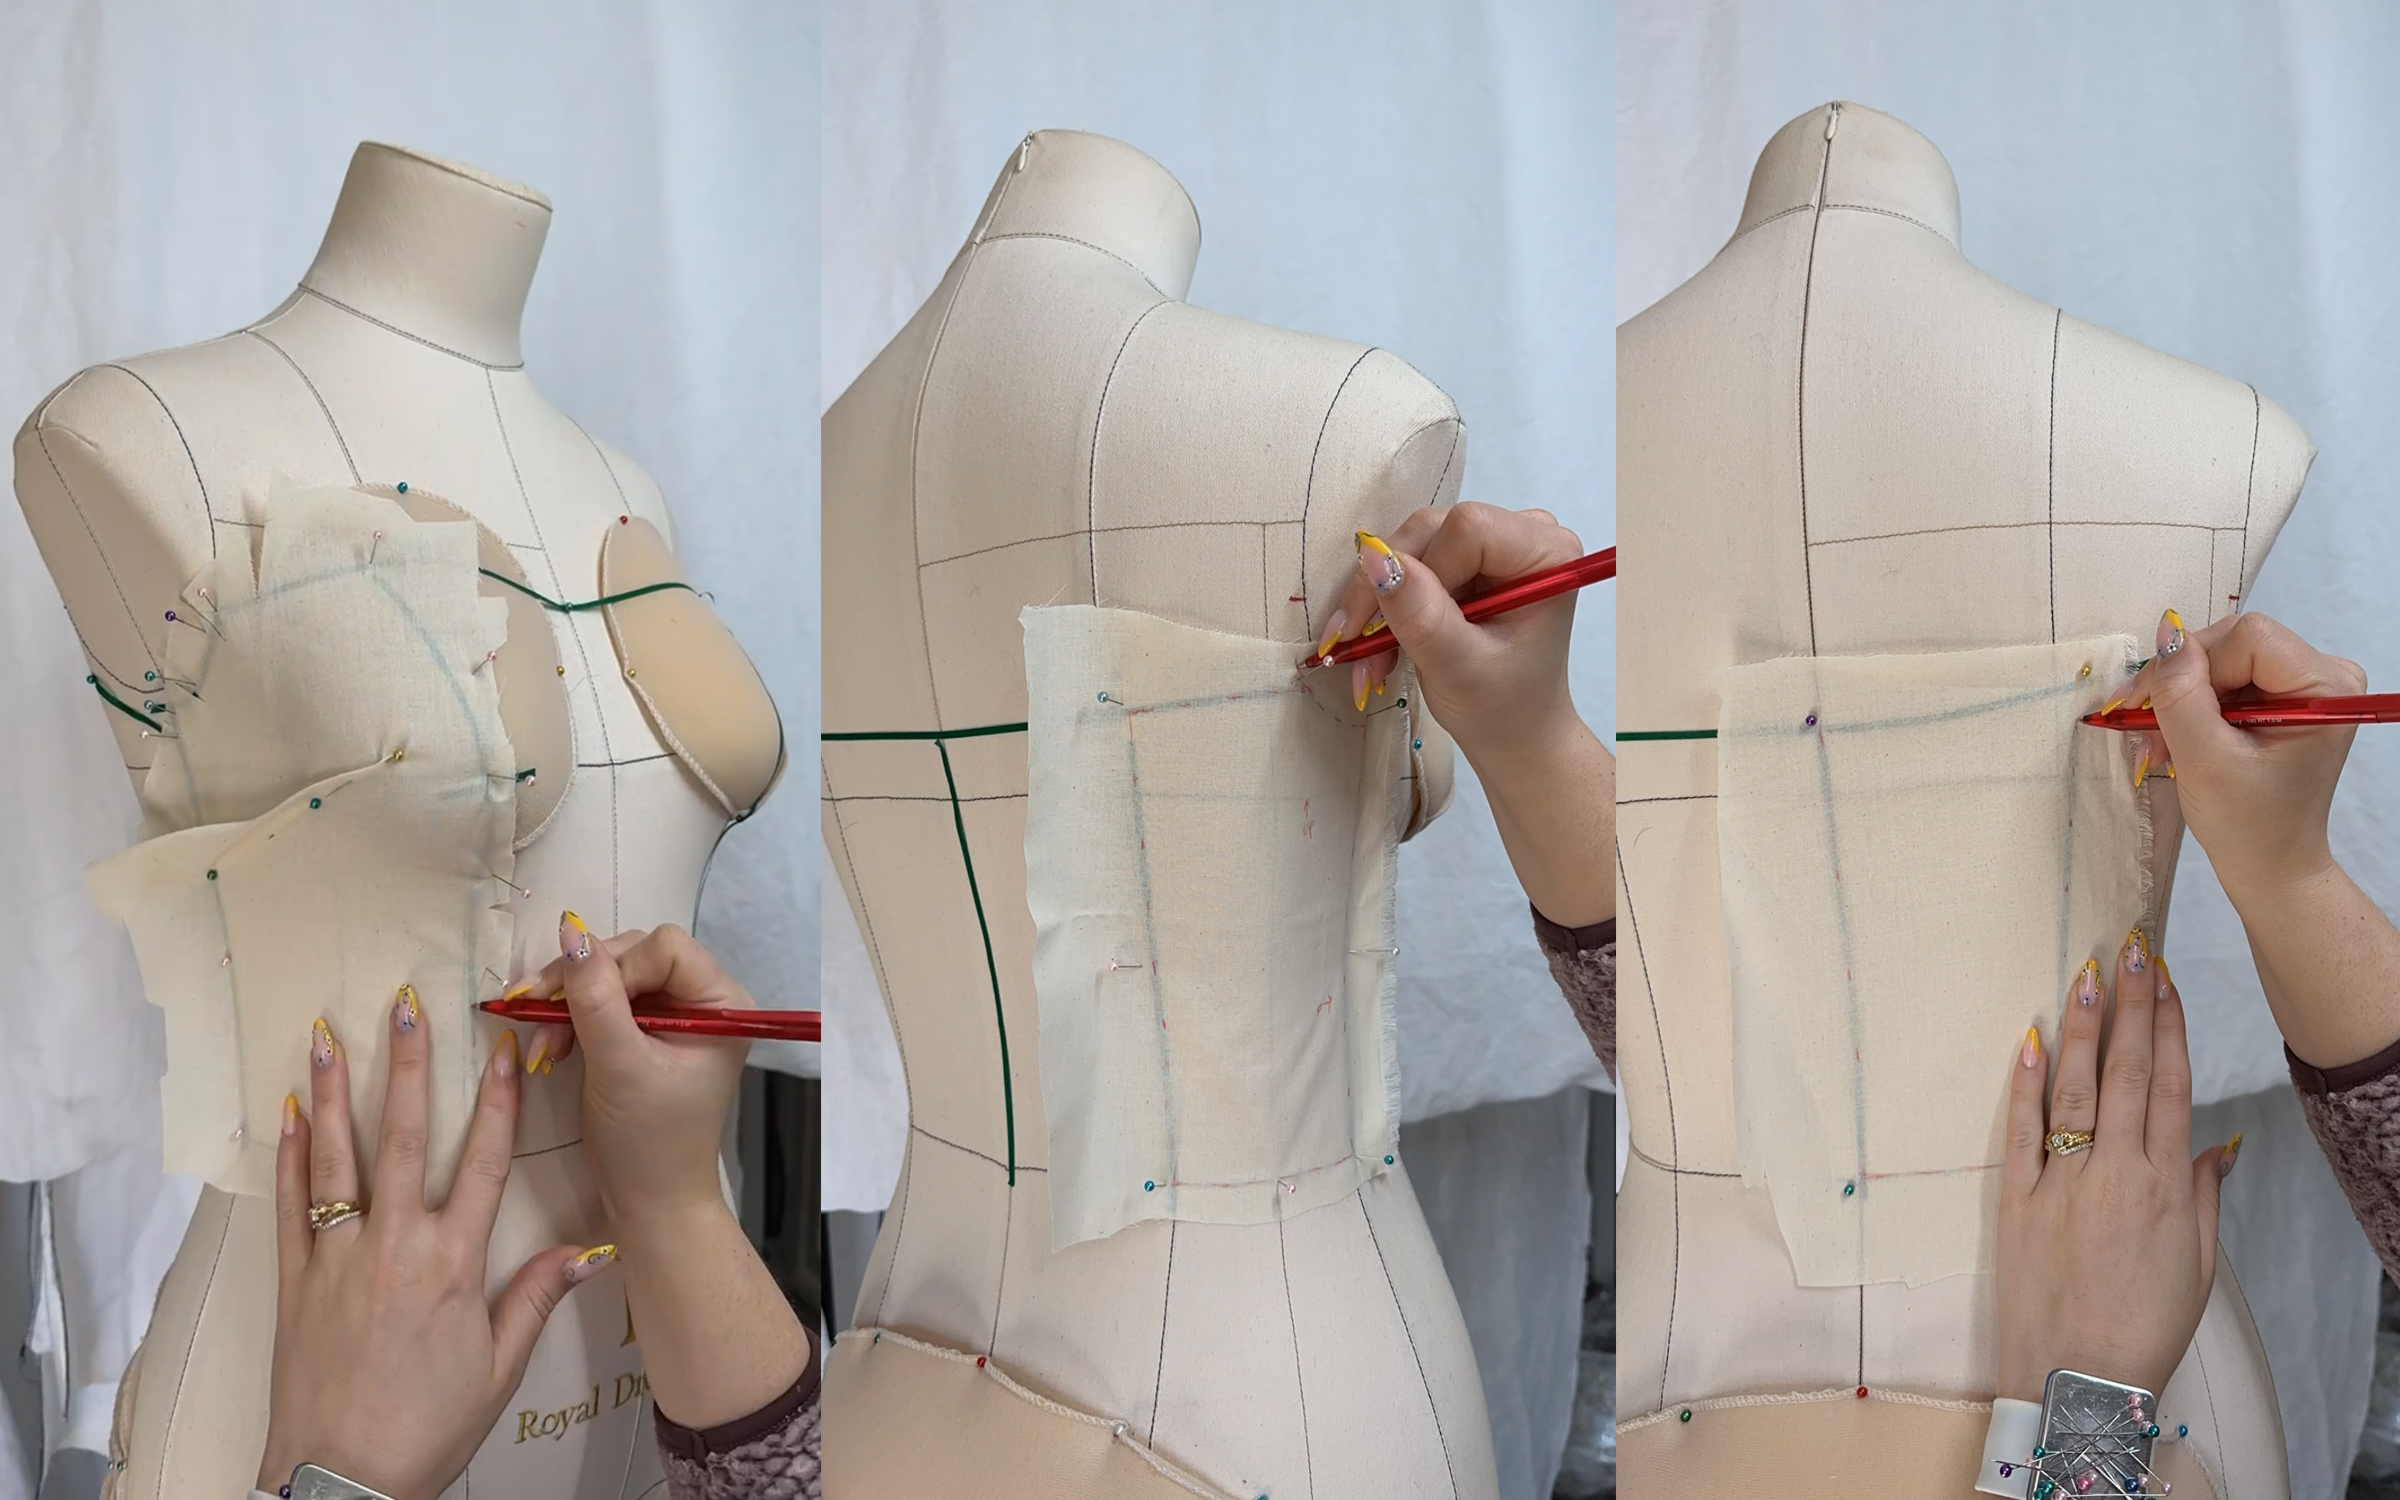
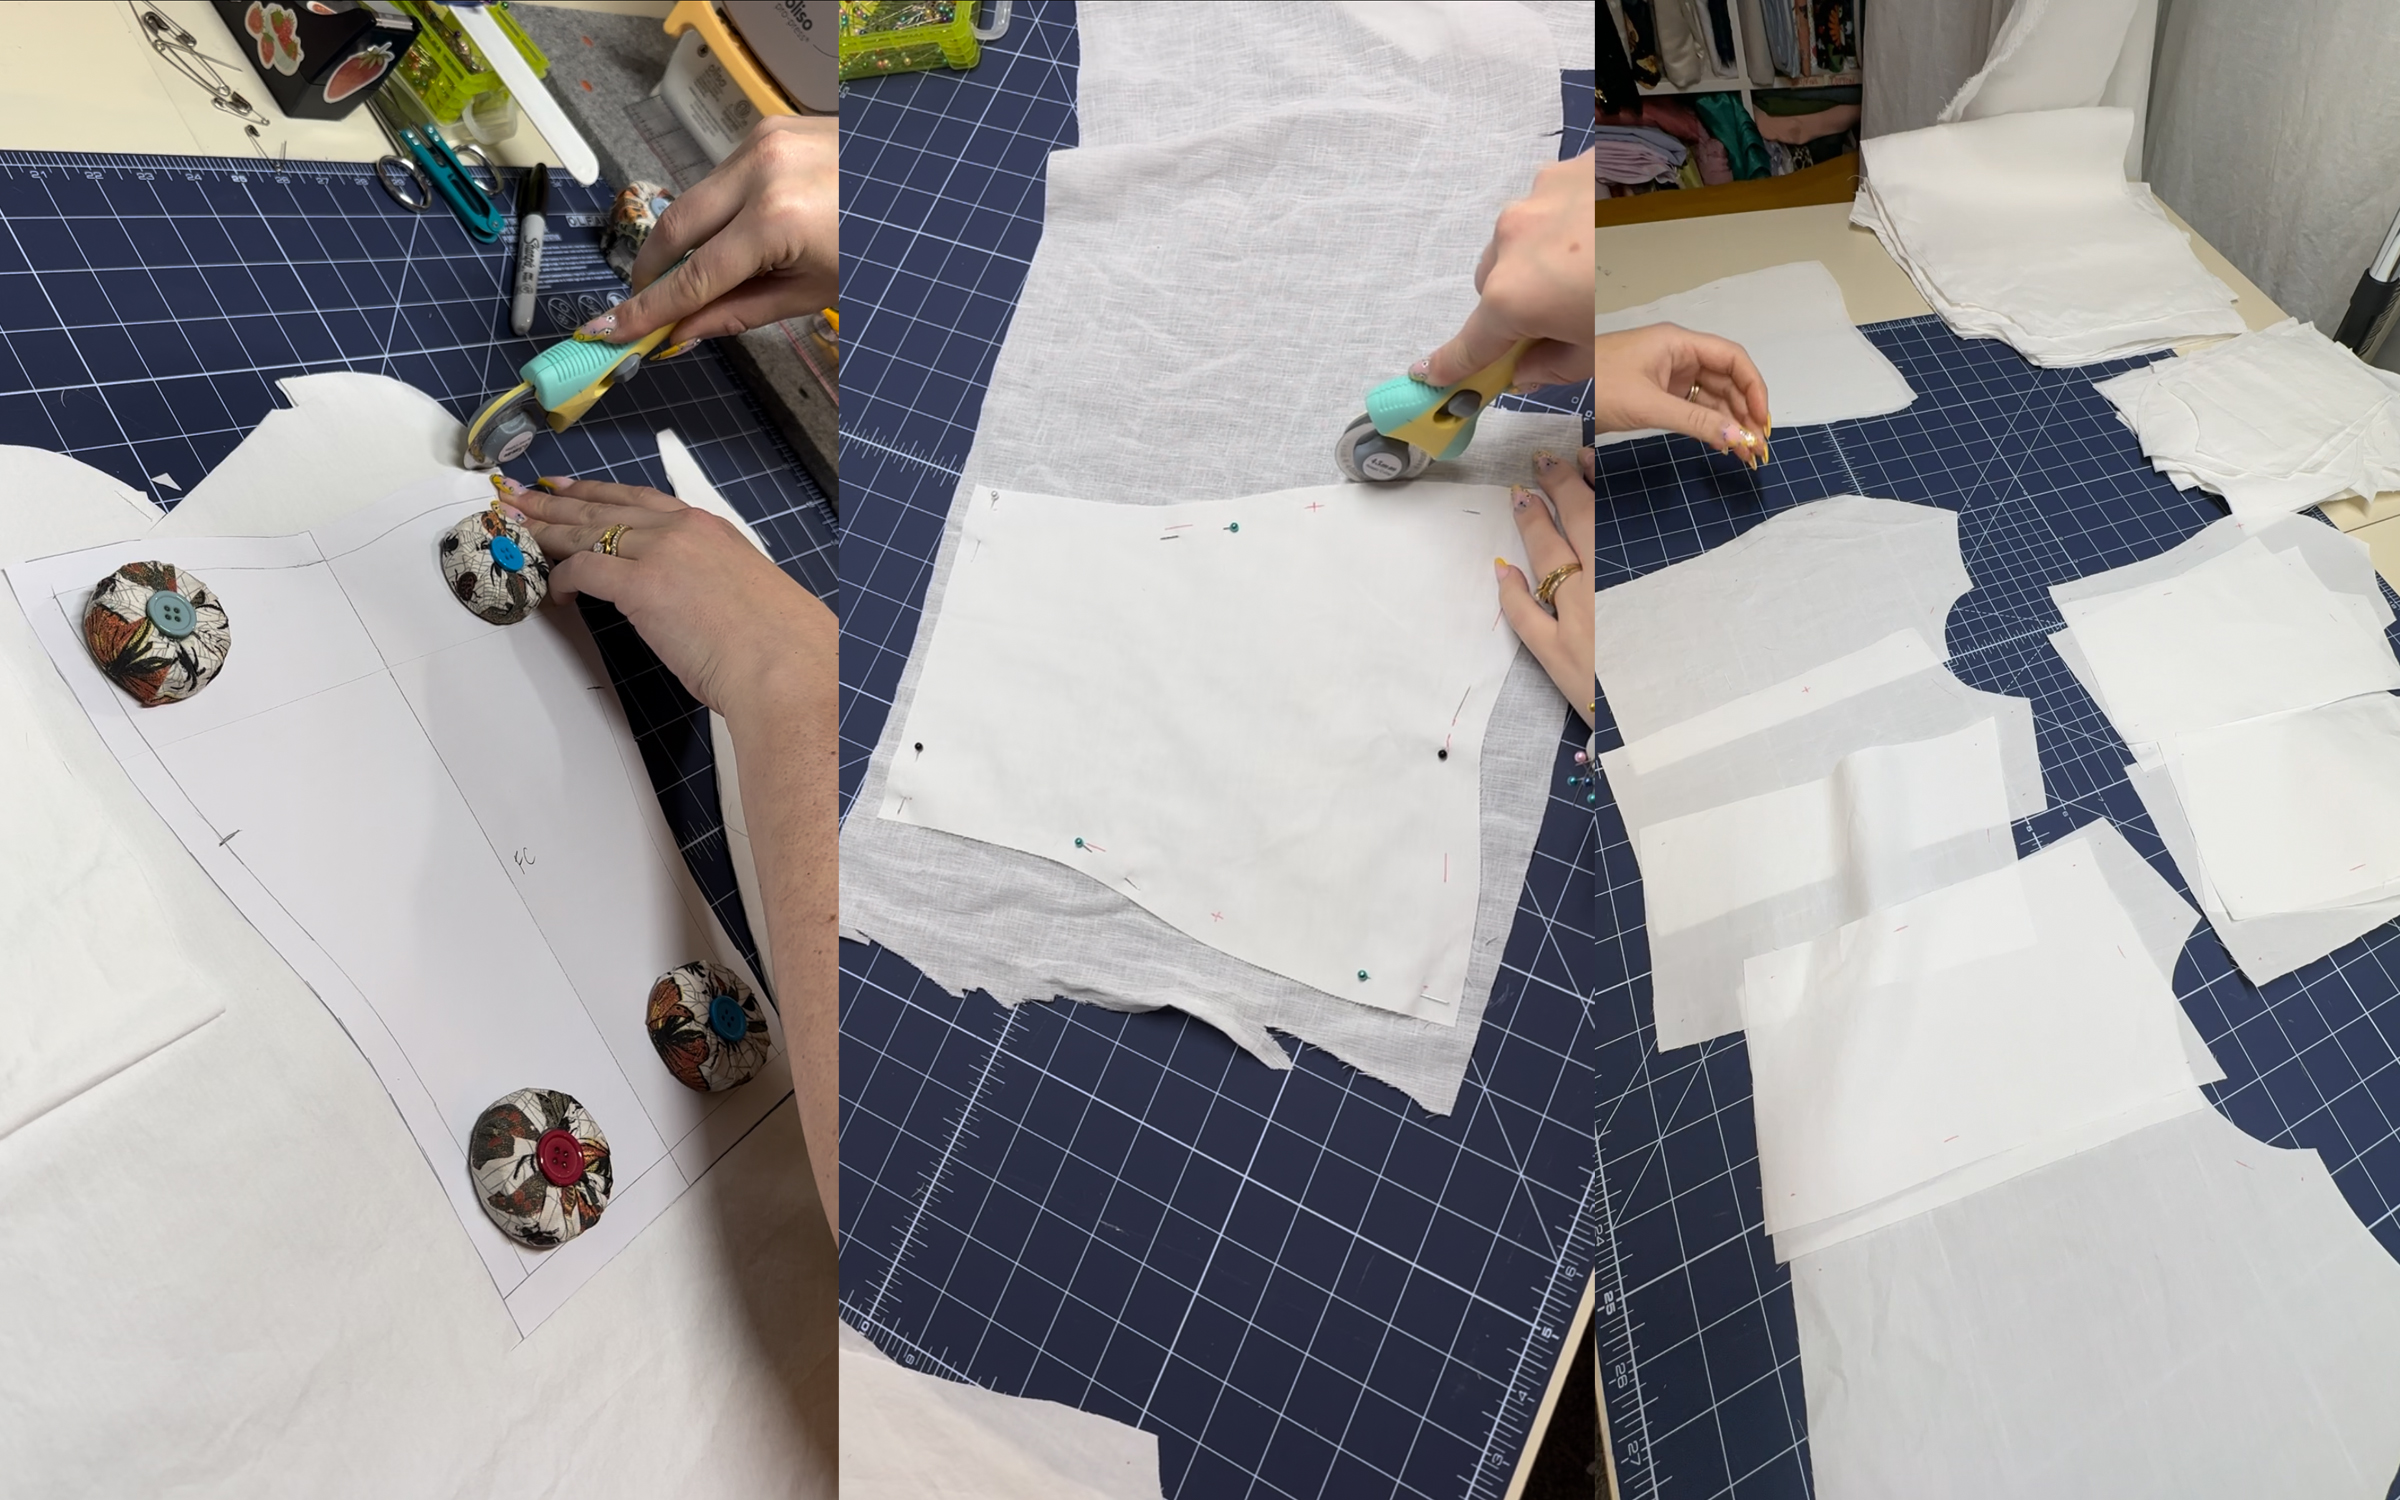
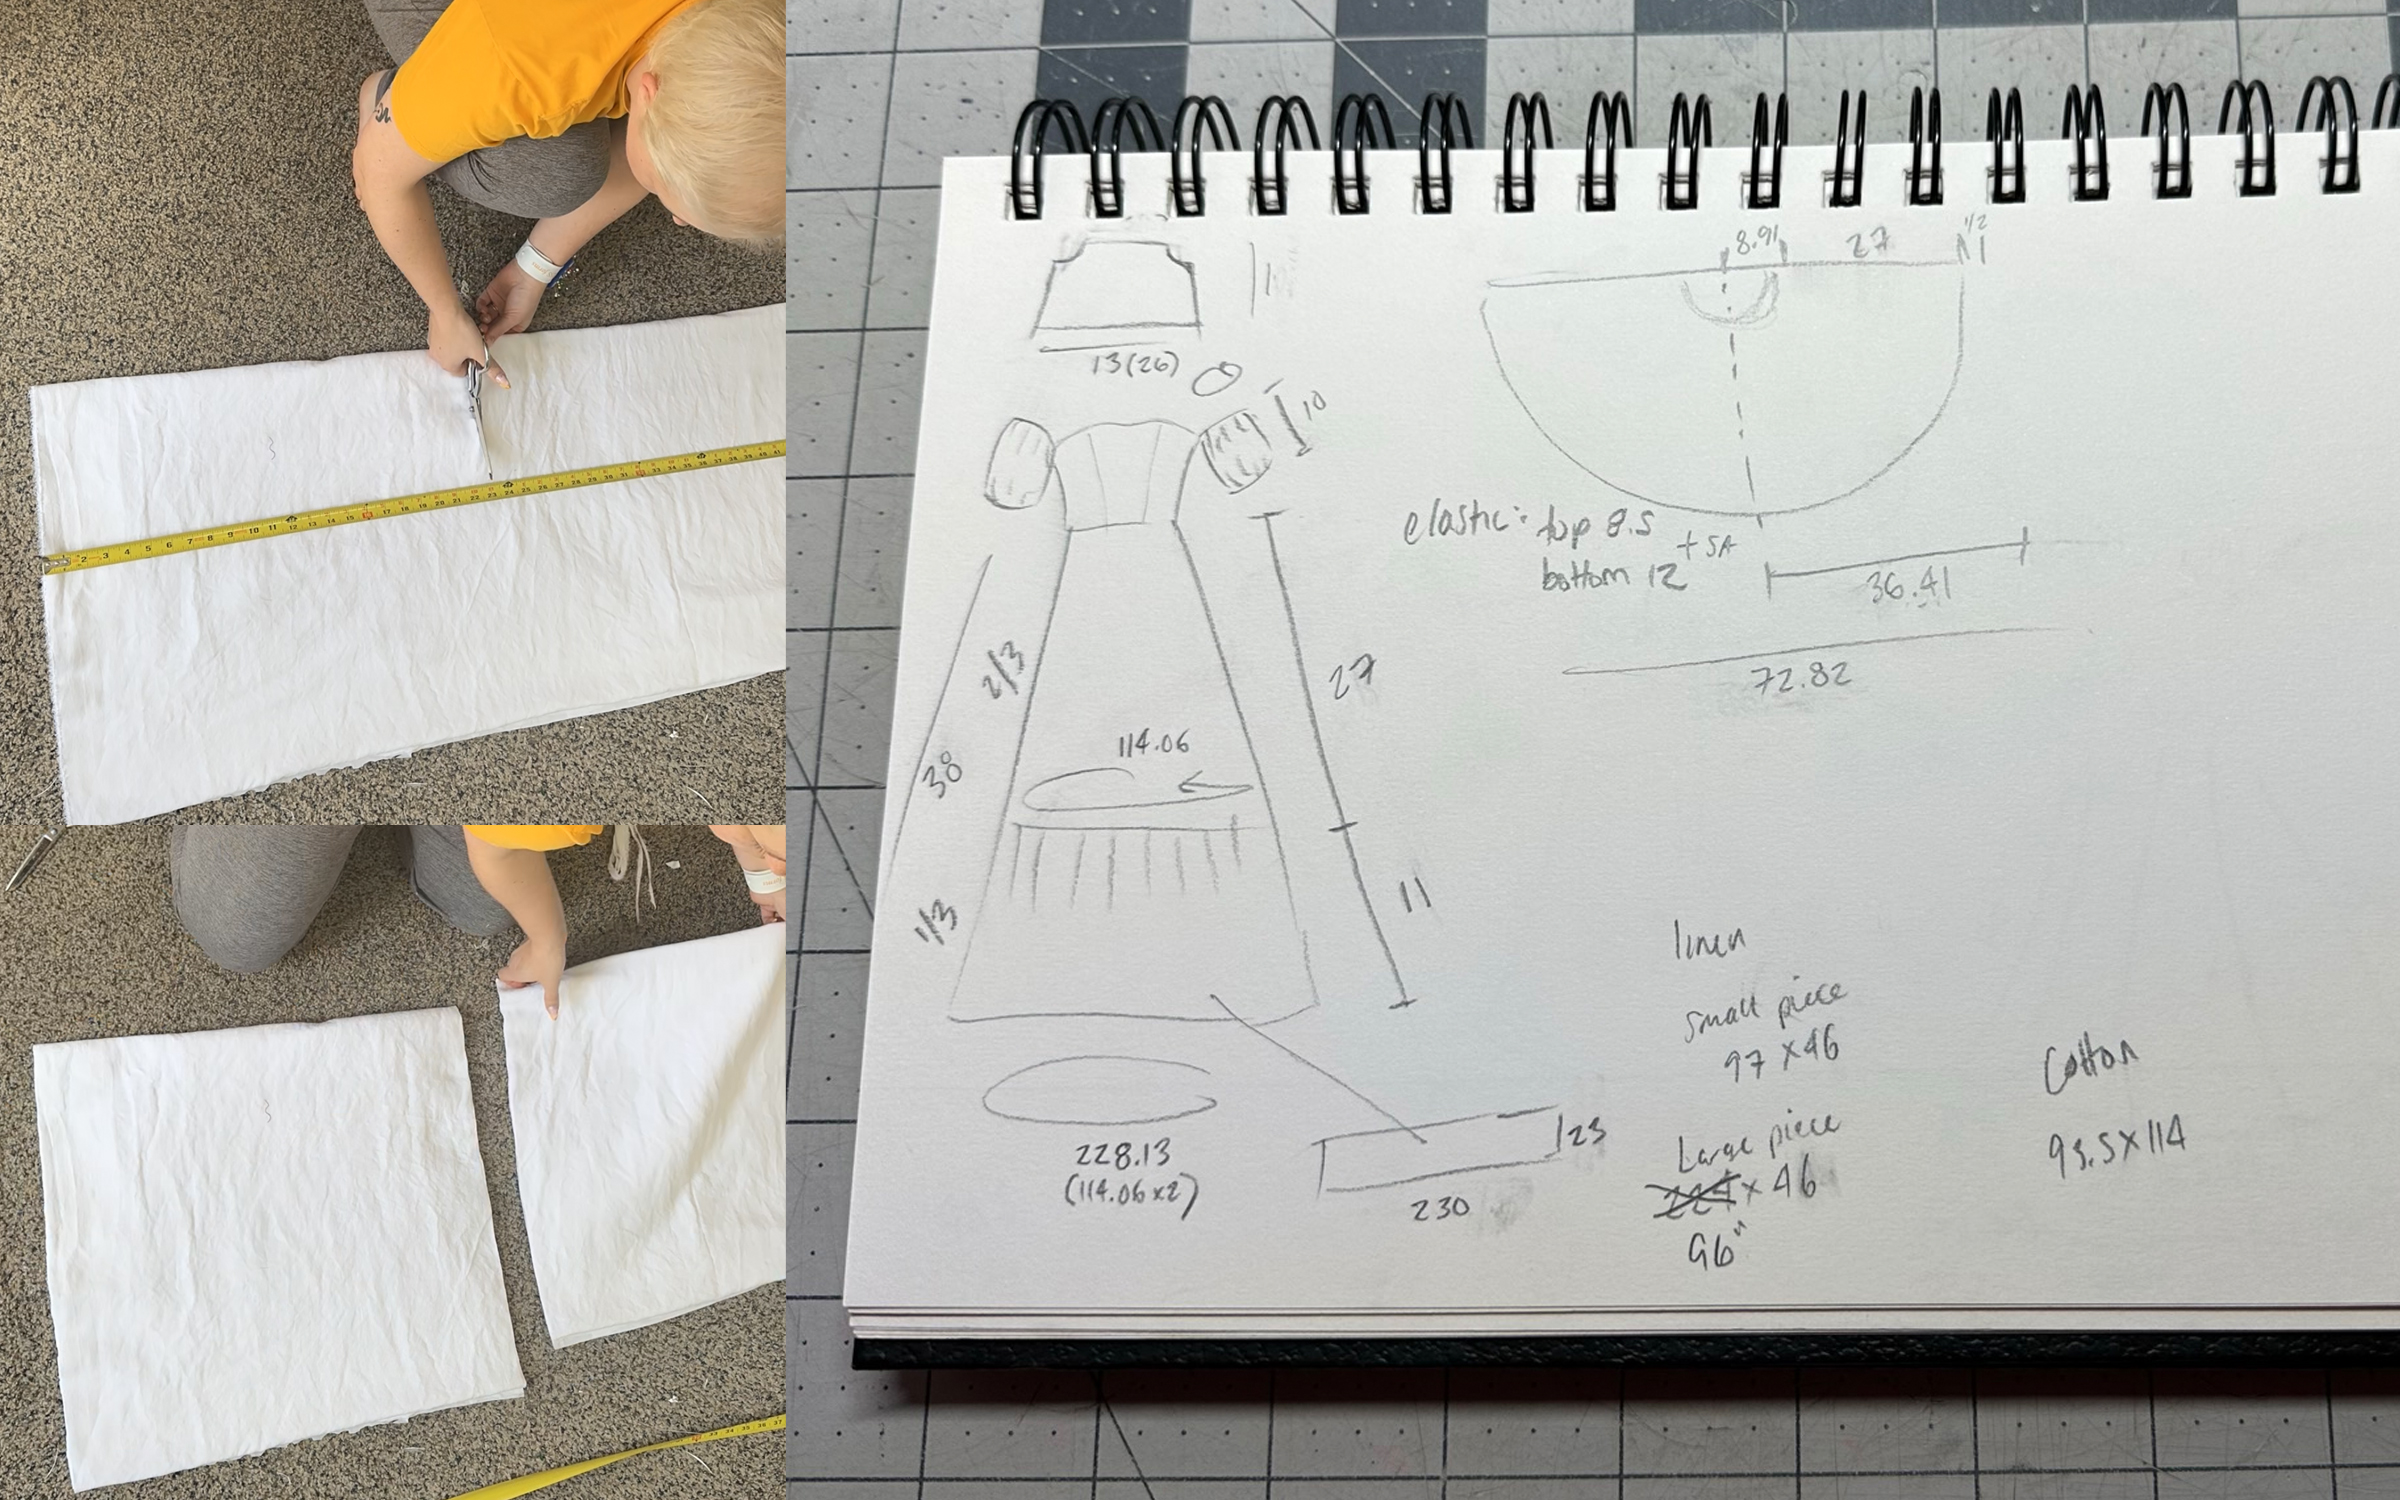
I started by drafting the bodice pattern and measuring the skirts and ruffles to calculate how much fabric I would need to buy. The bodice was drafted as a simple strapless shape with bust seams and a center back zipper. I then added slight dips under the arms to accommodate the puff sleeve attachment points. The puff sleeves were patterned as 10 x 26” rectangles with notches cut into the top outside corners to fit the underarm curve.


Once I had everything patterned and measured, I bought 14 yards of lightweight linen. I also bought 2 yd of extra wide cotton fabric to line both the bodices and top portion of the skirts as the linen was a little too sheer on its own. I overbought with a plan to use as much fabric for the bottom ruffle as possible after cutting the bodices and skirt bases. I ended up with less than a yard left and some scraps!


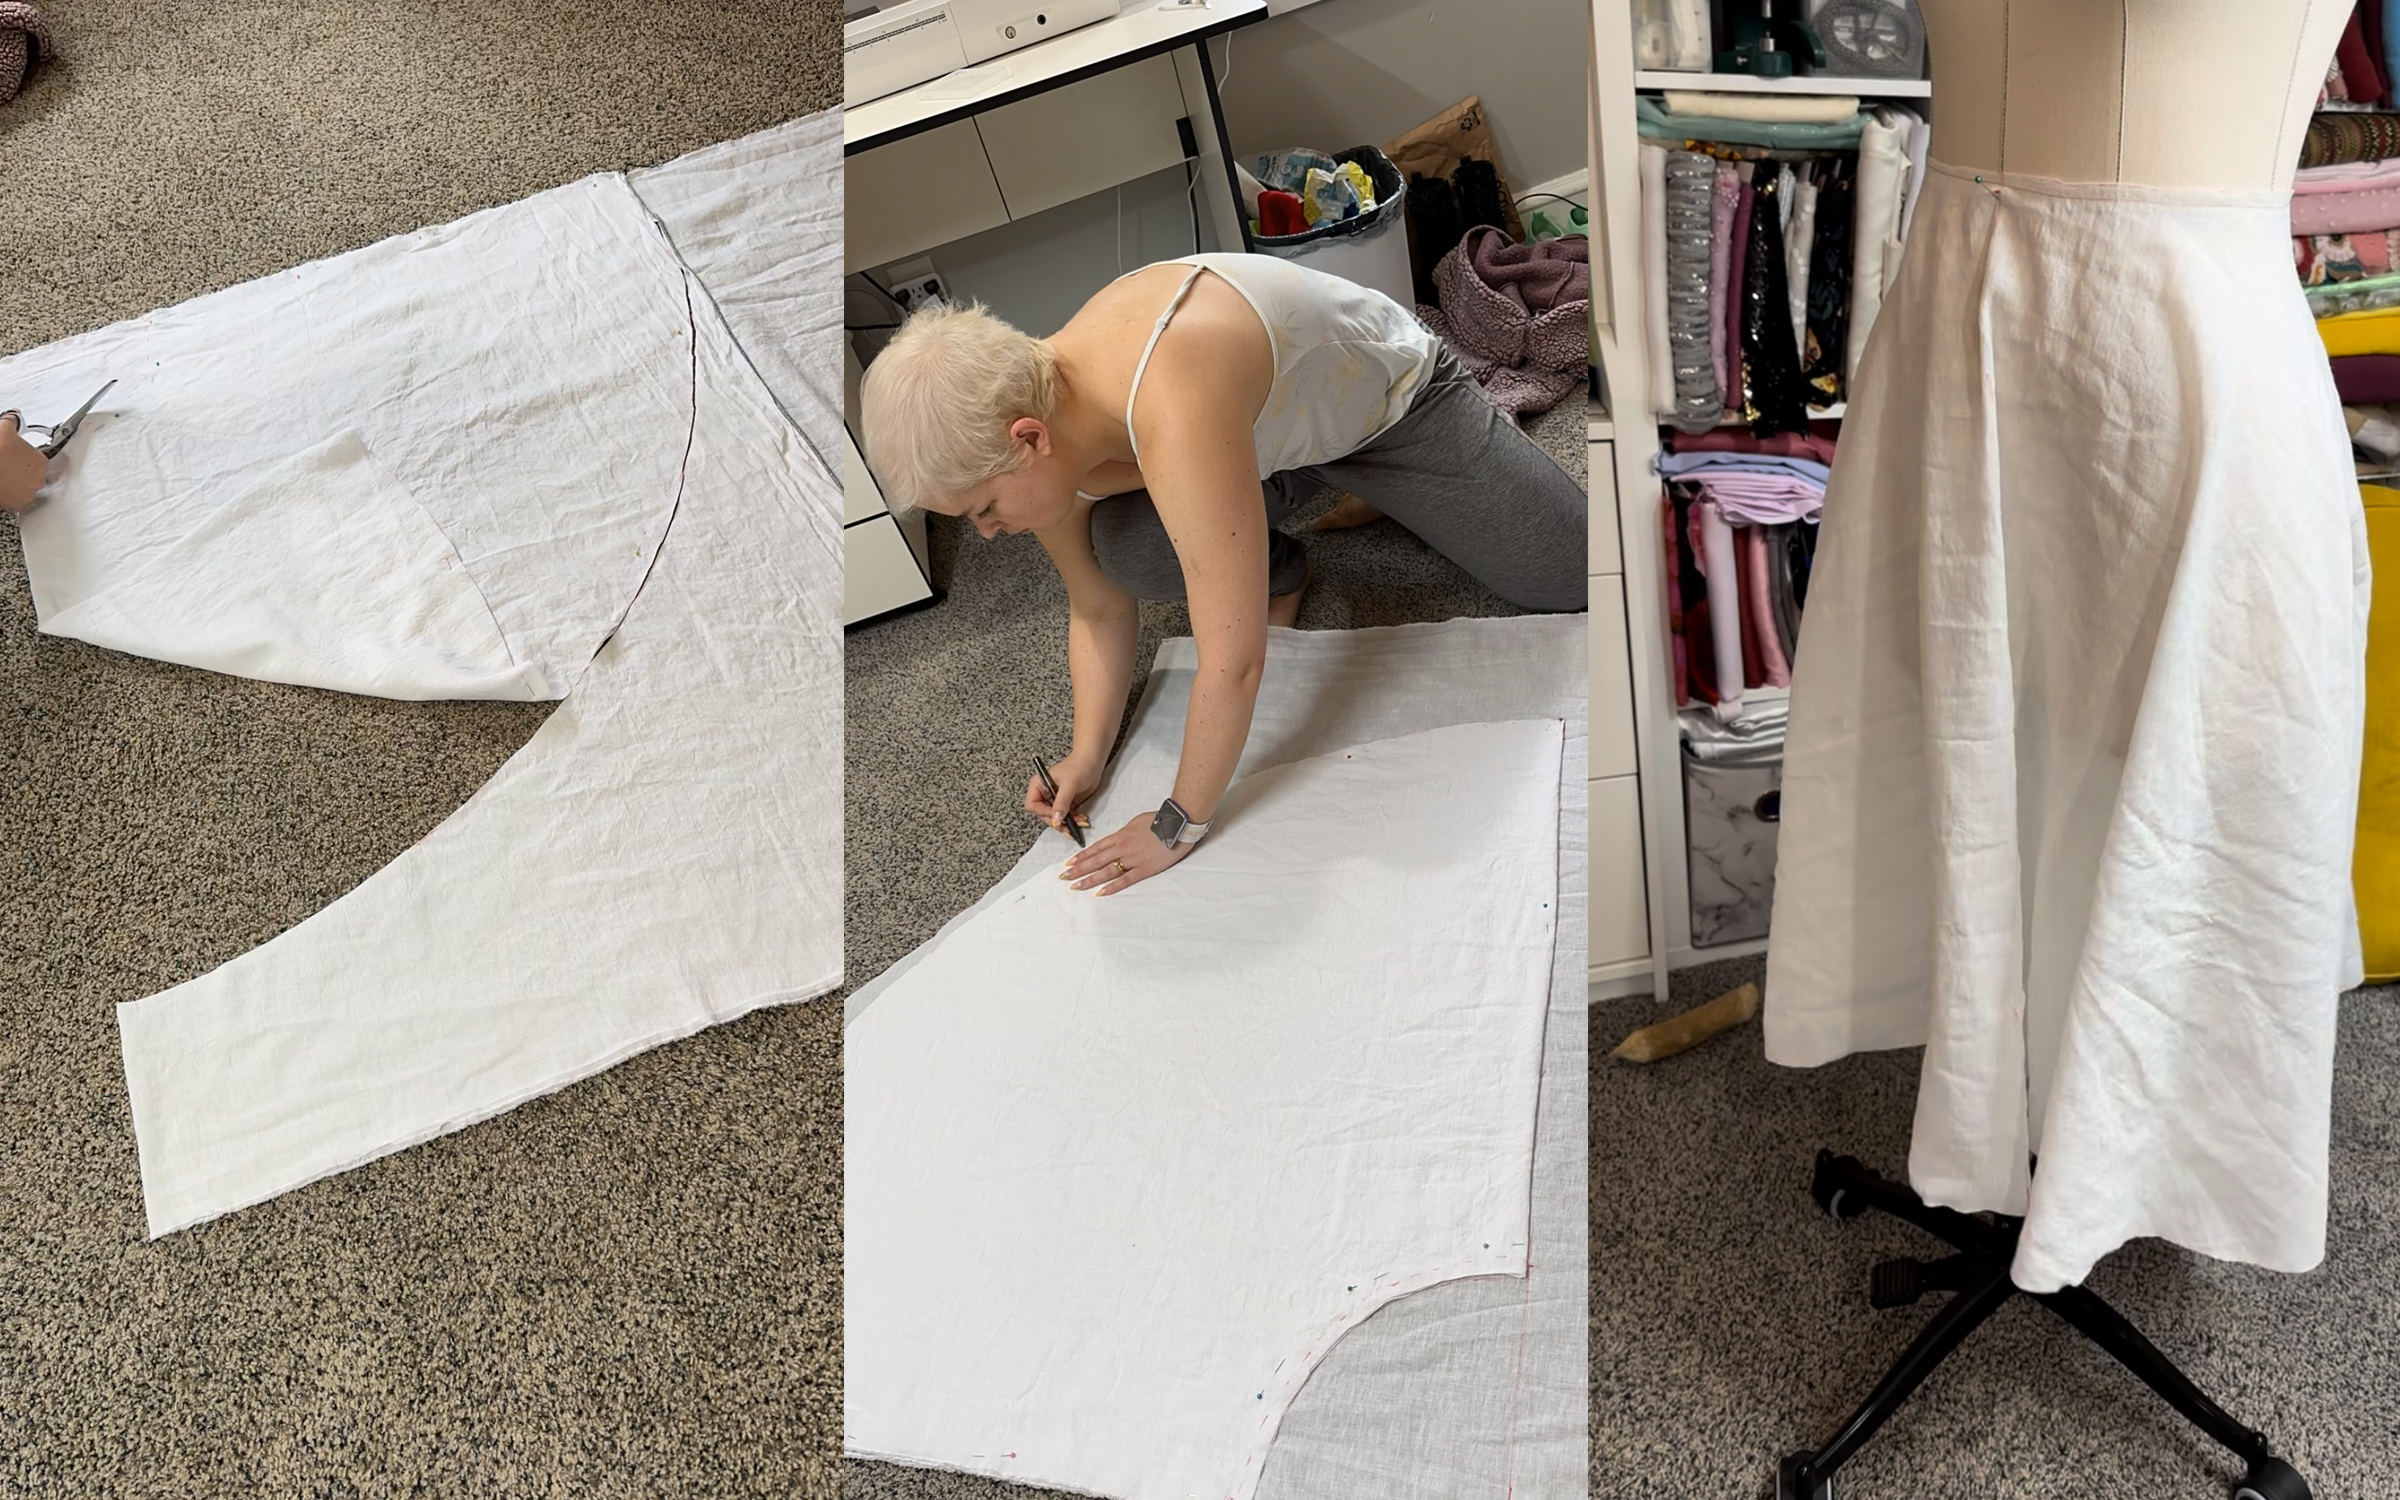
I started by cutting out the half circle skirt bases from both linen and cotton and then hanging them on my mannequin to settle for the night. The linen ended up growing a full inch and needed to be trimmed. That's why it's super important to let your skirt fabric hang and grow overnight every time!


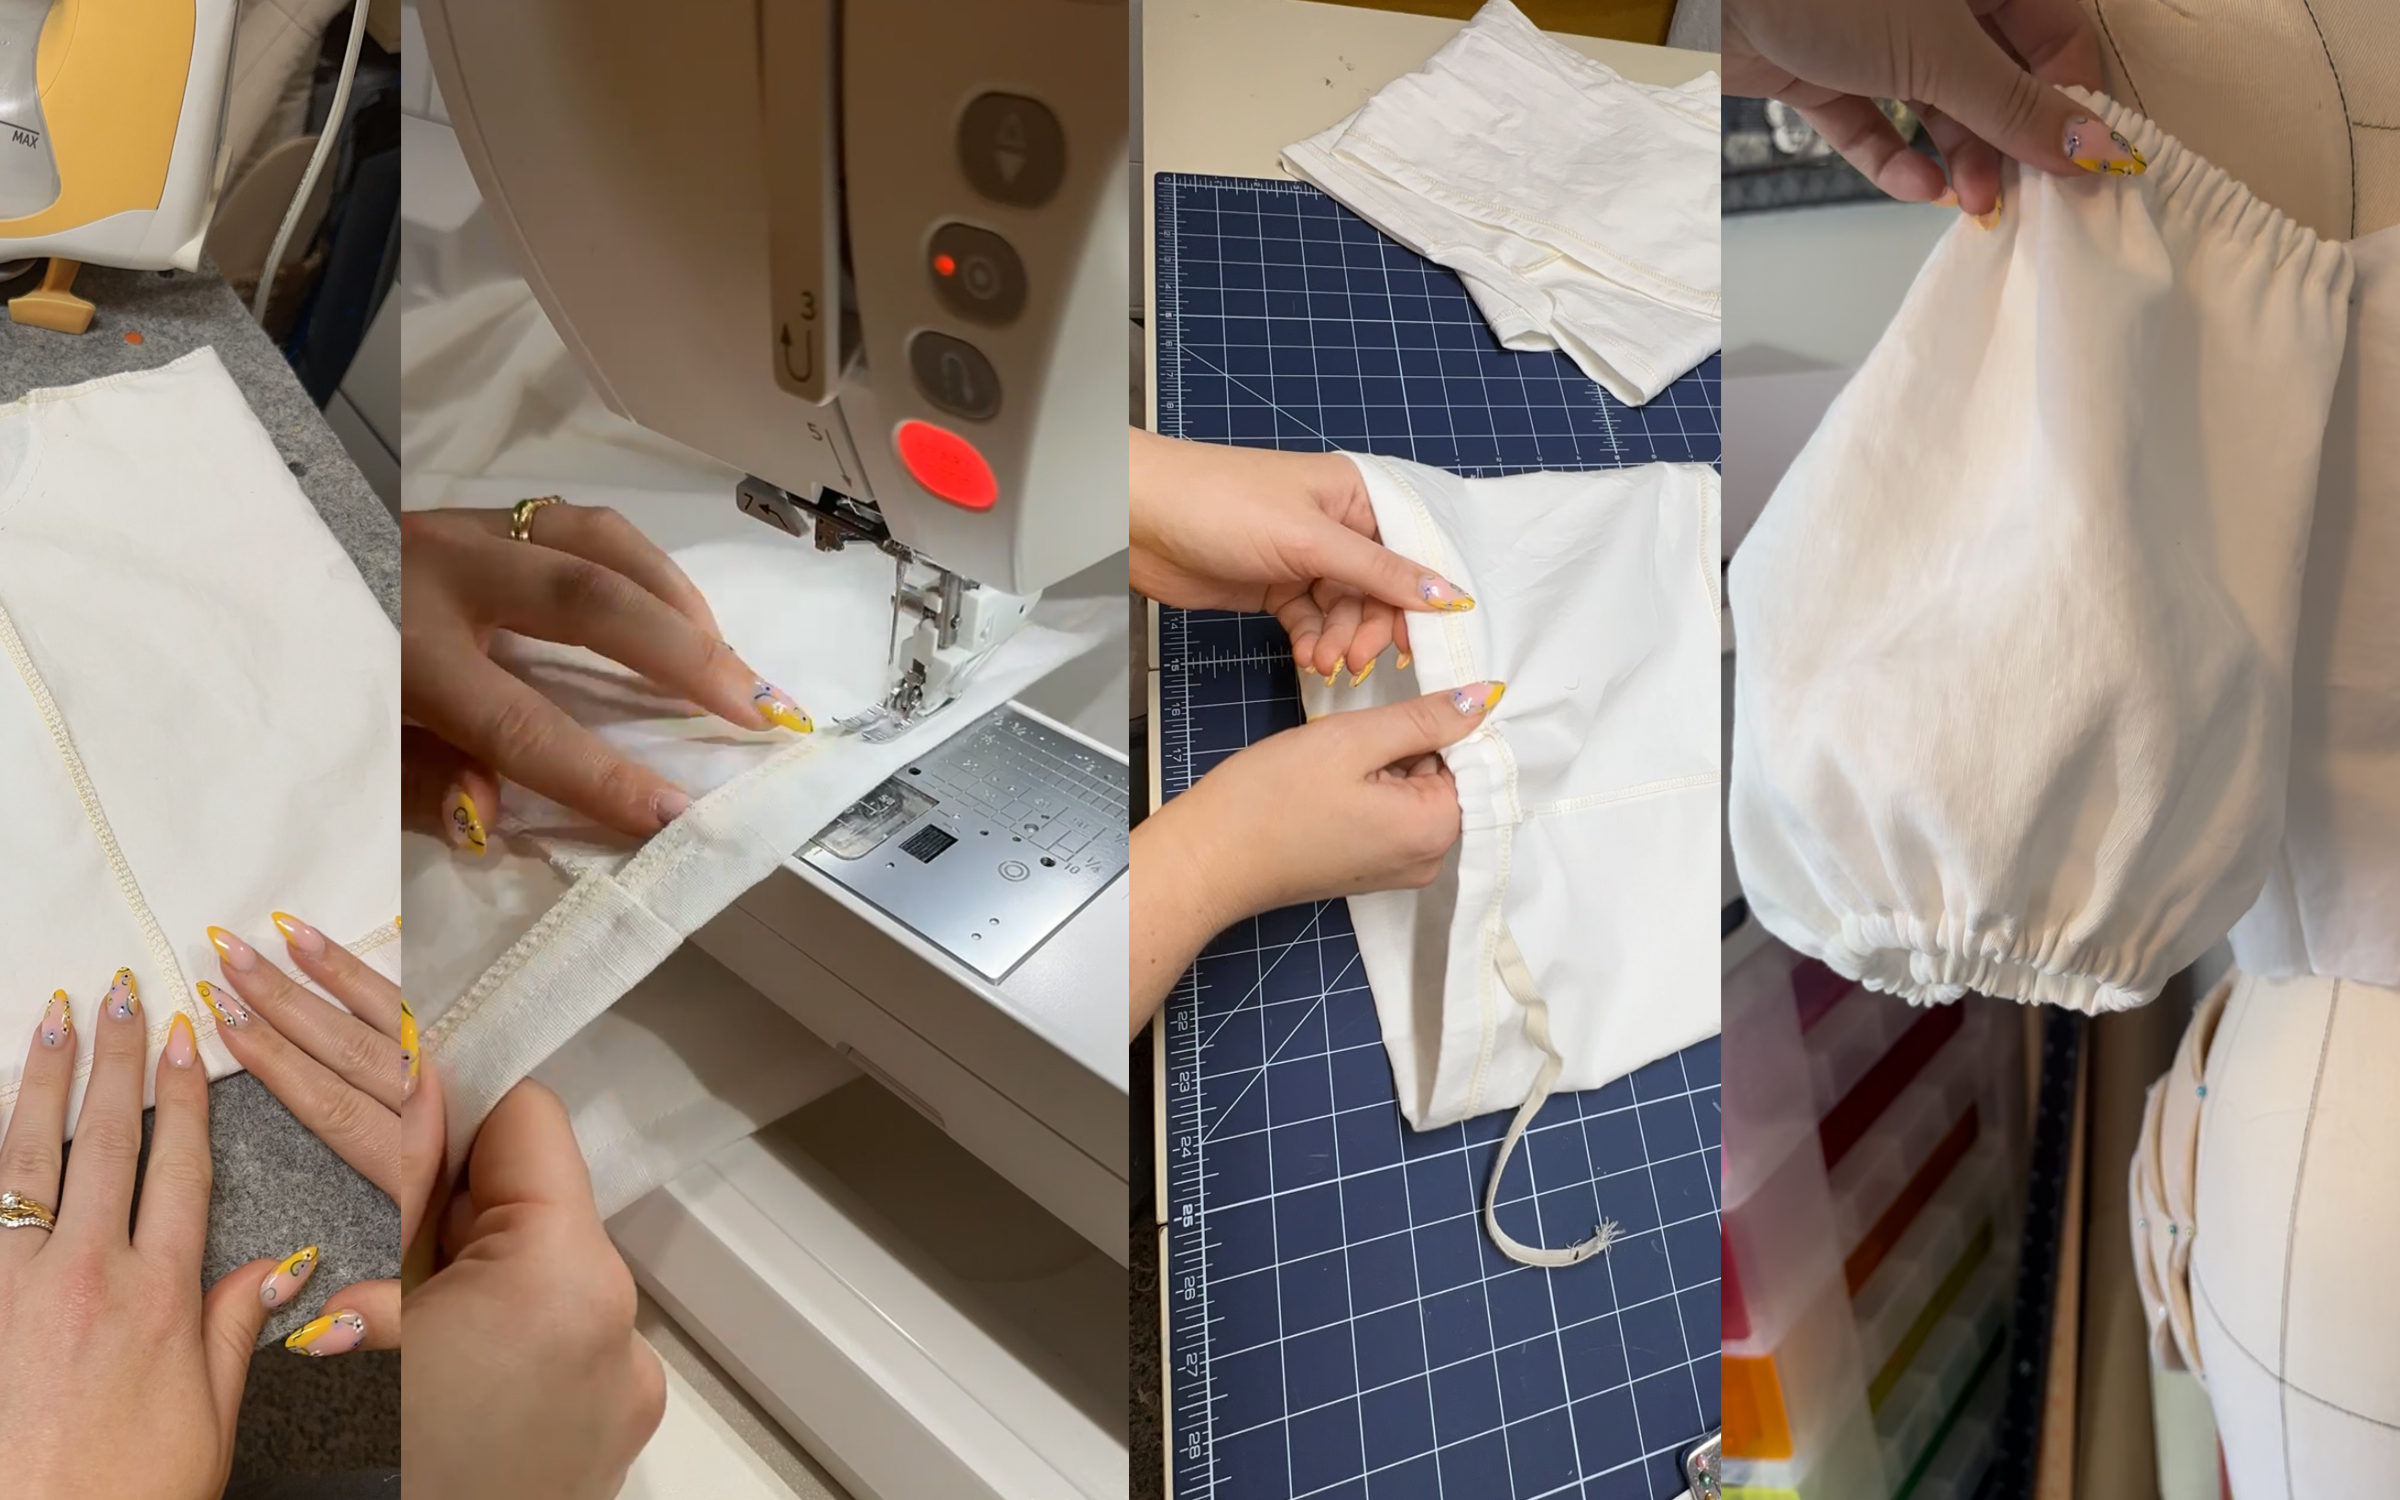
For each bodice pattern piece, I cut out two pieces of linen and four pieces of cotton. Sew 21 pieces of fabric per bodice total. I then basted one piece of linen on top of one piece of cotton to use for the outside layer of my bodice. The other cotton pieces were assembled and used as the lining. These three layers of fabric provided enough stability that I did not need to use any boning or interfacing.


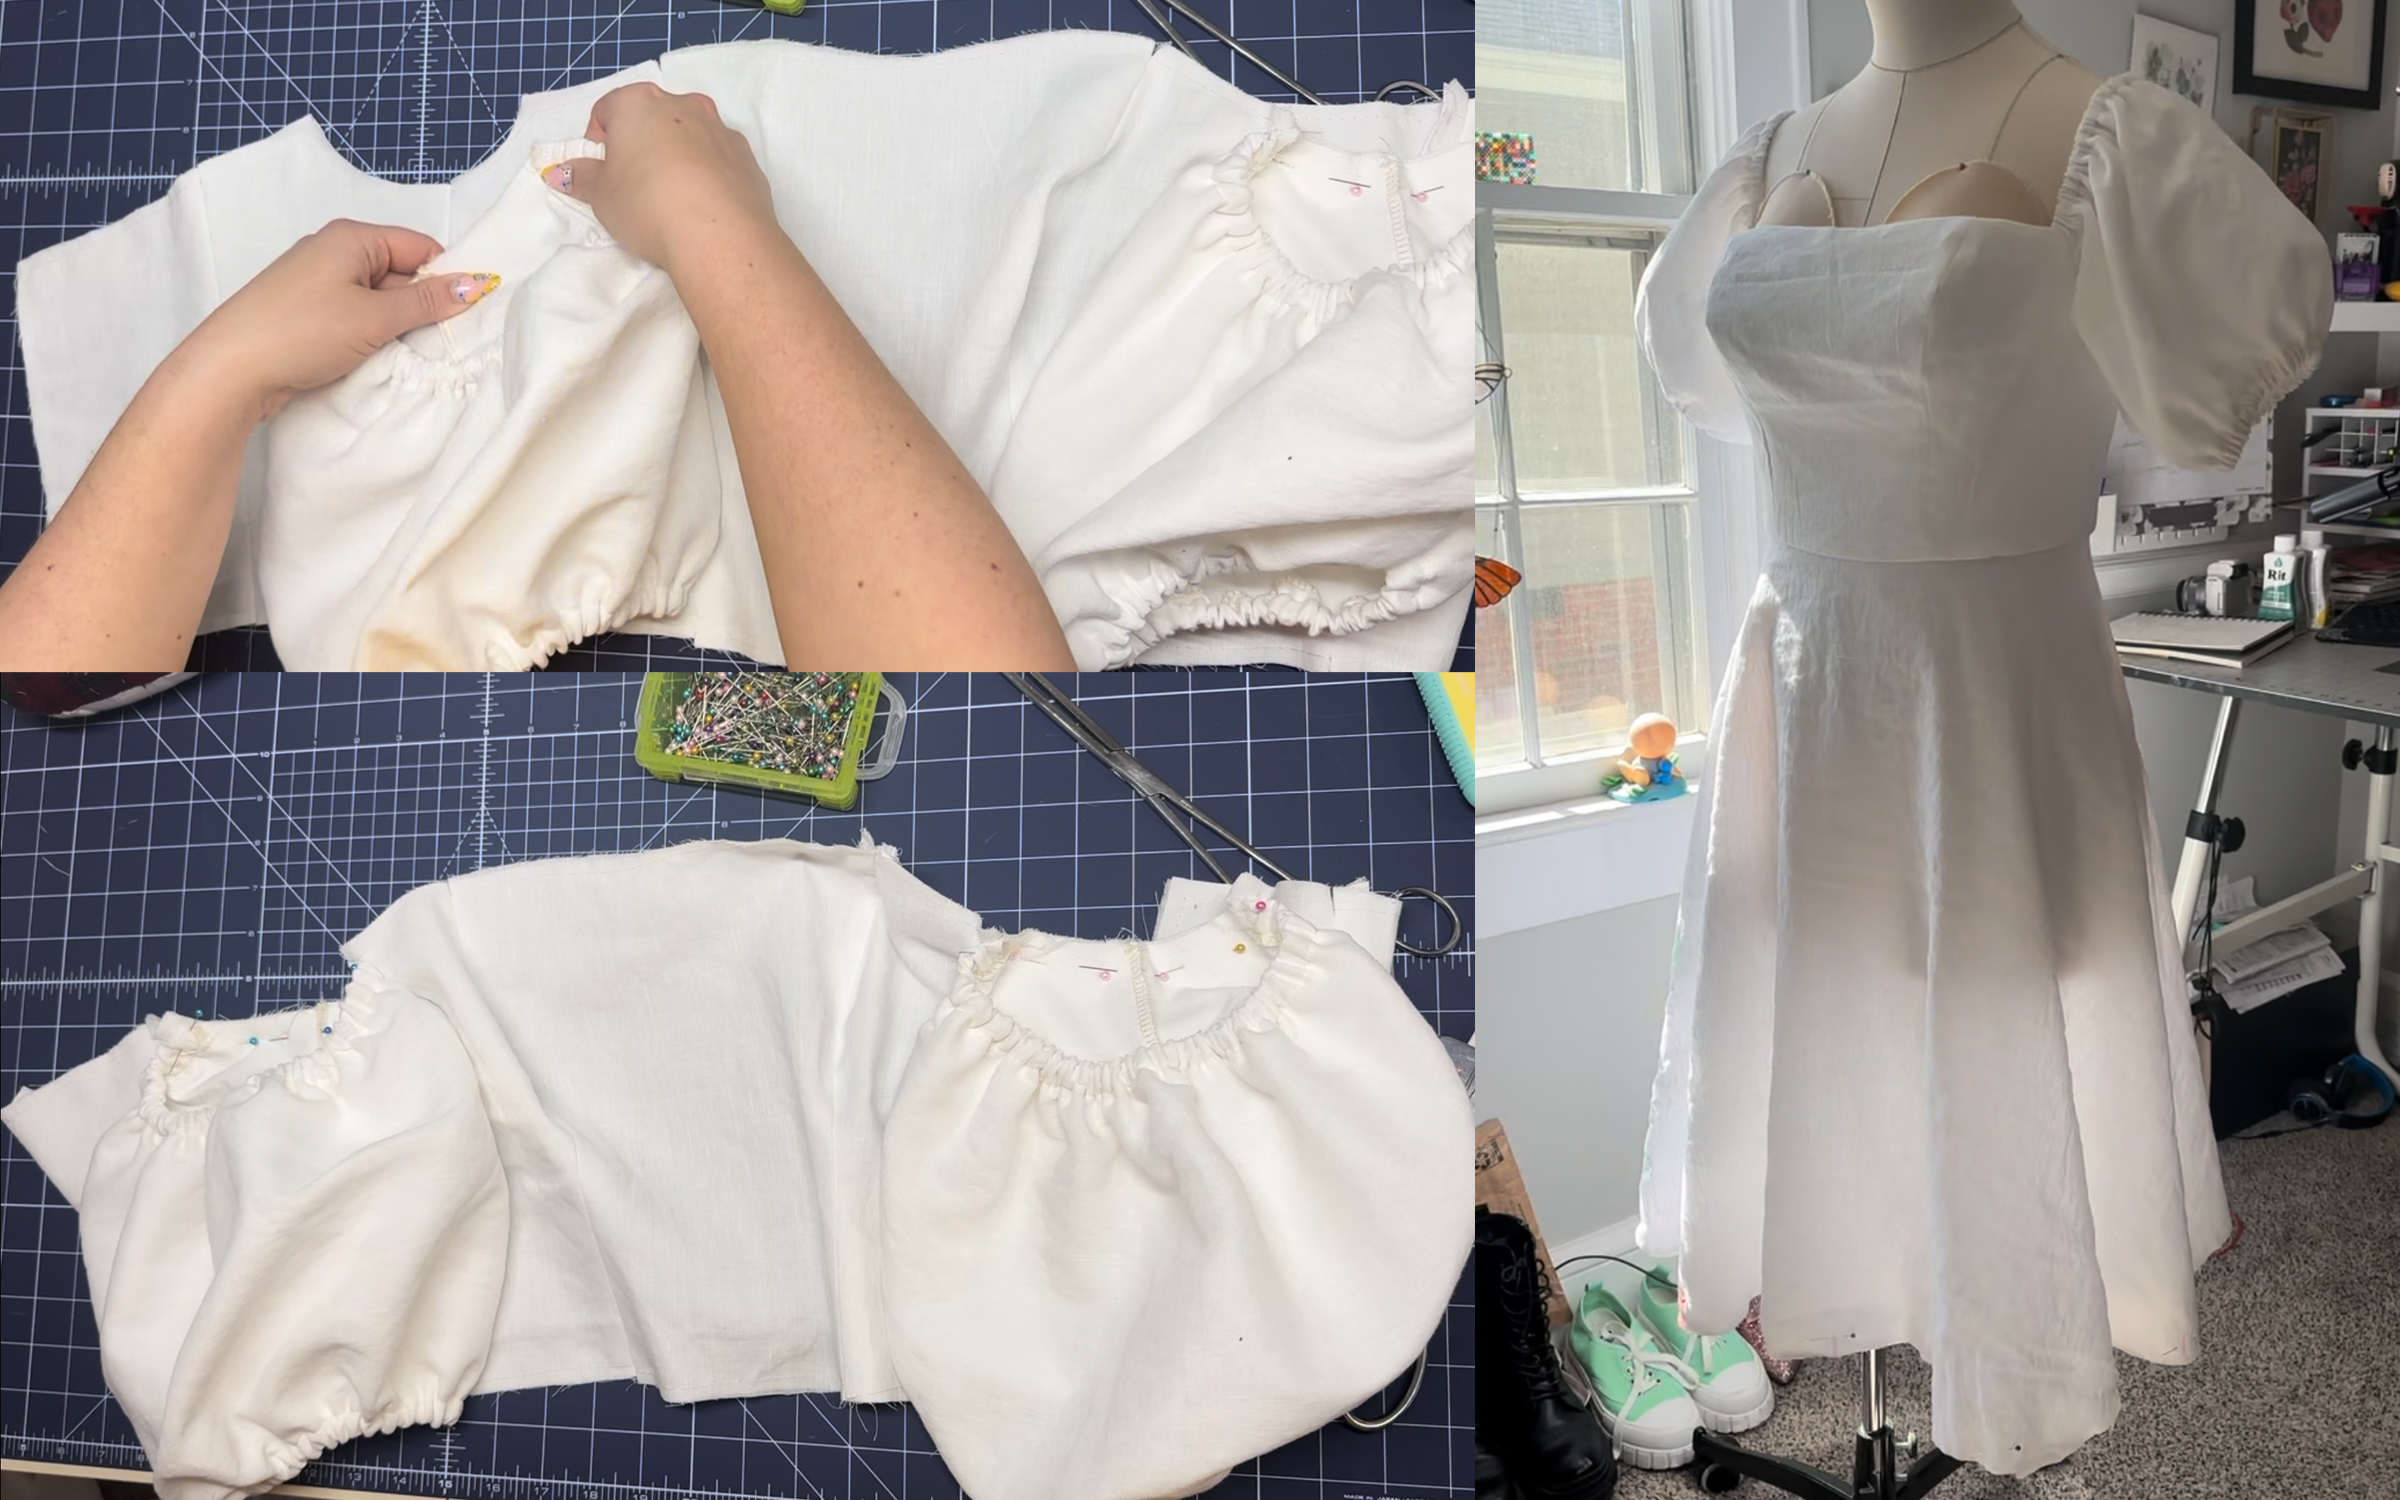
The sleeves were constructed of one-piece linen and one-piece cotton each. I serged the underarm seam closed and then serged the top and bottom raw edges. I then flipped those each inside the sleeve ½” and sewed them down to create channels for the elastics. The sleeves were attached into the underarm dip of the outer bodice fabric. Their raw edges were then hidden when the bodice lining was attached.


Once the linen skirt growth was trimmed, I basted the linen to the cotton fabric, serged the back seams individually and attached the skirt to the outer bodice. I used an invisible zipper to close the back, careful not to catch the lining fabric. Once an invisible zipper was installed, I sewed the remainder of the back skirt seam and a hand whip stitched in the lining to hide all the raw edges at the waist and next to the zipper.


The final step was to add the ruffles at the bottom edge of the skirt base. I saved this for last because I wanted to use every last scrap of linen I had left. I sewed all remaining full width lengths of linen together to create one long yardage then I folded it up lengthwise so I could make one clean cut through the center of all yardages to create two long strips. I folded both long strips in half and ironed them to create fuller ruffles without having to finish the bottom edge. After sewing the ends together to create one giant loop, my MC 9450 QCP with adjusted tension and walking foot helped to gather the lengths into a more manageable size. I marked four points on the gathered loop in even increments to help me line them up with the front, sides and center back of the skirt base. After attaching the ruffle at those four points I hand gathered the remainder to the bottom edge of the skirt. All that was left was to use my serger to create a nice clean attachment and the dresses were done!


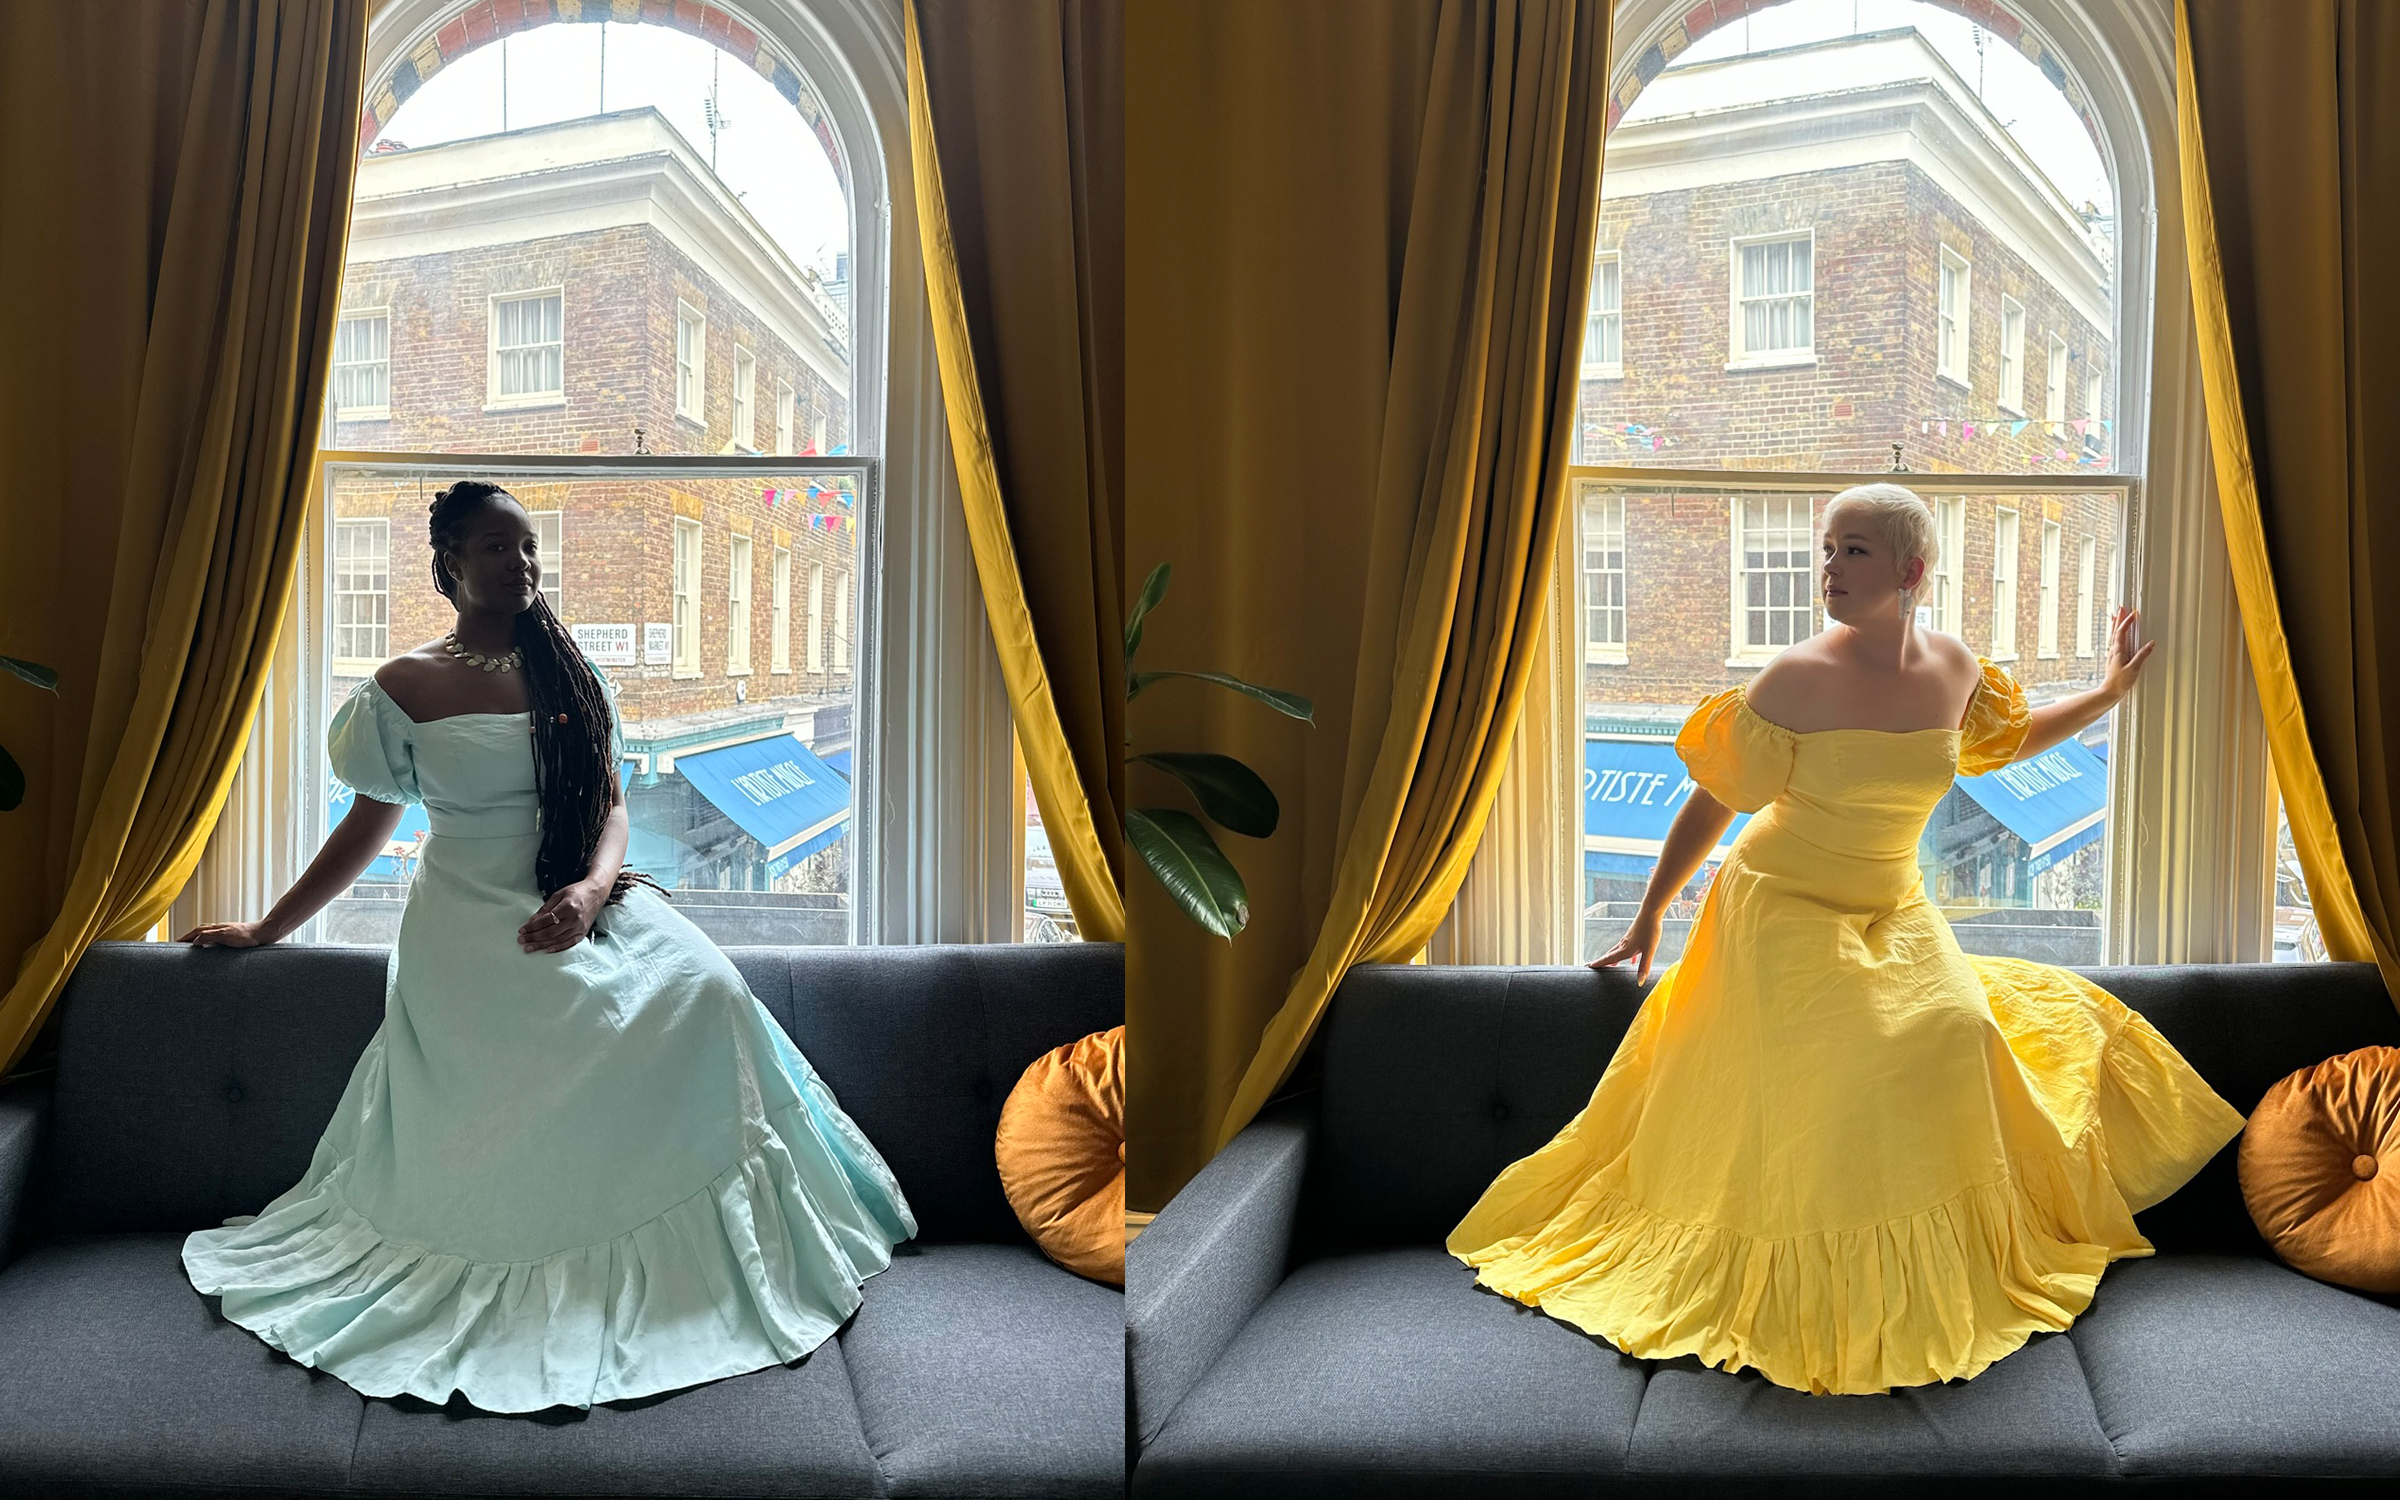
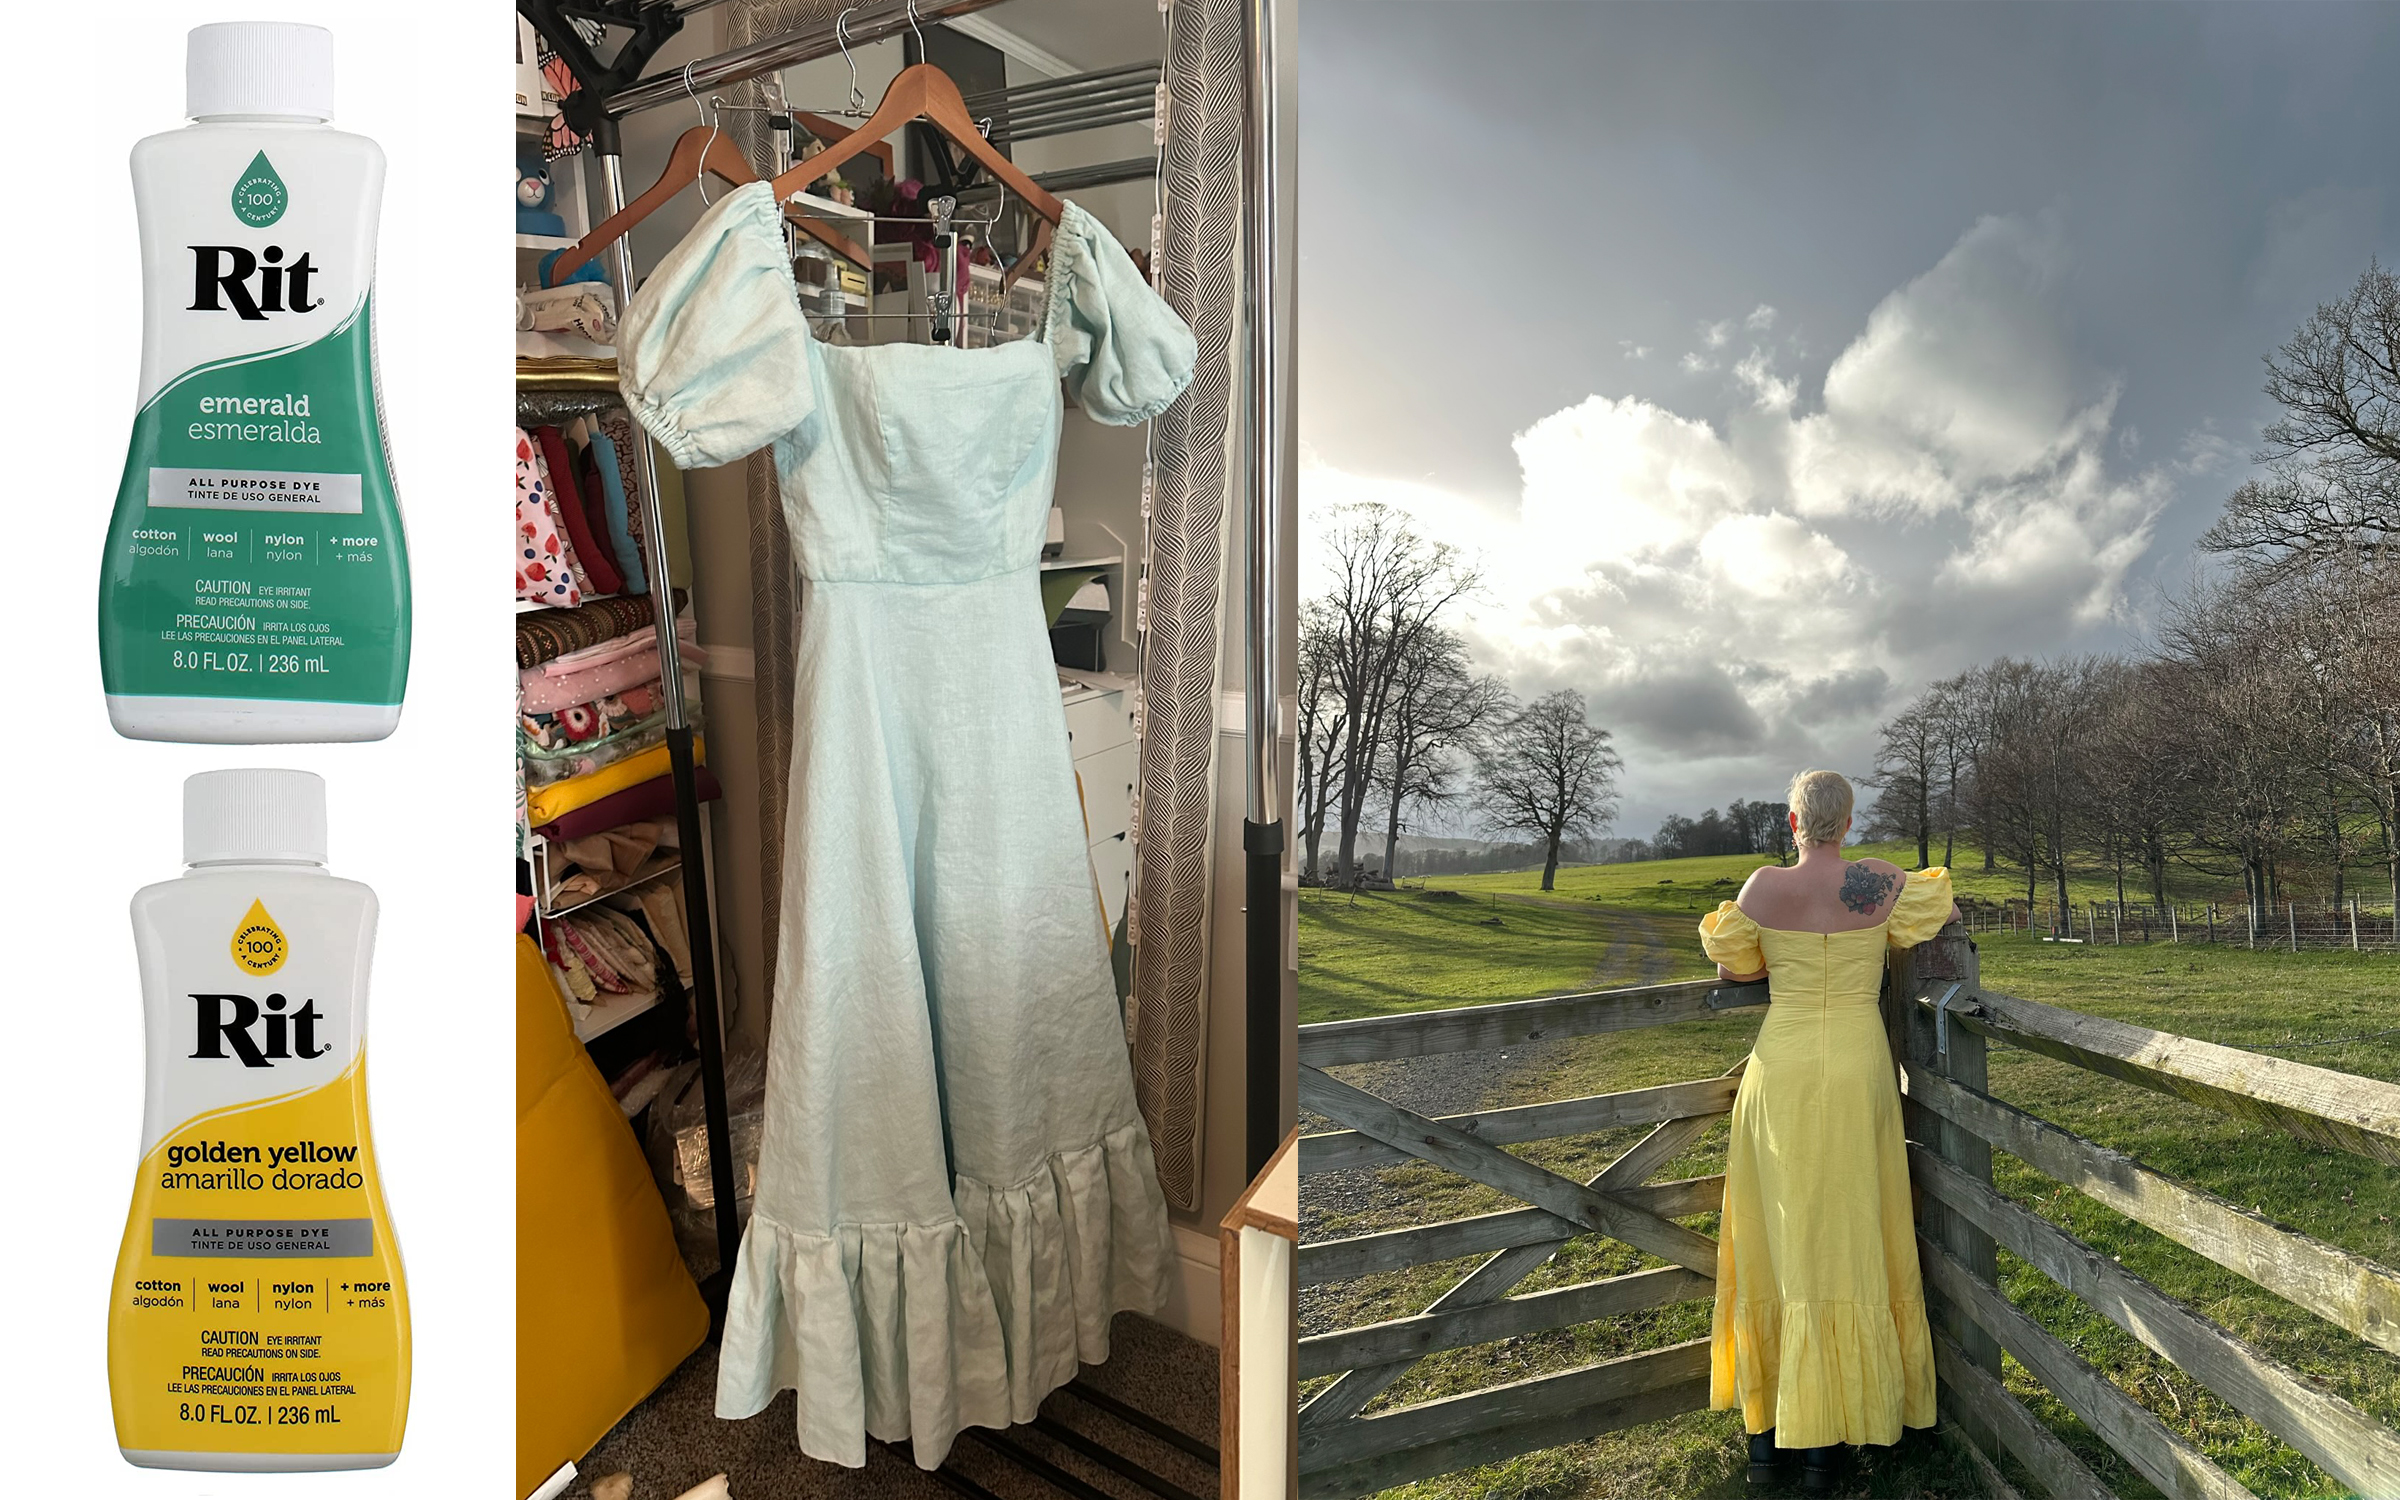
I decided to go one step further and dye each of the dresses a different color. I chose yellow for mine and Lauren wanted a soft blue green for hers, so I used a lighter dose of emerald. Rit liquid dye in Golden Yellow and Emerald worked beautifully in the washing machine! Of course, I left this decision to the last second so Lauren's dress was dyed and completely dry before I had to pack but mine ended up needing to be wrapped up wet and dried at our Airbnb in London!


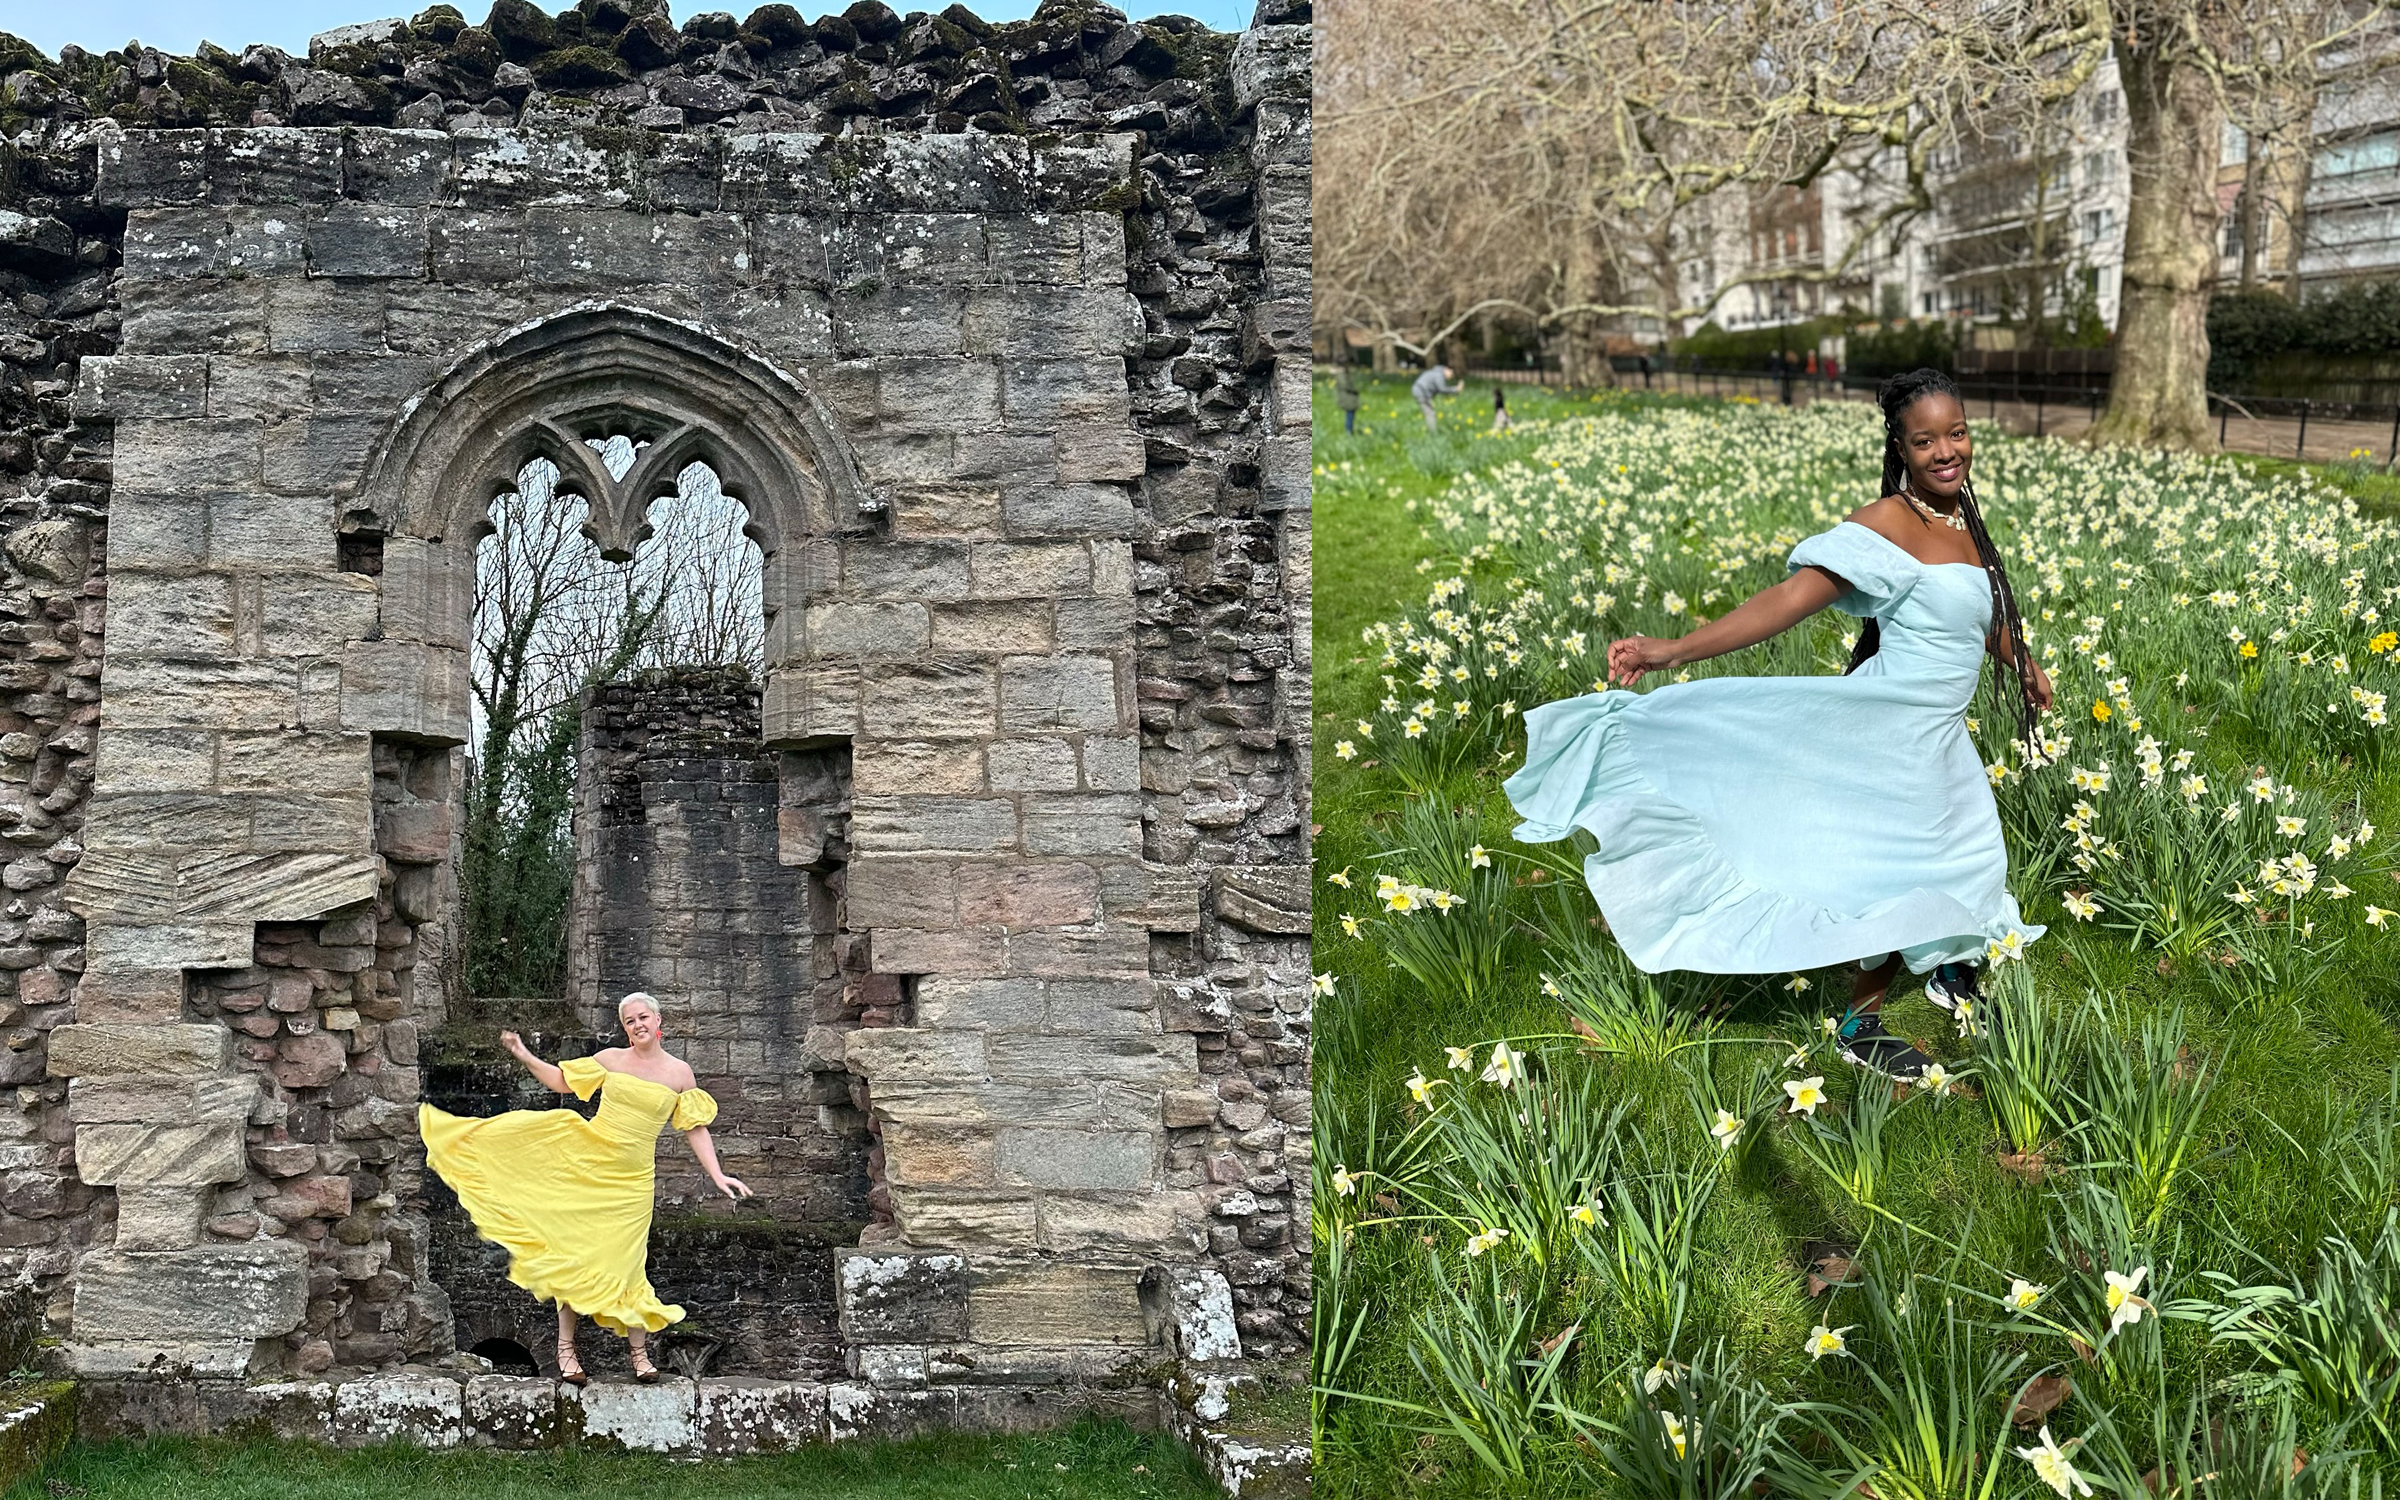
After giving it plenty of time to dry, the weather cleared up and we took some fantastic photos in the daffodil fields at Green Park next to Buckingham Palace. It was a truly magical day and worth all of the last-minute stress.


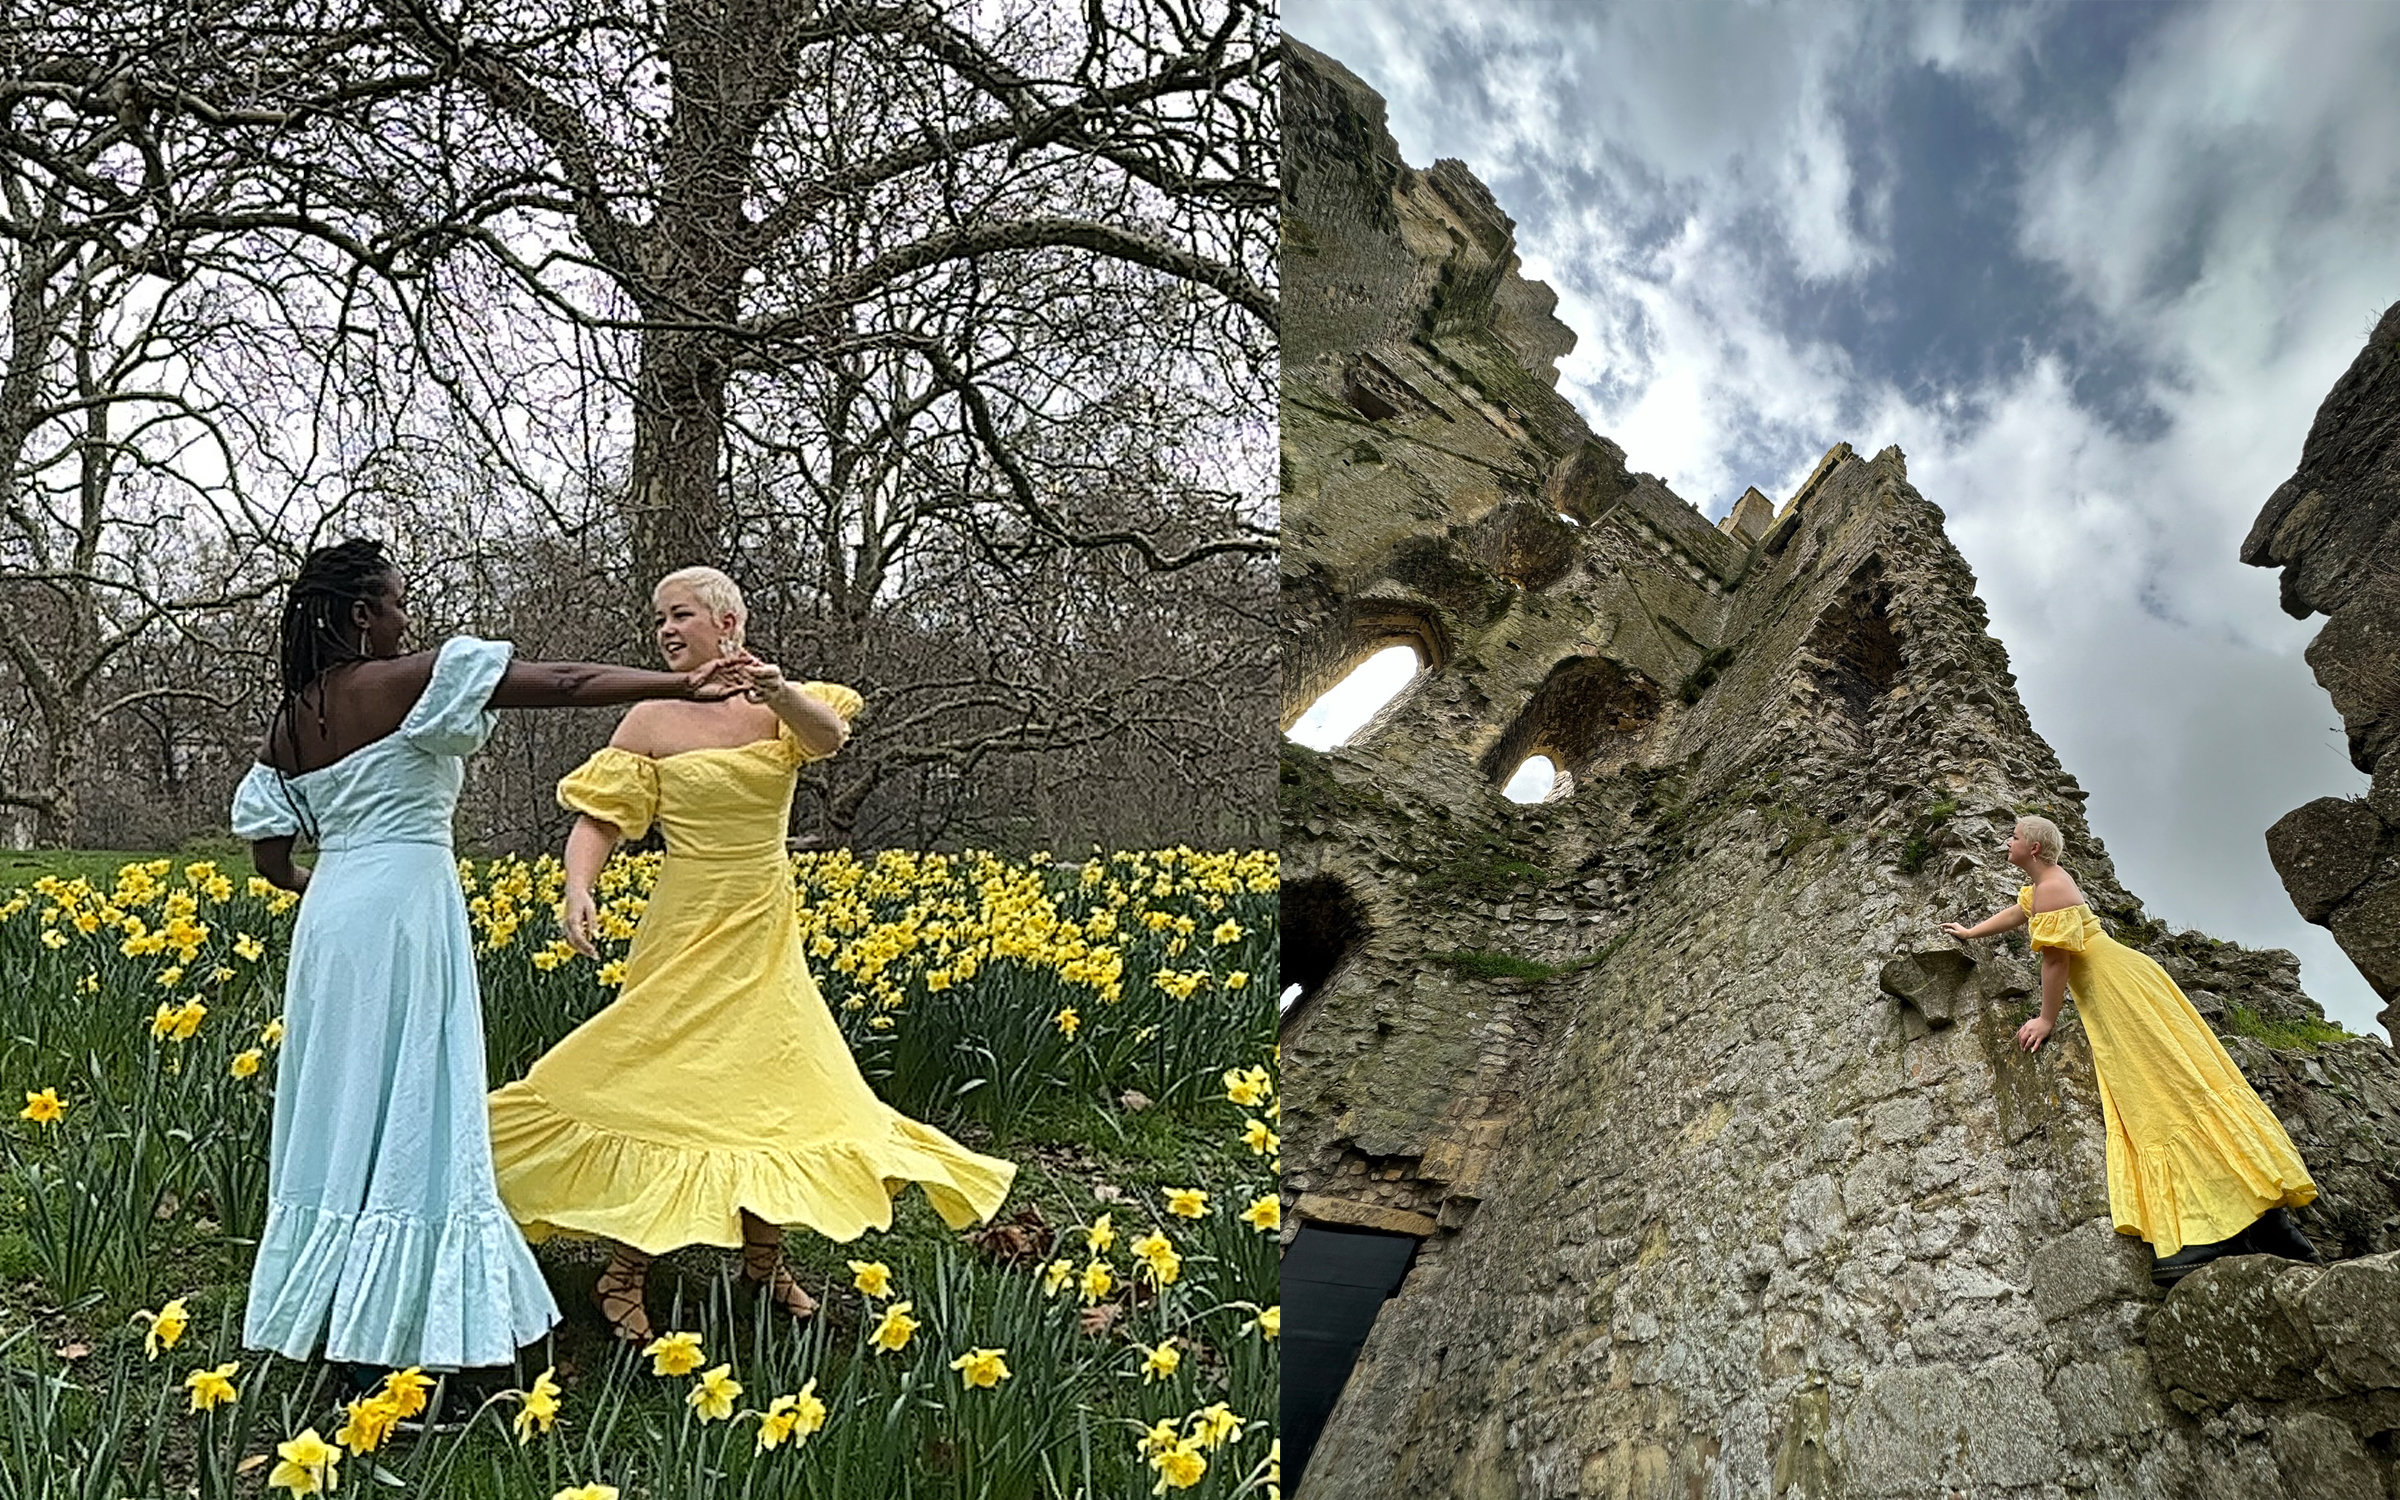
The dresses traveled with us from London, through the Cotswolds to a few castles and all the way up to Edinburgh Scotland. They were easy to toss on over top of leggings and we got some really great photos and videos in and around beautiful castles. We even got called princesses by some of the local kids on field trips. It was a trip I will remember forever! I hope you enjoy these photos.


Everyone is Talking about Making Matching Ruffle Dresses
Reviews


Tako
Beautiful
Wednesday, November 23, 2016

cpindzola
Around the Table Dresden Placemats
Saturday, December 17, 2016

I like the concept, but the directions are "sloppy." Nowhere in the supply list does it mention the felt or the batting (how much?). Also, I would never use a high loft batting in a placemat, or a table runner, as I think that it would be too unstable for a glass. The next time I make these, I will cut out the batting (I use flannel) and spray baste it to the wrong side of the Dresden plate before I put the Dresden plate on the felt to cut out. I have not yet washed the finished placemat, and am hoping that the single layer of felt does not curl up, or become distorted after washing/drying.
Txmaid
Fun Great Gift!
Tuesday, February 21, 2017

MargieARK
Teatime Quilted Tablecloth
Friday, February 24, 2017

I made this today but your cutting directions need to be changed. You only need 4 of color 1 and color 3 4.5 squares for the triangles. Also the inner border, you only need 2 cuts as WOF is long enough to cut each in half to fit the sides.
MickelSews
Great Machine
Wednesday, August 30, 2017

I've had this machine for only a week now. I bought it used from a lady who makes her own clothes, but she no longer needed the machine. During the purchase, she noted that she is almost sad that it's better to give it away because of how well the machine performed. (I also bought it along side a computerized machine of another brand.} She demoed the machine for us, showing it worked and gave us everything (including the box it came in!) She took amazing care of this machine. I have used it a few times now, and the directions for threading were easy to follow (albeit my hands are quite large so the lower looper was a pain, but that is no fault to the machine or brand.) And I recommend this machine to anyone who wants to learn to serge and wants a machine that can grow with them. I will happily use this machine time and time again.
rvstan
S9 Review
Sunday, February 25, 2018

I love, love, love my S9! It's sews and embroiders beautifully and it's simplicity of use amazes me. I would recommend this machine for both a beginner and an experienced seamstress. If I would ask anything of Janome it would be to upgrade the programming to run a larger hoop size. I understand that it can't get much wider but there is most definitely room for it to go longer. That is the only limitation of this machine.
pjmnana
PJMNana
Monday, February 26, 2018

I purchased a Memorycraft 15000 a few years ago and it was the best purchase I ever made! This machine can do just about anything you would would ever want! I love the capability of using the Acuedit app to set up my embroidery pattern on my Ipad and then download it to the machine! I love how my embroidery looks upon completion and I love all the good lighting it has to light up your workspace. That way you don’t need to worry about where to set up your machine. It also has plenty of room to do machine embroidery on any size quilts! There are many decorative stitches from which to choose that are outstanding! It’s hard to choose which one to use! There are so many great features it is hard to decide what I love the most. If you want to buy only one machine to last a lifetime, I would recommend this one!
KLWash
S9 Review
Sunday, February 24, 2019

The S9 is amazing. I learned to sew by hand when I was just 5 and in my grandmothers way as she was quilting. I took seeing classes in high school until they would no longer let me sign up. The S9 makes me appreciate my current skills as well as motivate me to want to learn more. This machine is awesome.
SewSueMe2002
Horizon Memory Craft 15000
Thursday, November 19, 2020

My Janome Horizon Memory Craft 15000 is fantastic! I love, love, love this machine! When I came across the Eye for and Eye embroidery design today, I wanted to make it. However, the embroidery file is missing. Nothing downloads when I select the download button. Please help!
Jillfmischo
Treat Bag fun!
Monday, August 16, 2021

I made the Halloween treat bag for my new granddaughter and I’m sure it will last for years. No embroidery machine so I appliquéd the lettering. Need a little more skirt fabric for a better gathered look, and I used thin double-bias tape for the skirt hem, over edge stitch on skirt sides. I’m pleased with my results!
elenaz
Very helpful tutorial
Wednesday, October 25, 2023

I want to say thank you for teaching me this method of applique. I was able to do it with a small letters. This method is the best so far from all of those I've seen and tried.
plonkar
So useful
Thursday, November 30, 2023

I'd like to express my gratitude for teaching me this appliqué method. I successfully applied it with small letters, and, so far, it's the most effective among all the methods I've seen and tried.

DEALERS
The TWO Closest Dealers to you are:
1900 CENTRE ST , WEST ROXBURY MA, 02132
(617)323-6200
443 MOODY STREET , WALTHAM MA, 02453
781-893-3331
Find Additional Dealers