Pattern Instructions:
Enlarge the pattern 200%. Make a reversed copy also. Tape pages together. The pattern that faces forward will be your full size guide. The reversed copy is the one you’ll use to trace fusible templates.
Cutting Instructions:
Background block:
Cut the white background fabric 18" x 18".
(This block will be trimmed to 16¾" x 16¾" once the appliqué has been completely stitched.)
Borders:
Cut two (2), 3¼" strips across the width of the fabric.
From each strip, cut two (2), 16¾" x 3¼" pieces.
Border corners:
Cut one (1), 3¼" strip across the width of the fabric.
From the strip, cut four (4) 3¼" x 3¼" pieces.
Pillow Backing:
Cut two strip 14" across the width of the fabric.
From each strip, cut 1 piece 14" x 22¼" long.
Lightweight fusible non-woven interfacing:
(this is usually about 22” wide)
Cut two pieces 18" x 18"
Cut two pieces 3¼" x 16¾"
Cut two pieces 3¼" x 22"
Cut two pieces 14" x 22"
Interface the pieces:
(The interfacing in this pillow gives the fabric a little extra body. It also nicely stabilizes the appliqué for stitching.)
Note: Please follow the manufacturer’s instructions for fusing the interfacing correctly.
Fuse one of the 18" x 18" pieces of interfacing to the back of the white block fabric. (Be careful not to trap any little threads or fuzz between the fabric and the interfacing.)
Fuse the other piece of 18" x 18" interfacing to the back of the block also. The two layers of interfacing will keep the pillow front looking very crisp and stabilize the decorative stitching.
Fuse the two 3¼" x 16¾" pieces to the backs of two 16¾" red border strips. (The other two red strips will be interfaced after piecing.)
Fuse the 14" x 22" pieces to the backs of the 14" x 22¼" pillow backing pieces. (Just center the interfacing on the fabric so it’s only ?" scant on either end.)
Appliqué Instructions:
General:
Trace shapes onto the paper side of fusible web. Remember to include overlap allowances where needed, (such as the vining pieces that connect to the flowers). Roughly cut around each piece. Fuse web to the wrong side of fabric, following the web manufacturer’s recommendations. Cut out appliqué pieces and peel off the paper backing.
To assemble the appliqué, lay the full size guide on top of a light source, such as a light box. Center the background block on top of the guide to determine where pieces are to be fused. The center of the design is marked on the pattern.
Apply the shapes to the background block. I like to lightly tack in place with the iron at this time, and then transfer to the ironing board to adhere the pieces fully. Another way to do this is to use tape that is easily peeled off, such as painter’s tape or pink hair tape -- and tape the pieces to the background. Gently remove the tape as you fuse the pieces in place.
Decorative stitching ideas for the appliqué:
Here’s the fun part. Time to get creative with thread and stitches! Just an FYI, I find it’s easiest to sew decorative stitches around appliqué if I set the speed control slider to about half speed or a little less. Always do these stitches in the needle down position so the needle stays safely in the fabric when you pause to pivot. Use the Open Toe Appliqué Foot F2, so you can see the edges of the shapes.
It’s a good idea to practice on a little sample fabric with some shapes fused to it, to get the feel and rhythm of the stitch pattern.
Use a variety of complimentary threads to enhance the project.
Some of the stitches I used:
Mode 1, Stitch 5, set at 3.5, 2.5 or 2.0.
I used this stitch along the insides of many of the appliqué shapes. I also sometimes used it with a different thread color, stitching around the outside of the appliqué shapes for definition. The three single stitches it makes show up decorative thread beautifully.
When stitching along the inside of a shape, keep the needle about 1/16" from the edge of the shape. Pivot often, sometimes every two or three stitches depending on the depth of the curve.
When stitching along the outside, keep the needle about a thread width away from the edge of the shape so the entire stitch lands nicely next to the piece.
Mode 3, Stitch 09, set at 3.5, 0.5.
I used this stitch along the edges of some of the appliqué shapes. It covers the raw edge of the shape. Stitch so the needle falls just outside the appliqué whenever the stitch makes its outward zig. When using this stitch, pivot when the needle is on the outside of the piece.
Mode 2, Stitch 73, set at 7.0, 2.5.
I used this stitch around the outside edge of the smaller heart. To pivot this pattern, notice that it makes one straight stitch between stars. The place to pivot this stitch is as soon as that single stitch is placed. Stop exactly at this point with the needle still in the fabric and pivot. Never try to pivot while the star is stitching out or you won’t have a nice star.
(I also used the stitch set at 4.0, 2.0 going down the middle of one of the flower vines.)
Mode 2, Stitch 64, set at 4.0, 2.0.
I used this stitch around the edge of one of the large hearts.
Mode 2, Stitch 67, set at 5.0, 2.0.
I used this stitch around the edge of the other large heart.
Mode 1, Stitch 1, set at 3.5, 2.0.
Yes, with decorative thread, an ordinary straight stitch, nicely executed can be just the thing. If you want to highlight another stitch with just a hint of another color, this is the perfect way to do it. Try a little metallic thread for big impact.
Assembling the pillow:
Finishing the block:
Once the appliqué is complete, press the block and trim to 16¾" x 16¾". (Note: the pillow area will actually measure 16¼" square when finished. Often pillow forms are a little bigger than their measurements state.)
Sew the buttons on where the flower centers should be. Embellish with beads or crystals if you desire.
Adding the border:
Using the 1/4 Inch Seam Foot O, sew a 3¼" square on each end of a 16¾" strip that hasn’t been interfaced. Repeat. Press seams.
Fuse the two 3¼" x 22" pieces of interfacing to these pieced strips. (The interfacing will be ?" short on either end. This is fine; just center the interfacing on the strip.)
Using the 1/4 Inch Seam Foot O, sew the plain border strips to the top and bottom of the block. Press seams toward border. Next sew the pieced border strips to the sides of the block. Press seams toward border.
Hemming the pillow back pieces:
On one long edge of each backing piece, press under a scant ½”. Then press under again ½” so the raw edge of the fabric is completely enclosed. Stitch with a straight ?" from the folded edge, using Satin Stitch Foot F.
Completing the pillow:
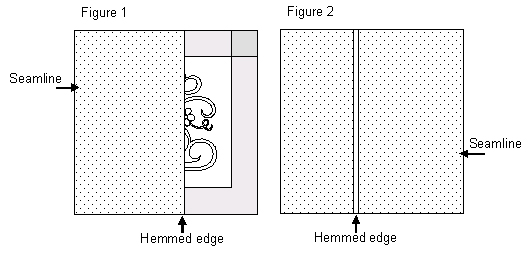
Lay one hemmed backing piece on the bordered pillow top right, sides together, matching raw edges. Sew the two pieces together with a ½" seam, using a backstitch to anchor the stitches at the beginning and ends of the seam. Use Satin Stitch Foot F. (See figure 1.)
Lay the other hemmed backing piece on the bordered pillow top, right sides together, matching raw edges. The hemmed edge of this piece will be overlapping the first piece. Sew the two pieces together with a ½" seam, using a backstitch to anchor the stitches at the beginning and ends of the seam. (See figure 2.)
![]()
Trim the corner seams to reduce bulk. Turn the pillow right side out and press flat. Pin the pillow cover in strategic areas so it will not shift while doing the remaining stitching.
From the front of the pillow, using matching thread and the Acufeed Walking Foot, stitch in the ditch between the pillow block and the border. Make sure this stitching is secure. (See figure 3.)
![]()

Slip the pillow form through the opening in the back.
© 2008. Jane Spolar