Projects

Quick Change Placemats

Created By:

Heidi Proffetty

Skill Level: Beginner

Here’s a clever placemat project that will have you reconsidering your traditional placemats. This DIY placemat project consists of two pieces, a placemat base with exposed border and removable snap on decorative covers. Let say you just spilled or dripped something on your pretty placements. Instead of waiting to send the whole placement through a washing machine cycle, you can quickly unsnap the decorative cover and snap on a fresh new one. You can make custom covers to color coordinate with your kitchen or dining space to add that perfect splash of color to accent your room or choose licensed character fabrics and novelty prints to make the perfect super hero or villain themed birthday party special. Make some extra covers for other celebrations or upcoming holidays. And don’t forget about your patio table, make additional placemat sets using outdoor fabrics to create a splendid summertime table setting for you and your guests.

Janome Supplies Required

Janome Purple Tip Needle or Topstitch Size 80/12 or 90/14

BI-Level Presser Foot (Available for 9 mm Janome sewing machines) or standard straight stitch foot

Fabric and Notions Required

1 – Yard of 58” – 60” Polyester Fabric

4 – Novelty Print Cotton Fabric Fat Quarters or (1/2 yards of assorted themed cotton fabrics)

1 1/8 – Yards of Coordinating Solid Color Cotton Fabric

1 1/8 – Yards of Pellon Fusible Featherweight 911F

Coordinating thread colors to match your project pieces. 40 wt. Rayon or Polyester Thread

Fabric Marking Pen

 16 – KAM Resin Snaps (Standard and Long prong types) & KAM Snap pliers*

Awl

Tweezers

Small Screwdriver

Regular fabric cutting scissors

Cutting mat, Rotary Cutter & Standard quilt ruler

Pressing Cloth, Iron & Ironing surface

Straight pins or Clover mini clips

Washable Glue stick

Instructions

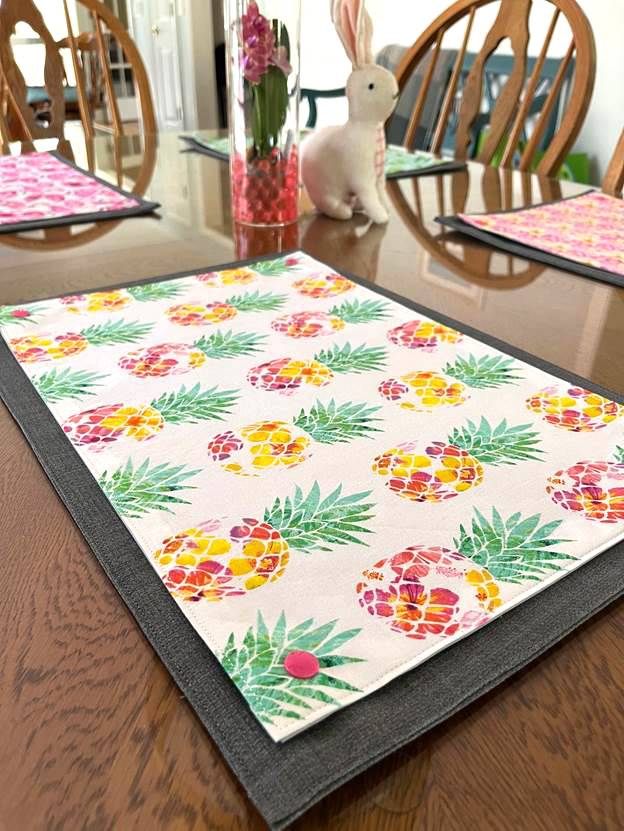
Makes: Set of 4 Placemats with Removable Covers

Placemat Finished size: 18 ½” x 13”

Project Time: 1 Afternoon


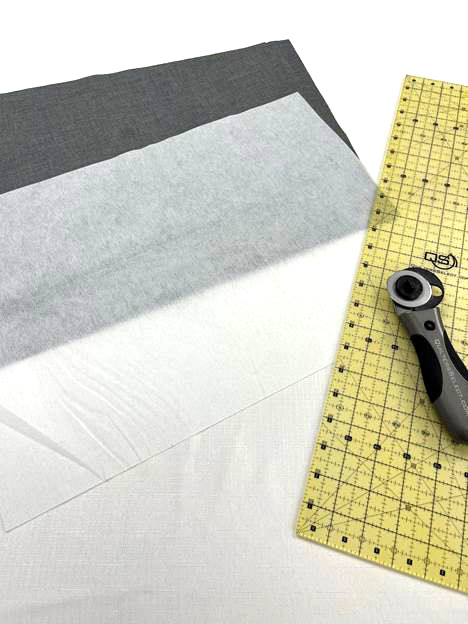
PART 1 – Fabric Cutting

Prewash fabrics to eliminate fabric shrinkage, starch if desired and press.

Use your rotary cutter, cutting mat and quilt ruler.

  1. Polyester fabric, cut 8 fabric pieces each measuring 19 ½” x 14”
  2. Trim each of the 4 Novelty Print fat quarters to measure 18 ½” x 13” or cut from assorted ½ yards of fabric, 4 pieces measuring 18 ½” x 13”
  3. Solid color cotton fabric, cut 4 fabric pieces each measuring 18 ½” x 13”
  4. Pellon Fusible Featherweight:

Cut 4 pieces each measuring 14” x 19 ½”

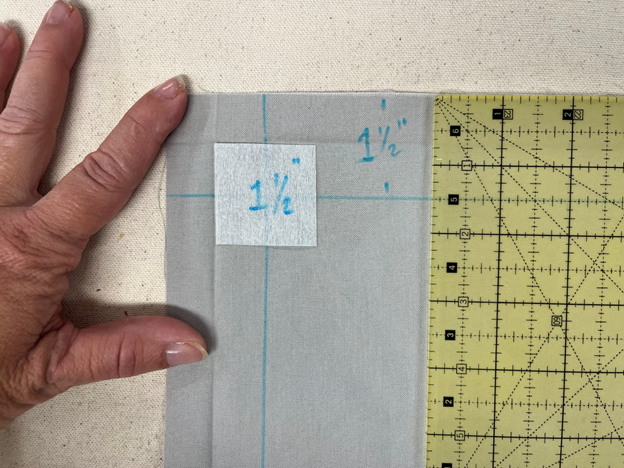
Cut 16 pieces each measuring 1 ½” x 1 ½”


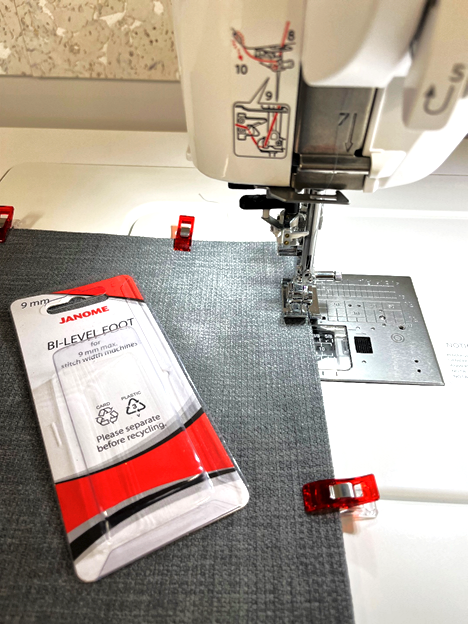
PART 2 – Sewing Machine Set Up

Thread sewing machine with coordinating top and bottom threads

Install a fresh new needle. Janome Purple Tip Needle or Topstitch Size 80/12 or 90/14

Set your needle position between 1/16” – 1/8” markings on BI-Level foot or make other

adjustments for edge stitching

Set your sewing speed to Medium Speed

Set the needle in the down position in fabric (If your machine has this function)

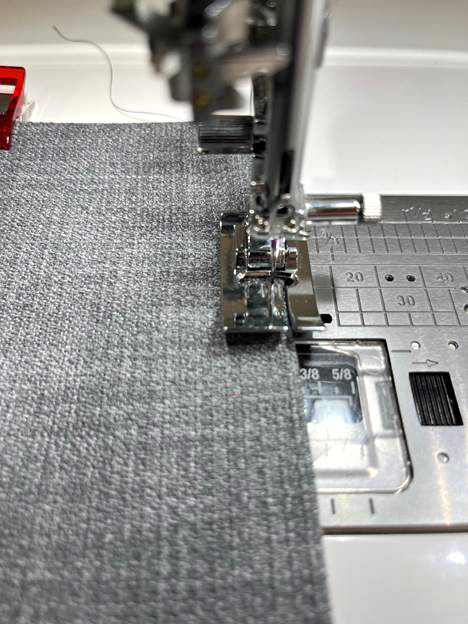
Attach BI-Level foot or a standard straight stitch foot.

Select a straight stitch and use standard stitch length of 2.4


PART 3 – Preparing the Placemat Bases with Exposed Trim

1.  Following manufacturer’s instructions, fuse 1 piece of featherweight to the reverse side of 4 polyester fabric pieces. For each of the 8 polyester fabric pieces, on the reverse side, use fabric marking pen, mark 1/2” in from raw edges on all 4 sides. Working with long edges first then repeat for the shorter edges, turn & press the raw edges inward to meet the markings. Then press entire piece front and back, press carefully as to not to unfold the already pressed edges.


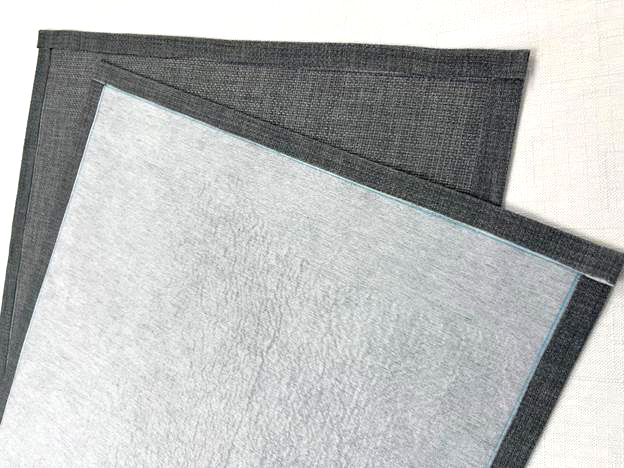
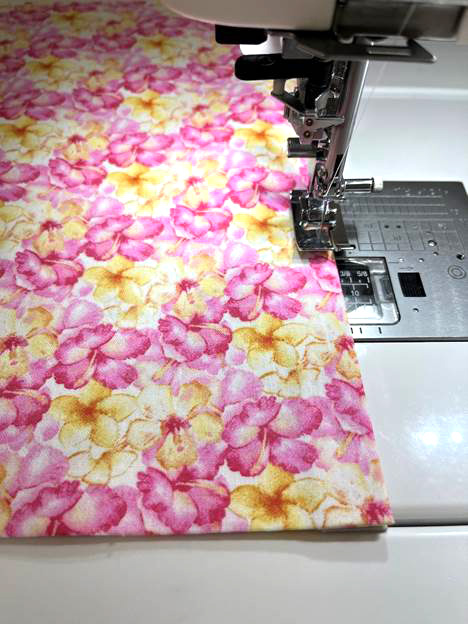
2. Place 1 prepared with fusible fabric piece on top of 1 unlined fabric piece, wrong sides together, taking time to align the outer edges evenly on all 4 sides. (See additional reference photo’s regarding alignment under Part 4). Then using your BI-Level or straight stitch foot, edge stitch very close along all 4 sides. Back tack on start and end.


PART 4 – Preparing the Decorative Covers

1. Using the 8 pieces of prepared Novelty & Solid Cotton fabric pieces, on the reverse sides, use a fabric marking pen, mark 1 ½” in from raw edges on all 4 sides.


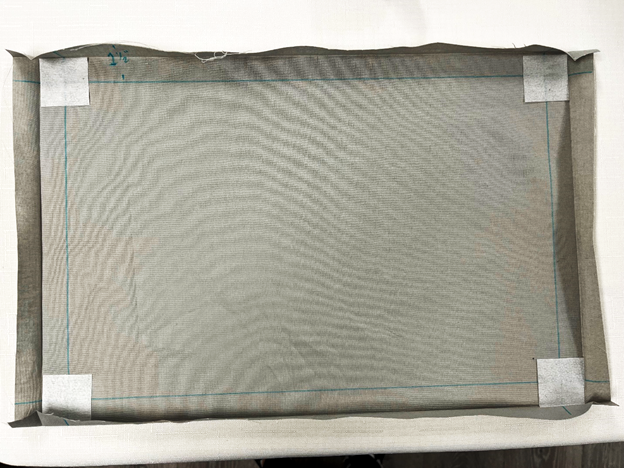
2. Working with long edges first then repeat for the shorter edges, turn the raw edges inward to meet markings & press flat. Use clips to temporarily hold.


 3. Then press entire piece front and back. Working with 4 of the prepared fabric pieces, open out the already pressed seams in each corner, align and insert a piece of 1 ½” x 1 ½” fusible featherweight. Use a small dab of washable glue to hold the featherweight in place. Fold the edges inward again and carefully press each corner.  


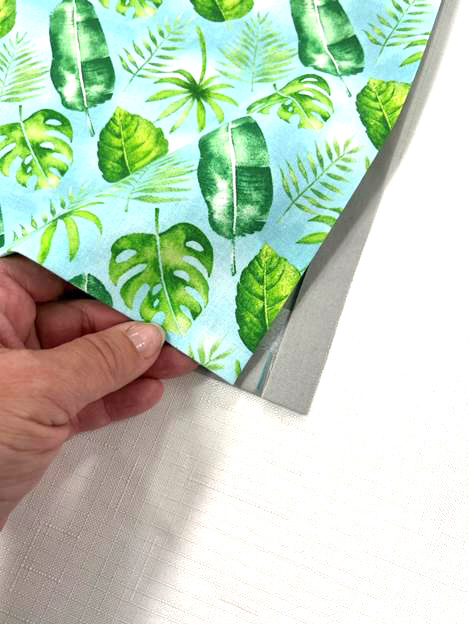
4. Place 1 fabric piece prepared with fusible on top of 1 unlined fabric piece, wrong sides together, taking time to align outer edges on all 4 sides. Use pins or clips to hold pieces together.


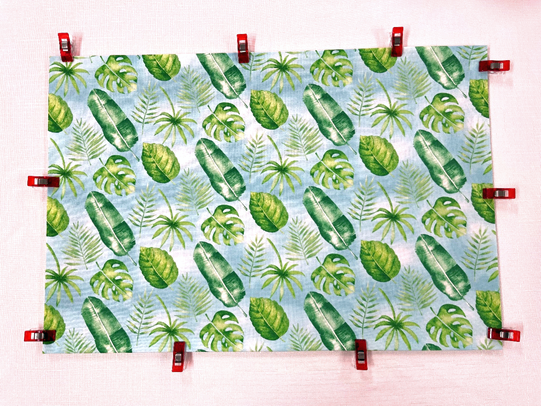
5. Then using BI-Level or straight stitch foot edge stitch very close along all 4 sides. Back tack on start and end. 


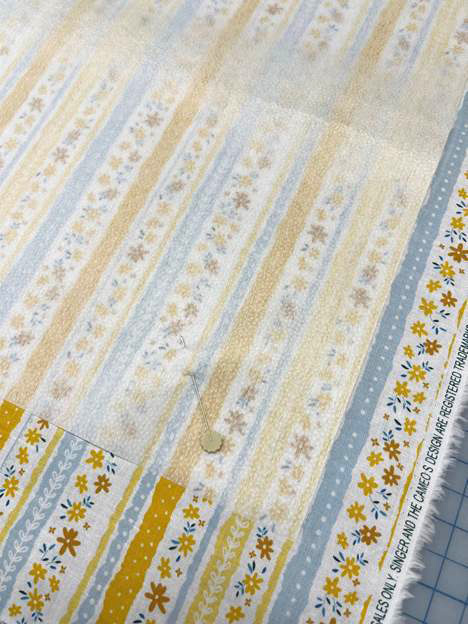
Designer Tip:  If you want to make choose the exact motif to work with or to align a directional motif for the decorative covers. Use a piece of featherweight cut to the same dimensions of the decorative fabric pieces.  The featherweight is transparent and allows you to fussy cut the fabric pieces for your decorative covers. Simply place your featherweight on top the fat quarter or yardage, position the featherweight over the motif or pattern as desired and fussy cut your decorative cover using the featherweight as your guide.


Part 5 – Insert the Snaps on the Placemat Bases

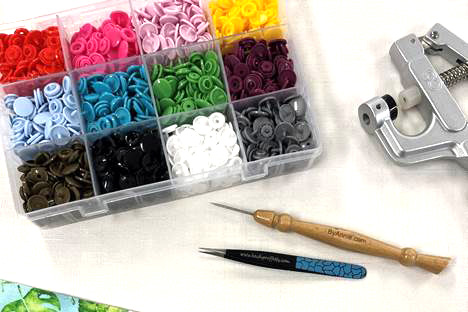
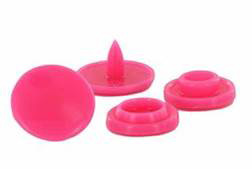
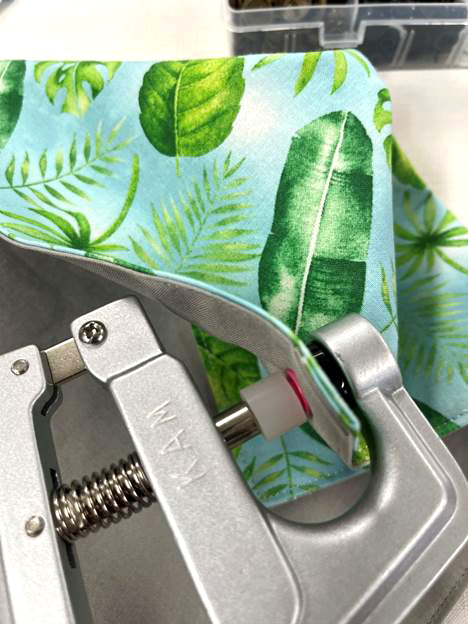
1. Gather snap tools. Kam snaps come with 4 different pieces: 2 caps, 1 socket & 1 stud.


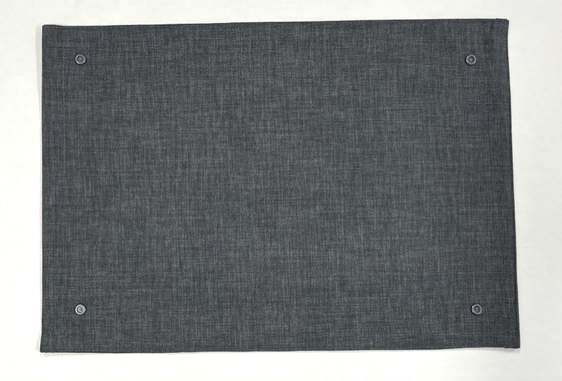
2. For each of the prepared placemat bases, you will be installing a cap & socket in each corner. Practice installing a few snaps on scrap fabric first. Next, decide on your snap placement and using a fabric marker, measure & mark a dot to represent the center point of the snap. For this pattern we are leaving an approximate ¾” exposed trim on all 4 sides and the snap placement is approximately 1 ½” in for each corner. Use an awl to poke through all layers for each marked dot. Choose a cap whose prong will be long enough to be fully exposed through multiple layers of fabric. The placement base is thicker than the decorative covers, you will need caps with slightly longer 6.2 mm prongs. Insert the prong from the backside of the placemat. Next place a socket on top of the exposed prong. Set up your KAM plier following KAM instructions. Align the pliers and squeeze firmly. Unlike installing metal snaps, you will not need to squeeze your pliers with too much force because these snaps are made of plastic/resin. Repeat this step for all 4 corners. For images on how to install KAM snaps, refer to photos under Part 6.


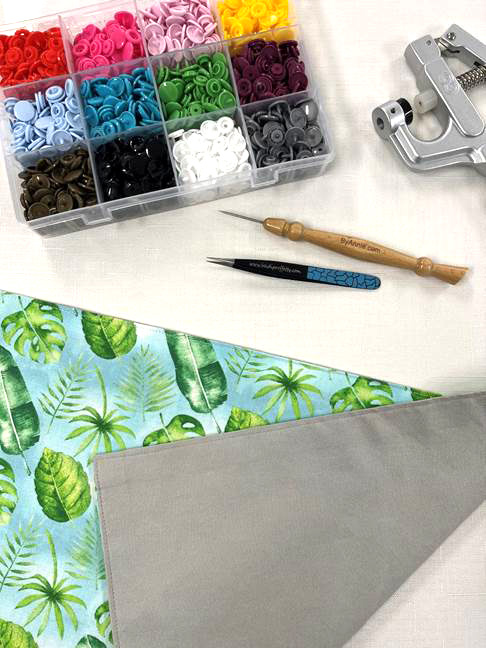
Part 6 – Insert the Snaps on the Decorative Covers 


1. Gather snap tools again. For each of the prepared decorative covers, you will be installing a cap & stud in each corner.


2. Measure and mark your snap placement to align with the sockets that you previously installed on the placemat base. Proper alignment is an important step here if you want your decorative covers to sit nice and flat. The snap placement is approximately ½” in for each corner. 


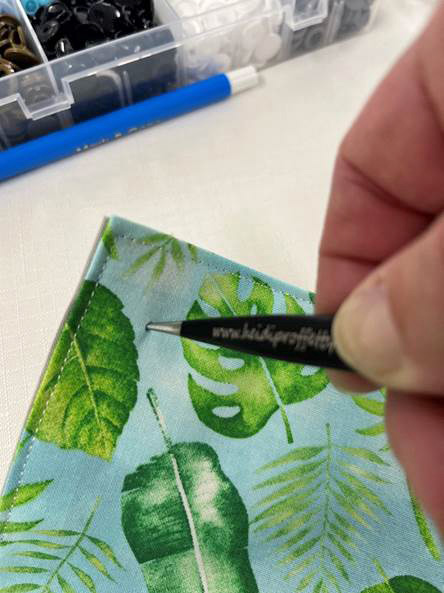
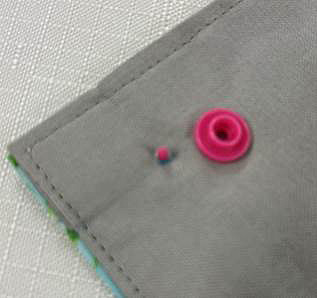
3. Again, using an awl to poke through all layers for each marked dot. Next insert a cap with its prong pushed through the right side of the decorative cover exposing the prong on the reverse side, place a stud on top of the prong. Using your pliers squeeze firmly.


4. Check the snap alignment and that each cover snaps securely onto each placement base. You’re finished!


Skip buying traditional placemats and instead make your own set of Quick Change Placemats and then sew lots of extra custom covers to stylishly meet all of your entertainment needs.  

Happy Quilting and Sewing!

Heidi

Everyone is Talking about Quick Change Placemats
Reviews


Tako
Beautiful
Wednesday, November 23, 2016

cpindzola
Around the Table Dresden Placemats
Saturday, December 17, 2016

I like the concept, but the directions are "sloppy." Nowhere in the supply list does it mention the felt or the batting (how much?). Also, I would never use a high loft batting in a placemat, or a table runner, as I think that it would be too unstable for a glass. The next time I make these, I will cut out the batting (I use flannel) and spray baste it to the wrong side of the Dresden plate before I put the Dresden plate on the felt to cut out. I have not yet washed the finished placemat, and am hoping that the single layer of felt does not curl up, or become distorted after washing/drying.
Txmaid
Fun Great Gift!
Tuesday, February 21, 2017

MargieARK
Teatime Quilted Tablecloth
Friday, February 24, 2017

I made this today but your cutting directions need to be changed. You only need 4 of color 1 and color 3 4.5 squares for the triangles. Also the inner border, you only need 2 cuts as WOF is long enough to cut each in half to fit the sides.
MickelSews
Great Machine
Wednesday, August 30, 2017

I've had this machine for only a week now. I bought it used from a lady who makes her own clothes, but she no longer needed the machine. During the purchase, she noted that she is almost sad that it's better to give it away because of how well the machine performed. (I also bought it along side a computerized machine of another brand.} She demoed the machine for us, showing it worked and gave us everything (including the box it came in!) She took amazing care of this machine. I have used it a few times now, and the directions for threading were easy to follow (albeit my hands are quite large so the lower looper was a pain, but that is no fault to the machine or brand.) And I recommend this machine to anyone who wants to learn to serge and wants a machine that can grow with them. I will happily use this machine time and time again.
rvstan
S9 Review
Sunday, February 25, 2018

I love, love, love my S9! It's sews and embroiders beautifully and it's simplicity of use amazes me. I would recommend this machine for both a beginner and an experienced seamstress. If I would ask anything of Janome it would be to upgrade the programming to run a larger hoop size. I understand that it can't get much wider but there is most definitely room for it to go longer. That is the only limitation of this machine.
pjmnana
PJMNana
Monday, February 26, 2018

I purchased a Memorycraft 15000 a few years ago and it was the best purchase I ever made! This machine can do just about anything you would would ever want! I love the capability of using the Acuedit app to set up my embroidery pattern on my Ipad and then download it to the machine! I love how my embroidery looks upon completion and I love all the good lighting it has to light up your workspace. That way you don’t need to worry about where to set up your machine. It also has plenty of room to do machine embroidery on any size quilts! There are many decorative stitches from which to choose that are outstanding! It’s hard to choose which one to use! There are so many great features it is hard to decide what I love the most. If you want to buy only one machine to last a lifetime, I would recommend this one!
KLWash
S9 Review
Sunday, February 24, 2019

The S9 is amazing. I learned to sew by hand when I was just 5 and in my grandmothers way as she was quilting. I took seeing classes in high school until they would no longer let me sign up. The S9 makes me appreciate my current skills as well as motivate me to want to learn more. This machine is awesome.
SewSueMe2002
Horizon Memory Craft 15000
Thursday, November 19, 2020

My Janome Horizon Memory Craft 15000 is fantastic! I love, love, love this machine! When I came across the Eye for and Eye embroidery design today, I wanted to make it. However, the embroidery file is missing. Nothing downloads when I select the download button. Please help!
Jillfmischo
Treat Bag fun!
Monday, August 16, 2021

I made the Halloween treat bag for my new granddaughter and I’m sure it will last for years. No embroidery machine so I appliquéd the lettering. Need a little more skirt fabric for a better gathered look, and I used thin double-bias tape for the skirt hem, over edge stitch on skirt sides. I’m pleased with my results!
elenaz
Very helpful tutorial
Wednesday, October 25, 2023

I want to say thank you for teaching me this method of applique. I was able to do it with a small letters. This method is the best so far from all of those I've seen and tried.
plonkar
So useful
Thursday, November 30, 2023

I'd like to express my gratitude for teaching me this appliqué method. I successfully applied it with small letters, and, so far, it's the most effective among all the methods I've seen and tried.

DEALERS
The TWO Closest Dealers to you are:
196 Boston Post Road , Orange CT, 06477
203-878-1654
19 PUTNAM AVENUE , PORT CHESTER NY, 10573
914-934-2934
Find Additional Dealers