Welcome to the official Janome.com Blog Page!

  • 7/27/2021

    Welcome back to the Rainbow Quilt Block of the Month designed by Janome Maker Carolina Oneto!This month you will make Block Six. The Diamond Block, is a block that is perfect for practicing your half square triangle skills!  Get ready to have fun! 


    Remember that all the blocks will have a finished size of 12” and the unfinished size will be 12 1/2”. All seams are ¼”.  Please read through all of the instructions prior to starting this block. Carolina sews on the Janome 1600P-QC that makes piecing and quilting effortless with an extra-wide work area, side loading bobbin for easy access, and an automatic thread cutter! 

    Fabrics:

    White background

    Three 5 3/4” squares

    Two 4” square

    Pink

    One 5 3/4” square

    One 4” square

    Dark pink

    One 5 3/4” square

    One 4” square

    Orange

    One 5 3/4” square

    INSTRUCTIONS for making HST four at a time:

    • Make four half-square triangles.
    • Place a white and colored fabric square (5 3/4”) right sides together.
    • Sew a 1/4″ seam allowance all around the perimeter of the square.
    • Make two diagonal cuts and press each piece open to one side.
    • Trim away the dog ears using a square quilting ruler, you will obtain 4 HST 3,5”


    Instructions for making HST two at a time

    Do this process with the 2 white squares of 4” and the two squares of the same size in pink and dark pink. You will assemble 8 half-square triangles that you must square up to the size of 3.5".


    PINK


    DARK PINK


    ORANGE


    FINAL ASSEMBLY


    • Arrange your blocks in correct layout
    • Using a quarter-inch seam allowance, sew together in rows. Join all rows, using a ¼” inch seam allowance.
    • Press your completed block and trim down to 12.5″ square (if necessary).


    You can find the past blocks by visiting:


    Block One     HERE

    Block Two     HERE

    Block Three  HERE

    Block Four    HERE

    Block Five     HERE


    After you make your block, we’d love to see them!

    Janome Sewing Classroom

    Janome America Instagram – Be sure to tag @janomeamerica and use the hashtag #janomemakes and also tag @carolinaoneto!


  • 8/3/2021

    Ah, the dreaded zipper! One of the most essential parts of creating bags, garments, cosplay, and home decor is also one of the most frightening for many sewing enthusiasts. We are here to say fear no more! Janome Maker Meredith Daniel from Olivia Jane Handcrafted is going to show you not only how easy it is to install a zipper by creating a zippered pocket in anything!!!  After you add zippered pouches to everything, you can use this skill builder to go forward adding zippers pillows, dresses, and so much more!


    hidden zipper pocket tutorial


    A zippered pocket is such a useful addition to any bag! Did you know they are also incredibly easy to insert? This tutorial will show you how to do just that, and you will be an expert in no time at all! 

    hidden zipper pocket tutorial


    You'll need just a couple of things:

    • the fabric you want to put a zipper pocket into
    • a zipper the length of you want your pocket opening (I'm using a 7" metal zipper)
    • a cut of fabric for your pocket (you'll need less than a fat quarter!)
    • a scrap of interfacing (I'm using SF 101)
    • a marking tool, ruler, and cutting tools

      hidden zipper pocket tutorial


    To demonstrate this technique, I'm installing a zipper on the front of my Basic Drawstring Bag. It would also make a great addition to my Mosaic Heart Tote, but you can use this to add a pocket to whatever you need! I am using my Janome Skyline S9 with a walking foot for the whole of this tutorial. That's right! You don't even need a zipper foot. Let's get started!


    Cut two pieces of interfacing 1.5"x 1" longer than your zipper. I cut a piece 1.5x8". Cut two matching pocket bags. They should be at least 1.5" longer than your zipper, and you will need at least 1" above wherever your zipper is at. I cut two pieces measuring 11x7.5".  Mark the placement of your zipper opening on the outer fabric. I find it useful to crease the fabric where I want the zipper to be, and then I have an accurate way to tell where to add interfacing.


           hidden zipper pocket tutorial   hidden zipper pocket tutorial

    Place one strip of interfacing on the wrong side of your outer fabric. Center it over where the zipper will be placed, and fuse according to the manufacturer's instructions. Repeat this on the wrong side of one pocket piece. The interfacing needs to be placed 1/2" under the top of the pocket piece. 


    **Tip: to help protect your iron and your ironing board cover, use a pressing cloth! 


      hidden zipper pocket tutorial


    Find the center of your interfaced section on the pocket piece and draw a line that is 1/4" longer than the teeth of your zipper. I marked a line 7 1/4" for my 7" zipper. Now mark two matching lines 1/4" above and below that line. You will now have three lines. Mark little triangles that reach from the outer corners to about 1/4" in on the centerline. Align your pocket piece and outer fabric right sides together so that the interfaced sections are at the same area since you will be sewing through all layers in the next step. I used clover clips to keep my fabrics still and in line. Sew around the outside rectangle that you drew, overlapping by several stitches once you reach the beginning. All the inner lines are cut lines.


                                 hidden zipper pocket tutorial     hidden zipper pocket tutorial    hidden zipper pocket tutorial


    Using very sharp scissors, cut through all layers along the centerline until you reach the triangle points, then very carefully clip along those diagonal lines to the corners. Do not clip your stitches. Turn your pocket pieces toward the inside through the hole you just cut, and press well.

                                 hidden zipper pocket tutorial


    Align your zipper within the rectangular opening, and begin stitching somewhere in the middle. You will want to use a 1/8" seam allowance since you are sewing close to the folded edge of the fabric. When you get close to the zipper pull, put your needle down, raise your presser foot, and carefully open the zipper so that you can stitch unencumbered by the bulk of the pull. You can then close it again when you need to.

                        hidden zipper pocket tutorial     hidden zipper pocket tutorial    hidden zipper pocket tutorial


    Place your remaining pocket piece right sides together with the sewn pocket piece, and pin the corners. You will now sew all the way around the pocket pieces with a 1/4" seam allowance. Move the main fabric out of the way as you sew. 

                            hidden zipper pocket tutorial    hidden zipper pocket tutorial


    You have now completed your hidden zipper pocket!

                                 hidden zipper pocket tutorial     hidden zipper pocket tutorial    hidden zipper pocket tutorial


    Give yourself a pat on the back for learning a new technique!  You can now include this skill in your sewing toolbox! 

    hidden zipper pocket tutorial  

  • 8/19/2021

    Welcome back to the Rainbow Quilt Block of the Month designed by Janome Maker Carolina Oneto! You are over halfway done with your beautiful quit! Give yourself a pat on the back and get ready to start your next block!


    This month you will learn how to make block seven, the Rolling Stone quilt block.


    From Carolina:


    I sew all the blocks on my Janome 1600P-QC, which I really love, one of the great things about this machine is that the bobbin winder is independent of other mechanisms and the speed control is variable depending on the user’s need. These are only a couple of the features that make sewing and quilting fuss-free.


    Please read through all instructions prior to piecing. Remember that all the blocks will have a finished size of 12” so that means the unfinished size will be 12 1/2”. All seam allowances are 1/4"


    Fabrics:


    White background


    • Five 4 1/2” squares
    • One strip 2 1/2” x 18”


    Light Blue:


    ·Sixteen 2 1/2” squares


    Blue:

    One strip 2 1/2” x 18”


    INSTRUCTION FOR SQUARE IN A SQUARE UNITS


    Mark the wrong side of the LIGHT BLUE 2 1/2″ squares in half once diagonally. Lay marked square right sides together with a white 4 1/2″ square and sew on the marked line. Repeat on the diagonally opposite corner. Repeat on the other corners. Make 4. Unit measures 4 1/2″ unfinished.


    INSTRUCTIONS FOR THE RECTANGLE UNITS


    • Sew the two long strips of fabric, right sides together. Next, cut your sewn strip of fabrics into four equal parts. 4.5”. Press to the dark side.


    FINAL ASSEMBLY:

    • Arrange your blocks in the correct layout
    • Using a quarter-inch seam allowance, sew together in rows. Join all rows, using a quarter-inch seam allowance.
    • Press your completed block and trim down to 12.5″ square (if necessary).


    And that’s all!

    I hope you enjoy this new block! And don’t forget to share it!


    Block One     HERE

    Block Two     HERE

    Block Three  HERE

    Block Four    HERE

    Block Five     HERE

    Block Six      HERE   


    After you make your block, we’d love to see them!

    Janome Sewing Classroom

    Janome America Instagram – Be sure to tag @janomeamerica and use the hashtag #janomemakes and also tag @carolinaoneto!


  • 9/17/2021

    For learning how to sew or for a quick sew, coasters are a wonderful choice! They are not a massive commitment of time or materials and will give you practice and a finished project quicker! 

    Janome Maker Natalie Barnes from Beyond the Reef Patterns created a great video to show you how easy it is to make scrappy Quilt As You Go Coasters on the Janome HD9 Professional. This project is for beginners to experts and everyone in between! It uses scraps and is also improv so there are no mistakes!  


    Supply List:

    • Four 5" squares of Insulbrite 
    • Four 6" squares of  background fabric
    • Ruler 
    • Variety of scraps

    Please watch the full video prior to starting project. All seam allowances are 1/4" unless otherwise indicated. Finished project is four  4 1/2" squares.


    After finishing this project, we invite you to share in the Janome Sewing Classroom  Facebook Page, Instagram tagging @janomeamerica and using the #janomemakes tag, or on Pinterest tagging @janomeamerica and the hashtag #janome so that we can repin you! 

  • 9/28/2021

    Photo Sep 21, 11 08 23 AM (2)

    A Tutorial: How to Make a Whole Cloth Quilted Pillow Cover with Envelope Style Back in Sizes 12" square to 24" Square
    Whole-cloth quilted pillows made using your Janome sewing machine is a wonderful and easy way to bring heirloom-quality style into your home, freshen up your decor, and enjoy favorite fabrics year-round, using just a few simple steps! In this tutorial, I'll show you how to use two different built-in stitches on your machine to quilt the pillow fronts and how to finish the pillow with an envelope style back in SIX different sizes. Let's get started!

    1

    Materials List:
    Janome Sewing Machine (Horizon Quilt Maker Memory Craft 15000)
    walking foot for your sewing machine (optional)
    fabric depending on the pillow size (Plaid of My Dreams by Maureen Cracknell for AGF)
    batting (Hobbs Tuscany Supreme 100% Unbleached Cotton) 
    pillow insert or pillow you'd like to cover (Hobbs Pillow Pals)
    neutral thread (Aurifil 50wt 6010, 2692)
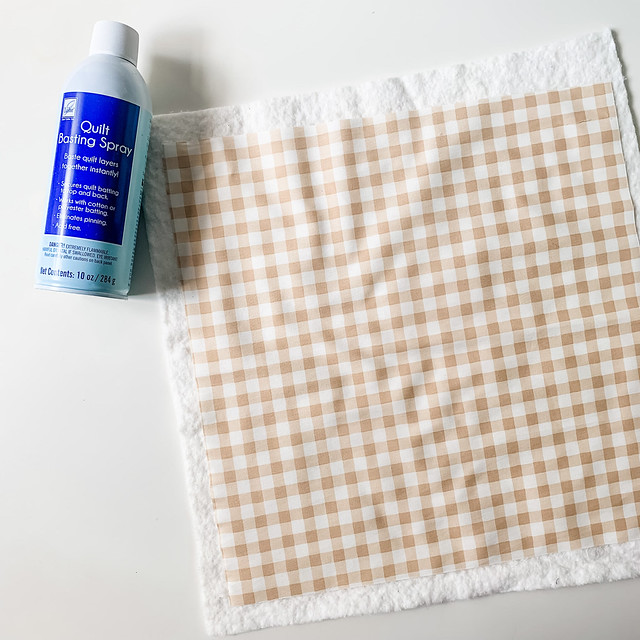
    basting spray or basting pins
    scissors or rotary cutter/mat
    hera marker or disappearing fabric marker to premark the quilting lines (optional)
    iron
     
    Size 12" x 12" square: one 12.5" x 12.5" square for main fabric, one 14" x 14" square of batting, two pieces of fabric measuring 11.5" x 12.5" for backing fabrics, two pieces of batting 13" x 14" for backing batting
    Size 14" x 14" square: one 14.5" x 14.5" square for main fabric, one 16" x 16" square of batting, two pieces of fabric measuring 12.5" x 14.5" for backing fabrics, two pieces of batting 14" x 16" for backing batting
    Size 16" x 16" square: one 16.5" x 16.5" square for main fabric, one 18" x 18" square of batting, two pieces of fabric measuring 13.5" x 16.5" for backing fabrics, two pieces of batting 15" x 18" for backing batting
    Size 18" x 18" square: one 18.5" x 18.5" square for main fabric, one 20" x 20" square of batting, two pieces of fabric measuring 14.5" x 18.5" for backing fabrics, two pieces of batting 16" x 20" for backing batting
    Size 20" x 20" square: one 20.5" x 20.5" square for main fabric, one 22" x 22" square of batting, two pieces of fabric measuring 15.5" x 20.5" for backing fabrics, two pieces of batting 17" x 22" for backing batting
    Size 24" x 24" square: one 24.5" x 24.5" square for main fabric, one 26" x 26" square of batting, two pieces of fabric measuring 17.5" x 24.5" for backing fabrics, two pieces of batting 19" x 26" for backing batting

    Whole Cloth Pillow Supplies

    Step 1. Quilting the pillow top pillow: Layer the batting with the pillow front fabric on top facing right side up on a flat surface. Pin or use a spray to baste these two layers together.

    Baste Layers

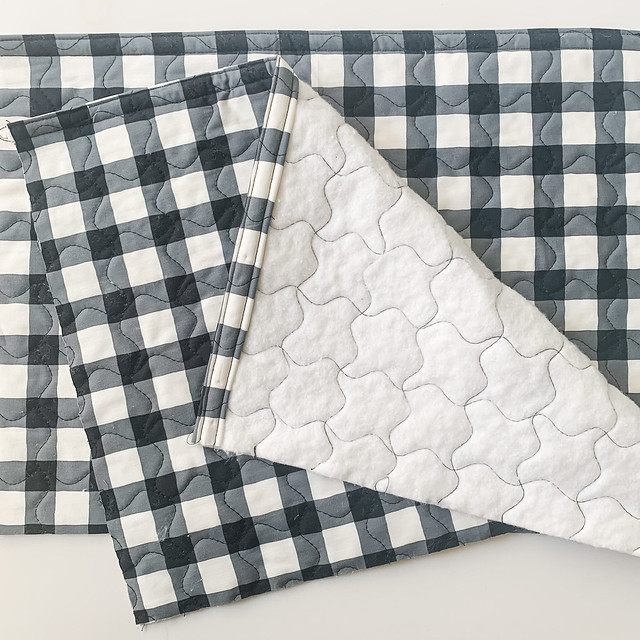
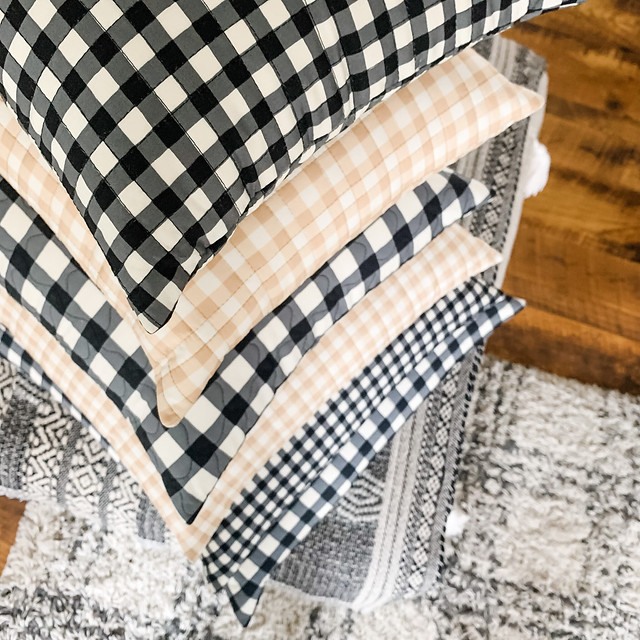
    The first pillow example is quilted using the built-in straight quilting stitch #1 on my Janome set at a stitch width of 4.5 and stitch length of 4.0.

    Janome Sewing

    Following the plaid pattern of the fabric I created a grid-like quilting design. If using a different fabric to achieve this similar quilting pattern premark the quilting lines using a hera or disappearing ink marker before quilting.

    Quilted Pillow Front

    The second pillow example is quilted using the built-in wavy quilting stitch #8 on my Janome set at a stitch width of 9.0 and stitch length of 4.0. Adding the wavy quilting both horizontally and vertically created a really fun pattern here that really pops!

    Photo Sep 17, 6 26 52 PM

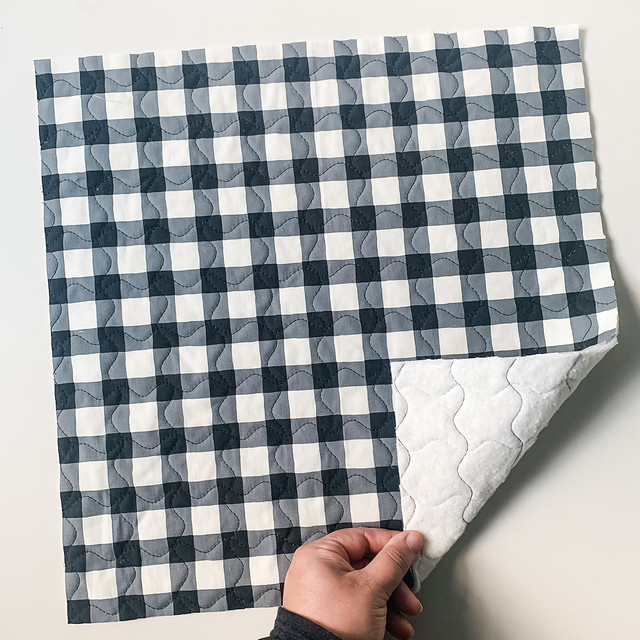
    Once quilting is complete trim away access fabric and batting to the desired pillow size. The first pillow example (beige/white gingham) is trimmed to 14" square for a 14" pillow insert. The second pillow example (black/buffalo plaid) is trimmed to 16" square for a 16" pillow insert.
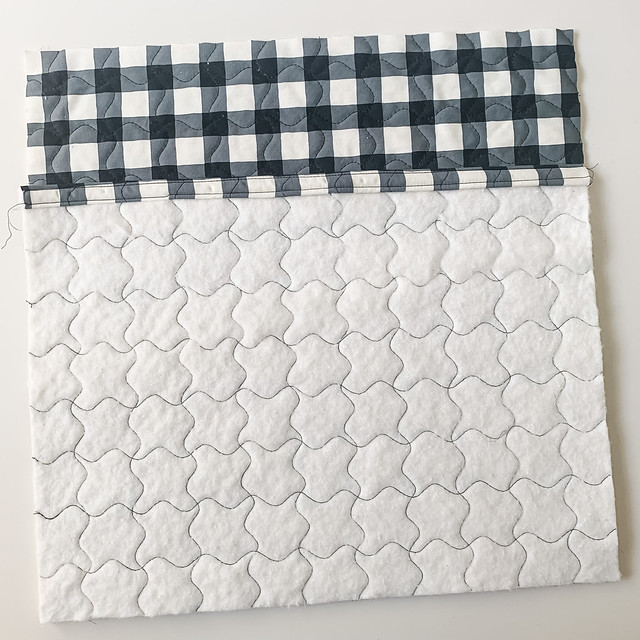
    Step 2. Quilting Pillow Back Pieces: Just as you did for the pillow front, layer each backing piece of batting with the pillow back piece of fabric on top facing right side up on a flat surface. Pin or use spray to baste these two layers together for both backing pieces. Mark quilting line again if needed and quilt the same as you did for the pillow front.

    pin in place

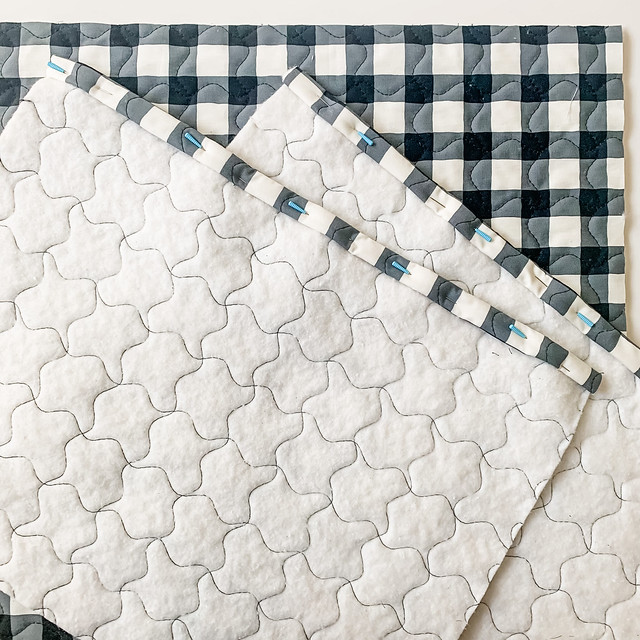
    To hem, fold over one long edge of the top back piece about 1/4 inch and then again. Pin and sew along the folded edge and outer edge to create a double seam finish. Repeat these steps for the bottom backing piece, as well.

    hem raw edge

    double hem finish

    Step 3. Sew Together Pillow Pieces: Lay the quilted pillow front right side up on a flat surface, then layer the top quilted pillow backing piece with the right side facing the pillow front onto the pillow front, then the bottom backing piece.

    layer pillow back piece onto pillow front

    pillow backing

    Pin or clip all three layers together.

    pin in place

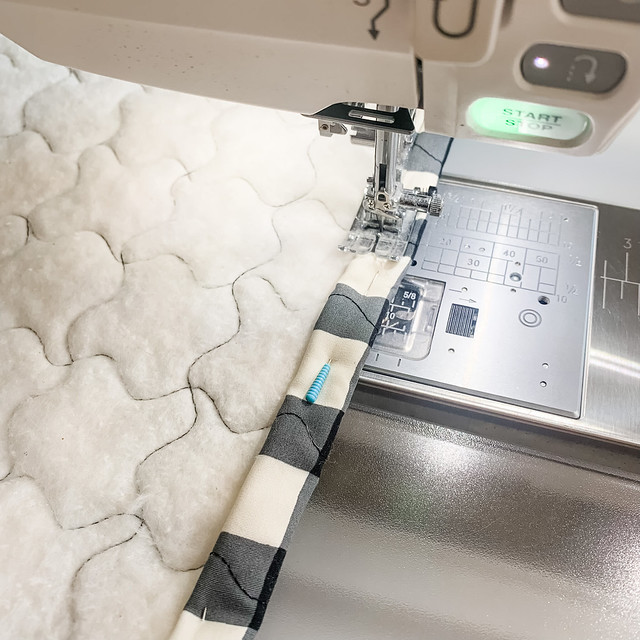
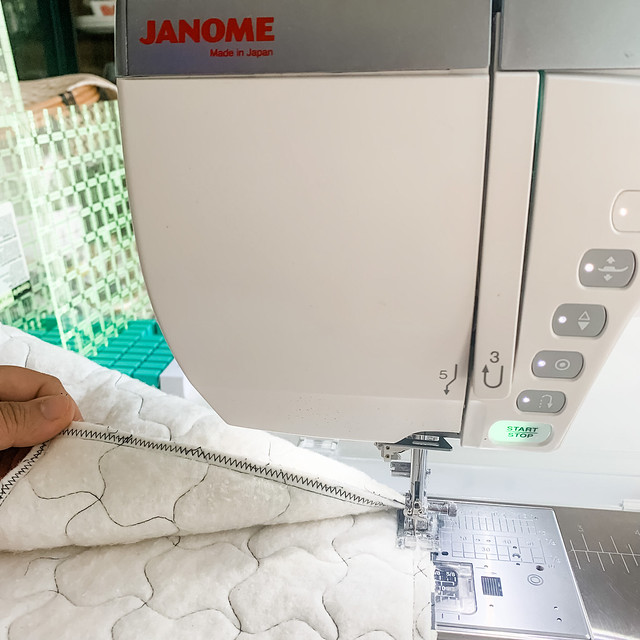
    Sew using a 1/4 inch seam all the way around the pillow attaching all three layers to create the pillow cover, removing pins or clips as you go.

    1/4" seam all the way around

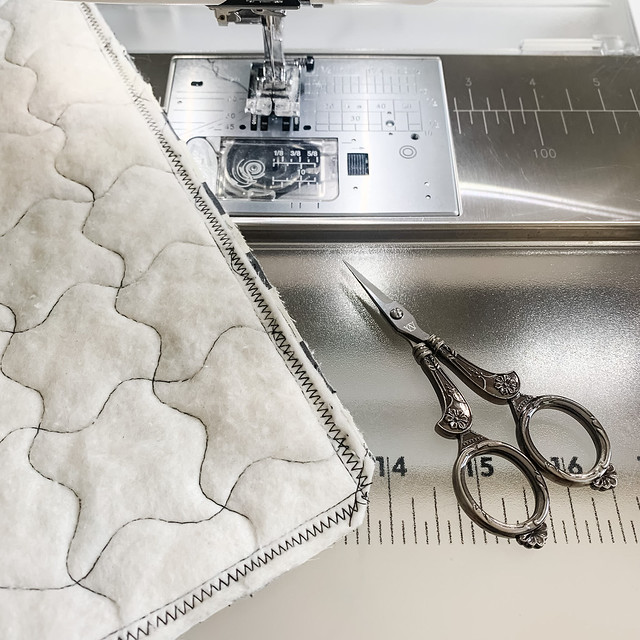
    For extra durability I then use the zig zag stitch on my machine to sew around the entire pillow again staying close to the raw edge to reinforce the seams.

    double secure with zig zag stitch

    For nice pointed pillow corners, I then sew a small diagonal stitch on the outside of each corner and clip away each of the four corners as shown below.

    clip four corners

    Turn the pillow cover right side out and press to make it nice and smooth before adding the pillow insert.

    turn pillow cover out and press

    Carefully stuff the pillow insert inside the pillow cover. making sure to work the corners of the insert into the corners of the pillow cover. Now you're ready to admire and enjoy your handmade quilted pillow!

    insert pillow form and done!

    Photo Sep 21, 11 10 43 AM

    Care and Maintenance: Remove insert and machine wash cover in cold water; gentle cycle. Lay flat to air dry or tumble dry on the lowest heat setting; remove promptly. Use a warm iron as needed to smooth out any wrinkles before reinserted the pillow insert.

    Photo Sep 21, 11 07 23 AM

    I hope you enjoyed this tutorial!
Prev 1 2 3 4 5 6 Next 

Tags

#freesewingtutorial 4th of July Applique Block of the Month Bunny Carolina Oneto Christmas Continental M7 Cosplay Cosplay Tutorial Costume Crafting Decorative Stitches DIY DIY Accessories DIY Father's Day Gift DIY skirt Embroidery Everyday Applique Father's Day Fiesta Weave Lunch Mats Fiesta! Four Fabric Quilted Project Bag Free Bag Pattern Free Pattern Free Quilt Pattern Free Sewing Free Sewing Pattern Free Sewing Tutorial free skirt tutorial Free tutorial Fun Projects Garment Sewing Good Tidings Quilt Along Green Goddess Dress Handmade Gifts Heidi Proffety Historical Costume Tutorial Holiday Sewing Home Decor How To How to Machine Bind How to Make a Quilt How to Make a Quilt. Free Quilt Pattern How to Make Panties How to Quilt How to Sew How to sew a top Janome Janome 9450 Janome AirThread2000D Janome Artisan Janome Artistic Digitizer Janome Conitential M7 Janome Continental M7 Janome HD3000 Janome Maker Janome MamoryCraft 15000 Janome MemoryCraft 15000 Janome MemoryCraft 6700p Janome S9 Janome Sewing Machine Janome Skyline S7 Janome Skyline S9 JanomeHD9 Lifestyle Machine Embroidery Maureen Cracknell MDW Melanie Call Memory Craft 15000 Moon Garden QAYG Quilt Block Mother's Day gift Napkins Patriotic Pattern Pillow Pillows Project QAYG Quilt Block Quilt Quilt As You Go Quilt Block Quilt Block Pattern Quilted Project Bag Quilting Quilting How to Quilt Rainbow Block of the Month Rainbow Quilt Block of the Month Rainbow Quilt BOM Reversible Zippered Pillow Rolled Hem Foot Scrappy Star Pillow Sew Sewing Sewing Machine Sewing Project Sewing Tutorial Skyline S9 SkylineS9 Stuffie Summer Sewing Project The Hype Tutorial Valentine's Day
DEALERS
The TWO Closest Dealers to you are:
1900 CENTRE ST , WEST ROXBURY MA, 02132
(617)323-6200
443 MOODY STREET , WALTHAM MA, 02453
781-893-3331
Find Additional Dealers